Introduction
In this tutorial, we're going to build a simple CRUD API to manage a catalog inventory. Our code will be deployed worldwide on Cloudflare's infrastructure, and executed on the serverless Workers runtime which will use Fauna as its data layer.
Both services share the same serverless global DNA. When combined, they become an ideal platform to build low latency services that can handle any load with ease.
Why use Fauna with Cloudflare Workers?
Thanks to its nonpersistent connection model based on HTTP, Fauna can be integrated seamlessly with Workers. Applications using both services can run serverless end to end, and be infinitely scalable with no need to manage infrastructure.
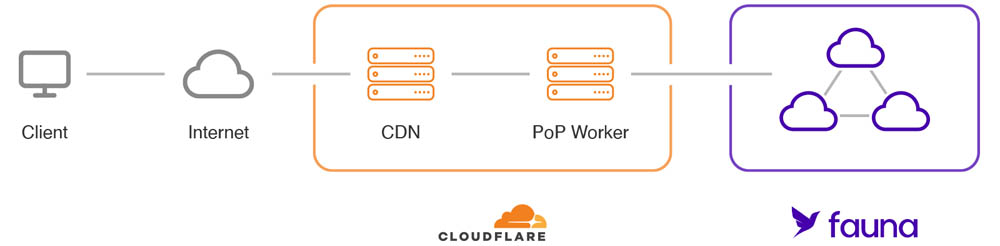
This setup is ideal for low latency services. Typically, server-side applications run their logic and database on single locations. When using Workers with Fauna, data and code will run in multiple locations and the round trip read latency can be drastically reduced. If you'd like to talk to a Fauna expert about using Cloudflare Workers with Fauna, please contact us. Otherwise, read on to dive into a hands-on exercise!
What we're building
Our application will consist of a JavaScript REST API with CRUD capabilities that will manage a simple product inventory.
As Fauna is a document-based database, our product documents will include the following data:
- title a human-friendly string that will represent the title or name of a product
- serialNumber a machine-friendly string that identifies the product
- weightLbs a floating point number with the weight in pounds of the product
- quantity an integer number that details how many items of a product there are in the inventory
The documents will be stored in the Products collection. Collections in Fauna are simply buckets of documents.
For simplicity's sake, the endpoints of our API will be public. Check some suggestions at the end, on how to improve this.
Finally, we'll use Cloudflare Workers to execute the JavaScript code of our application at the edge.
Requirements
To complete this tutorial you'll need a Fauna and a Cloudflare account. You won't need to add any payment information as we'll be using the free tier of both services.
You'll also need to install the following tools on your development machine:
- Node (any recent version will work)
- Cloudflare's Wrangler CLI
Setting up Fauna
Our first step will be configuring a database through Fauna's dashboard.
After you've logged into the dashboard, create a new database named Cloudflare_Workers_Demo:

Creating the products catalog
We're now going to create the Products collection to store the documents for our inventory.
To accomplish this, we're going to execute an FQL query on the Fauna shell which is available from the main menu of the dashboard:

To create a collection, simply execute the following FQL query that uses the CreateCollection function:
CreateCollection({name: "Products"})
The result will be similar to this:
{
  ref: Collection("Products"),
  ts: 1617851434855000,
  history_days: 30,
  name: "Products"
}
- ref is a reference to the collection itself. See the Collection FQL function.
- ts is the timestamp of its creation in microseconds.
- history_days determines how long Fauna will retain changes on the collection documents.
- name is the collection's name.
Creating a server key
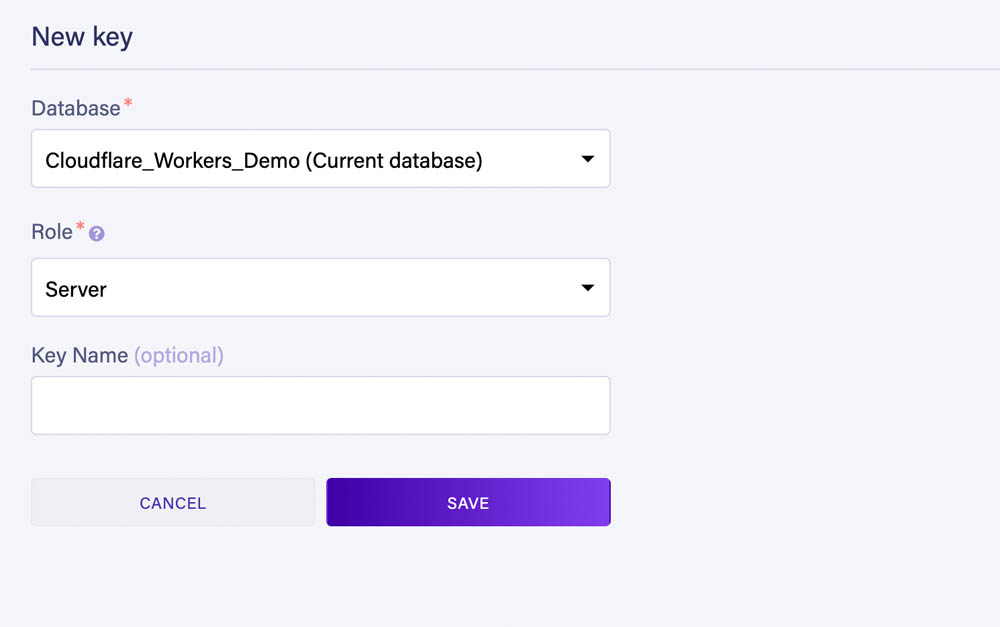
To be able to connect to the database from a Worker we now need to create a key.
Go to the Security section of the dashboard and create a new key with the Server role:
After saving, Fauna will show us the key's secret which we'll use to execute queries from our Worker:

Save the secret somewhere safe as Fauna will never show it again.
Also, never commit this secret to your Git repository. The Server role is all-powerful. Anyone with this secret would have full access to the database. You can learn more about the default roles in the documentation.
The initial configuration of Fauna is ready. Let's now focus on the logic of the application.
Managing our inventory with Workers
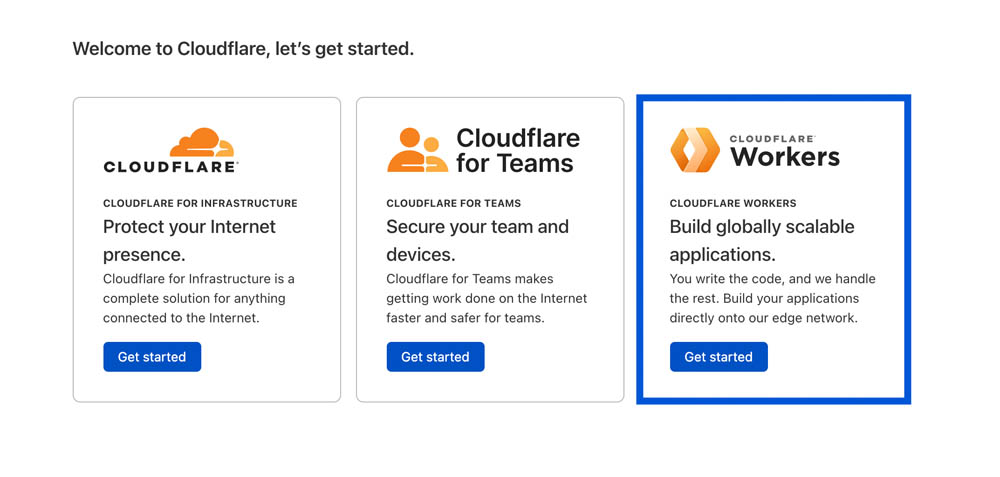
First, if you haven't already done so, create a free Cloudflare account and configure the Workers service:
You'll also need to install the Wrangler CLI in your development machine.
Once that's done, give Wrangler access to your Cloudflare account by using the login command:
wrangler login
Wrangler configuration
The first step to creating a Cloudflare Worker, is to initialize the project by using the init command:
wrangler init
This will create a wrangler.toml file with the default configuration which will be similar to this:
name = "fauna-cloudflare-workers-tutorial"
type = "webpack"
account_id = ""
workers_dev = true
route = ""
zone_id = ""
The name of the project folder will be used as the worker name, but you can change that if you wish to do so.
You will also need to add your Cloudflare account id to the wrangler.toml file which is available in the Workers section of the Cloudflare's dashboard:

Creating a test worker
Before continuing, we're going to create a minimal worker to test everything is working as expected.
Create an index.js file in your project folder with this content:
addEventListener('fetch', event => {
  event.respondWith(handleRequest(event.request));
});

async function handleRequest(request) {
  return new Response('hello world', {status: 200});
}
Then initialize NPM by doing:
npm init -y
This will create a package.json file with the default settings.
Finally publish the Worker with
wrangler publish
This will create and upload the Worker to Cloudflare. Once deployed, your Worker will be available at:
[worker name].[workers subdomain].workers.dev
If you open the deployed URL in your browser, you should see:
hello world
Adding the Fauna secret as an environment variable
Once the Worker has been created and deployed, we'll be able to store our Fauna secret safely on Cloudflare's infrastructure. To do that use the following command:
wrangler secret put FAUNA_SECRET
After running this command, paste the Fauna server secret you obtained earlier.
The FAUNA_SECRET environment variable will now be automatically injected into our Worker code at runtime.
It's also possible to configure environment variables directly on the wrangler.toml file, but in this case we want to avoid committing sensitive data to the Git repository.
Installing dependencies
We will be using JavaScript for our Worker but it's possible to use other languages that can compile to Web Assembly or JavaScript. See the documentation for more information on this.
First, let's install the Fauna JavaScript driver with:
npm install faunadb@^4.2.0
Then install the Worktop framework for Cloudflare Workers:
npm install worktop
Worktop will solve common needs such path parameters, query string parameters, HTTP methods, CORS, etc, right out of the box.
JavaScript utility functions
We'll start the coding part by focusing on some utility functions. Create the utils.js file in the project folder with this content:
export function customFetch (url, params) {
  const signal = params.signal;
  delete params.signal;

  const abortPromise = new Promise((resolve) => {
    if (signal) {
      signal.onabort = resolve
    }
  });

  return Promise.race([abortPromise, fetch(url, params)])
}

export function getFaunaError (error) {

  const {code, description} = error.requestResult.responseContent.errors[0];
  let status;

  switch (code) {
    case 'instance not found':
      status = 404;
      break;
    case 'instance not unique':
      status = 409;
      break;
    case 'permission denied':
      status = 403;
      break;
    case 'unauthorized':
    case 'authentication failed':
      status = 401;
      break;
    default:
      status = 500;
  }

  return {code, description, status};
}
The customFetch() function is necessary for the Fauna client because the Workers runtime uses a custom version of fetch. There's more info about this on the Fauna JavaScript driver documentation.
We will be using the getFaunaError() function to extract the code and description of the most common errors returned by Fauna. This function will also determine the HTTP status code for each error.
Base inventory logic
We can now replace the contents of the index.js file with the skeleton of our API:
import {Router, listen} from 'worktop';
import faunadb from 'faunadb';
import {customFetch, getFaunaError} from './utils.js';

const router = new Router();

const faunaClient = new faunadb.Client({
  secret: FAUNA_SECRET,
  fetch: customFetch
});

const {Create, Collection, Match, Index, Get, Ref, Paginate, Sum, Delete, Add, Select, Let, Var, Update} = faunadb.query;

router.add('GET', '/', async (request, response) => {
  response.send(200, 'hello world');
});

listen(router.run);
Let's analyze the the initialization of the Fauna client:
const faunaClient = new faunadb.Client({
  secret: FAUNA_SECRET,
  fetch: customFetch
});
The FAUNA_SECRET environment variable will be automatically injected into our application at runtime. Workers run on a custom JavaScript runtime instead of Node.js, so there's no need to use process.env to access these variables. The Fauna secret we obtained belongs to a key with the Server role, which will give our worker full access to the Fauna database.
As mentioned before, we're using a custom fetch() function so that the Fauna client can run on the Workers runtime.
After instantiating the client, we're creating references to the FQL functions we're going to use on our queries:
const {Create, Collection, Match, Index, Get, Ref, Paginate, Sum, Delete, Add, Select, Let, Var, Update} = faunadb.query;
This will make our JavaScript FQL queries much cleaner later on.
Creating new products in Fauna
Let's add our first Worktop route on the index.js file. This route will accept POST requests at the /products REST endpoint:
router.add('POST', '/products', async (request, response) => {
  try {
    const {serialNumber, title, weightLbs} = await request.body();

    const result = await faunaClient.query(
      Create(
        Collection('Products'),
        {
          data: {
            serialNumber,
            title,
            weightLbs,
            quantity: 0
          }
        }
      )
    );

    response.send(200, {
      productId: result.ref.id
    });
  } catch (error) {
    const faunaError = getFaunaError(error);
    response.send(faunaError.status, faunaError);
  }
});
For simplicity's sake, we won't be validating the request input on these examples.
On this route we're seeing our first FQL query written in JavaScript which will create a new document in the Products collection:
Create(
  Collection('Products'),
  {
    data: {
      serialNumber,
      title,
      weightLbs,
      quantity: 0
    }
  }
)
In this case, the Create function takes a reference to a collection from the Collection function, and an object with the document content.
To see what a document looks like, let's run this query straight in the dashboard shell:
Create(
  Collection('Products'),
  {
    data: {
      serialNumber: "A48432348",
      title: "Gaming Console",
      weightLbs: 5,
      quantity: 0
    }
  }
)
The result will be the created document:
{
  ref: Ref(Collection("Products"), "295308099167715846"),
  ts: 1617886599610000,
  data: {
    serialNumber: "A48432348",
    title: "Gaming Console",
    weightLbs: 5,
    quantity: 0
  }
}
- ref of type Ref is a reference to this document in the Products collection with the id 295308099167715846.
- ts is the timestamp of the creation of the document in microseconds.
- data is the actual content of the document.
Going back to our route, if the query is successful, the id of the created document will be returned in the response body:
response.send(200, {
  productId: result.ref.id
});
Finally, if Fauna returns any error, an exception will be raised by the client. We'll catch that exception and respond with the result from the getFaunaError() utility function:
const faunaError = getFaunaError(error);
response.send(faunaError.status, faunaError);
Reading product documents
The next route will read a single document from the Products collection.
Add this code to the index.js file. It will handle GET requests at /products/:productId :
router.add('GET', '/products/:productId', async (request, response) => {
  try {
    const productId = request.params.productId;

    const result = await faunaClient.query(
      Get(Ref(Collection('Products'), productId))
    );

    response.send(200, result);

  } catch (error) {
    const faunaError = getFaunaError(error);
    response.send(faunaError.status, faunaError);
  }
});
The FQL query uses the Get function to retrieve a full document from a document reference:
Get(Ref(Collection('Products'), productId))
If the document exists, we'll simply return it in the response's body:
response.send(200, result);
Otherwise, an error will be returned.
Deleting product documents
The logic to delete documents is very similar. Add this route to the index.js file:
router.add('DELETE', '/products/:productId', async (request, response) => {

  try {
    const productId = request.params.productId;

    const result = await faunaClient.query(
      Delete(Ref(Collection('Products'), productId))
    );

    response.send(200, result);

  } catch (error) {
    const faunaError = getFaunaError(error);
    response.send(faunaError.status, faunaError);
  }
});
The only difference with the previous route, is that we're now using the Delete function to delete a document by using its reference.
If the delete operation is successful, Fauna will return the deleted document and it will be sent in the response's body. If not, an error will be returned.
Testing and deploying the Worker
Before deploying the Worker, let's test it locally by using the dev command from Wrangler:
wrangler dev
Once the development server is up and running, we can start making HTTP requests to our Worker.
First, let's create a new product:
curl -i -d '{"serialNumber": "H56N33834", "title": "Bluetooth Headphones", "weightLbs": 0.5}' -H 'Content-Type: application/json' -X POST http:///127.0.0.1:8787/products
We should be receiving a 200 response with this JSON in the body:
{"productId":"<document_id>"}
Let's now read the document we just created:
curl -i -H 'Content-Type: application/json' -X GET http:///127.0.0.1:8787/products/<document_id>
The response will be the document serialized to JSON:
{"ref":{"@ref":{"id":"<document_id>","collection":{"@ref":{"id":"Products","collection":{"@ref":{"id":"collections"}}}}}},"ts":1617887459975000,"data":{"serialNumber":"H56N33834","title":"Bluetooth Headphones","weightLbs":0.5,"quantity":0}}
Finally, we can deploy our Worker by using the publish command:
wrangler publish
This will publish the Worker on Cloudflare's network and will be available on our workers.dev subdomain.
Updating the inventory quantity
We're now going to update the quantity of a product in our inventory, which by default is 0.
This presents a problem though. To calculate the total quantity of a product, we first need to determine how many items there are in the first place. If we solved this in two queries, first reading the quantity and then updating it, the original data might have changed.
To solve this, we're going to read and update the quantity of a product in a single FQL transaction. It's important to mention that all FQL queries are in fact transactions. If anything fails, all changes will be reverted back thanks to Fauna's ACID properties.
Add this route to the index.js file which will respond to PATCH requests on the /products/:productId/add-quantity endpoint:
router.add('PATCH', '/products/:productId/add-quantity', async (request, response) => {

  try {
    const productId = request.params.productId;
    const {quantity} = await request.body();

    const result = await faunaClient.query(
      Let(
        {
          productRef: Ref(Collection('Products'), productId),
          productDocument: Get(Var('productRef')),
          currentQuantity: Select(['data', 'quantity'], Var('productDocument'))
        },
        Update(
          Var('productRef'),
          {
            data: {
              quantity: Add(
                Var('currentQuantity'),
                quantity
              )
            }
          }
        )
      )
    );

    response.send(200, result);

  } catch (error) {
    const faunaError = getFaunaError(error);
    response.send(faunaError.status, faunaError);
  }
});
Let's examine the FQL query in more detail:
Let(
  {
    productRef: Ref(Collection('Products'), productId),
    productDocument: Get(Var('productRef')),
    currentQuantity: Select(['data', 'quantity'], Var('productDocument'))
  },
  Update(
    Var('productRef'),
    {
      data: {
        quantity: Add(
          Var('currentQuantity'),
          quantity
        )
      }
    }
  )
)
First, we're using the Let function to establish some variables we'll need later on:
- productRef of type Ref is a document reference
- productDocument contains the full product document, returned by the Get function.
- currentQuantity contains the value from the quantity property from the document. We're extracting the property by using the Select function
The variables created by Let are available on any subsequent FQL expressions by using the Var function.
After declaring the variables, Let accepts a second parameter which can be any FQL expression and is where we will be updating our document:
Update(
  Var('productRef'),
  {
    data: {
      quantity: Add(
        Var('currentQuantity'),
        quantity
      )
    }
  }
)
The Update function will only update the defined properties of a document. In this example, only the quantity property will be updated.
We're using Var("productRef") to get the reference of the document in question, as defined previously by Let.
Finally, we're calculating the total quantity, by summing the currentQuantity to a quantity JavaScript variable by using the Add function.
An important aspect to point out is that, even if multiple Workers are updating these quantities from different parts of the world, Fauna will guarantee the consistency of the data across all Fauna regions.
Here's an article that details how Fauna's distributed protocol works without the need of atomic clocks.
Let's now test our route:
curl -i -d '{"quantity": 5}' -H 'Content-Type: application/json' -X PATCH http:///127.0.0.1:8787/products/<document_id>/add-quantity
The response should be our full updated document with five extra items in the quantity:
{"ref":{"@ref":{"id":"<document_id>","collection":{"@ref":{"id":"Products","collection":{"@ref":{"id":"collections"}}}}}},"ts":1617890383200000,"data":{"serialNumber":"H56N33834","title":"Bluetooth Headphones","weightLbs":0.5,"quantity":5}}
To update the Worker in Cloudflare's network, simply publish it again:
wrangler publish
Cleaning up
Although we've been using the Fauna and Cloudflare Workers free tiers, it would be a good idea to delete the used resources to prevent any future additional charges.
The Fauna database can be deleted from its settings in the Fauna dashboard:

The Cloudflare Worker can be deleted from the Worker settings in Cloudflare's dashboard:

Next steps
In this post, you learned how to use Fauna with Cloudflare Workers to create a next-gen serverless application that can easily handle the demands of a hyper-connected worldwide audience.
We have only scratched the surface of what's possible when these two technologies are combined.
Further improvements to the application
This inventory application has been kept very simple on purpose but lacks essential features.
For example, all endpoints of the API are public. Here are some guides that will teach you how to use authentication and fine-grained authorization with Fauna:
- Introduction to authentication and authorization with Fauna
- Introduction on using Fauna with Node.js which will expand on some of the concepts presented in this tutorial.
Another important improvement would be to add some reporting capabilities. To accomplish this, you will need a deeper understanding of Fauna indexes and data aggregation:
Finally, we could have encapsulated the logic that updates the inventory quantity into a custom FQL function. These are called UDFs in Fauna lingo (user defined functions) and are similar in concept to stored procedures:
Learning FQL
Here are some FQL guides that will teach you how to harness the full power of Fauna:
Getting started with FQL
- Part 1: Fundamental Fauna concepts
- Part 2: Deep dive into indexes
- Part 3: Modeling data with Fauna
- Part 4: Running custom functions in Fauna
- Part 5: Authentication and authorization in Fauna
Core FQL concepts
- Part 1: Working with dates and times
- Part 2: Temporality in Fauna
- Part 3: Data aggregation
- Part 4: Range queries and advanced filtering
- Part 5: Joins
Don't forget to join the Fauna developers community!


Top comments (0)