Intro
I recently attended a lesson on networking and improving your online presence on LinkedIn.
Very early on in this lesson, I learned that some people look at your number of connections as some form of a measure of quality; if you don't have enough connections, you aren't worth their time.
6 degrees of separation
After introducing that concept, they showed off this neat page that lets you see the connections of your connections, and those connection's connections. Up to 3 layers deep.
Upon seeing this, I instantly was reminded of the idea of six degrees of separation. The concept that 6 chained "___ of a ___" statements can be used to connect any two people.
From this, I knew that this page must give you a HUGE pool of people to connect with, and sure enough, despite me having less than 50 connections at the time, this page had over 8.5 million results.
Adding it up
Given the idea that more connections is better, and this pool of 8.5 million people I could connect with, my brain got turning and I did a bit of math.
I instantly acknowledged that most of these people wouldn't accept if I sent them a request. I made a very conservative estimate that only 0.1% of people would accept given a request.
Putting the math for that in my browser, I determined I could potentially make at least 850k new connections if I sent a request to everyone.
Now, being realistic, there is no way in hell I could ever send 850 million requests in any reasonable amount of time.
... a human
Automating User Input
Once my brain made that connection, I completely tuned out of the lesson and got to work on automating the process of sending connection requests.
There are 3 key parts of my method of automating user input.
- Querying for page elements (buttons, text boxes, sliders) needed to do the desired action
- Simulation of input on queried elements
- A small bit of logic to put it all together
⚠️ Strong Warning ⚠️
While what I am about to teach you how to do is super easy and useful, you should keep one thing in mind:
Always read the rules of the site you are automating user input on because there is a good chance you can get banned from a site by doing this.
I completely missed this step. Only after triggering LinkedIn's anti-automation measures did I take a look at the site rules.
Sure enough, what I did was specifically listed in the Dont's section.
8.2 Dont's
You agree that you will *not*:
- Use bots or other automated methods to access the Services, add or download contacts, send or redirect messages;
Querying page elements
To send a connection there are three things we need to be able to find on the page:
The actual connect buttons:

The button to confirm your connection request:
And, after sending connections to everyone on a page, we need to be able to find the next page button:
There are 2 very common javascript methods for finding elements:
// returns the first element that matches the selector
document.querySelector(selector)

// returns an array of elements that match the selector
document.querySelectorAll(selector)
For the sake of being compact, I am going to make 2 functions that are basically just aliases for these with significantly shorter names:
const qs = (selector) => { document.querySelector(selector) }
const qsa = (selector) => { document.querySelectorAll(selector) }
Doing this makes it easier to read the what really matters here: the selector itself.
What is a selector?
querySelector and querySelectorAll take in a single string, a CSS selector, and use it to find matching elements(s).
CSS selectors were designed to make changing how certain elements look easier. While there are a LOT of different types of CSS selectors, we really only are going to be using one type of selector: the attribute selector.
To see why, lets examine this html from google maps:
<span jsnamespace="pane.directions-options" class="UsLaWc">
  <input aria-live="polite" name="transit-time" size="8" class="LgGJQc">
  <span class="RWVw5">
    <button aria-label="Earlier trips" class="n9A92c Ab1Xue">
    </button>
    <button aria-label="Later trips" class="oafJhe Ab1Xue">
    </button>
  </span>
</span>
This HTML makes the following:
![]()
If we were to select the right arrow, or "later trips" button, using class names, we would get something totally indecipherable
.RWVw5 > .n9A92c
This is because big companies have decided to start obfuscating class names into random sets of alphanumeric characters.
This is why attribute selectors are our best friend in this use case. By using them, we get significantly more human readable syntax:
[jsnamespace="pane.directions-options"] > span > [aria-label="Earlier trips"]
What if we wanted to select both the earlier and later trips button? Thankfully, attribute selectors have a tool for selecting only part of a string:
[aria-label$="trips"]
This will get element with labels ending in "trips".
There are 3 of these fancy selectors:
/* attribute starts with */
[attr-name^=""]

/* attribute contains */
[attr-name*=""]

/* attribute ends with */
[attr-name$=""]
Selecting the elements we need
Now that we know the types of selectors we need, let's write selectors for the elements we need to interact with.
First, the connect buttons:
<button aria-label="Invite REDACTED NAME to connect" id="ember2543" class="artdeco-button artdeco-button--2 artdeco-button--secondary ember-view">...</button>
/* We could select this with just a starting with "Invite" */
[aria-label^="Invite"]
/* or an ending with "to connect" */
[aria-label$="to connect"]
/* but to make what we are selecting 100% clear, we use both */
[aria-label^="Invite"][aria-label$="to connect"]
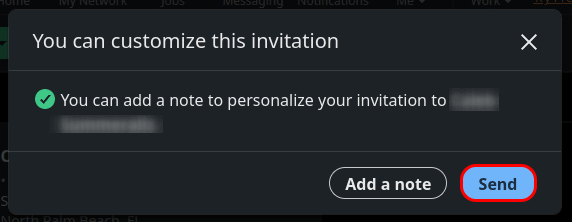
Next, the send button:
<button aria-label="Send now" id="ember2561" class="artdeco-button artdeco-button--2 artdeco-button--primary ember-view ml1">...</button>
Selecting just a button that says "Send now" seems pretty dangerous, so lets look for something to select that makes sure we only ever select a button that sends a connection request.
<div data-test-modal="" role="dialog" tabindex="-1" class="artdeco-modal artdeco-modal--layer-default send-invite" size="medium" aria-labelledby="send-invite-modal">
  ...
  <div id="ember2559" class="artdeco-modal__actionbar ember-view text-align-right">
    ...
    <button aria-label="Send now" id="ember2561" class="artdeco-button artdeco-button--2 artdeco-button--primary ember-view ml1">
      ...
    </button>
  </div>
  ...
</div>
Looks like they were nice enough to actually have a send-invite class!
.send-invite > div > [aria-label="Send now"]
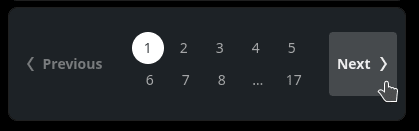
Finally, lets get our next page button:
<button aria-label="Next" id="ember2605" class="artdeco-pagination__button artdeco-pagination__button--next artdeco-button artdeco-button--muted artdeco-button--icon-right artdeco-button--1 artdeco-button--tertiary ember-view" type="button">
  ...
</button>
Again, just selecting for [aria-label="Next"] doesn't fill me with a lot of confidence that we will be getting the right element.
Inside the classes we have artdeco-pagination__button. We can use this to be sure we are selecting something for pagination:
[class*="pagination"][aria-label="Next"]
With all of our selectors, we can now get our elements in javascript!
qsa(`[aria-label^="Invite"][aria-label$="to connect"]`)
qs(`.send-invite > div > [aria-label="Send now"]`)
qs(`[class*="pagination"][aria-label="Next"]`)
Simulation of input on queried elements
Now that we have our selectors for all of the things we need to interact with, we need a way to interact with them.
Buttons:
In terms of pure javascript, buttons are generally implemented like this:
button.addEventListener("click", (event) => {
  // do stuff
})
Luckily, we can fake events like this using dispatchEvent:
button.dispatchEvent(new Event("click", {event options}))
Generally for this to work for clicks, we need to pass in the option bubbles:true.
Given this, here is a general method for clicking a node:
const click = (node) => { if (node!==null) {
  node.dispatchEvent (new Event("click", {bubbles:true}))
}}
Waiting
After we click a node, we have to wait a short bit for the page to update. For this, we have a general sleep method, that takes how long we should wait in milliseconds:
const sleep = (ms) => new Promise(r => setTimeout(r, ms));
Inorder to use this, we need to be able to use await, which is exclusive to asynchronous functions. All that really means is we need to make an async function that contains our code, then run it.
While that sounds complicated, in practice, it's as simple as wrapping your code with this:
(async ()=>{
  // put code here
})()
Other types of input
While there are many types of input, such as button, checkbox, color, date, datetime-local, text, radio, and range, there are actually only 2 types of HTML input: <button> and <input>
No matter what type of input it is, all you really have to do is change one thing:
qs("inputselector").value = newValue;
Yep. thats it.
Putting it together
In order to put together your automation logic, all you have to do is think through what actions you would make as a user, and then write them out as code.
Click a connect button, then click the confirm send button:
(async ()=>{
  click(qs(`[aria-label^="Invite"][aria-label$="to connect"]`))
  await sleep(5)
  click(qs(`.send-invite > div > [aria-label="Send now"]`))
})()
Alright, so then we just want to repeat that for every connect button:
(async ()=>{
  qsa(`[aria-label^="Invite"][aria-label$="to connect"]`).forEach((inviteButton)=>{
    click(inviteButton)
    await sleep(5)
    click(qs(`.send-invite > div > [aria-label="Send now"]`))
    await sleep(5)
  })
})()
Then once we have invited everyone on the current page, we move on to the next page and do it again:
(async ()=>{
  while(true) {
    qsa(`[aria-label^="Invite"][aria-label$="to connect"]`).forEach((inviteButton)=>{
      click(inviteButton)
      await sleep(5)
      click(qs(`.send-invite > div > [aria-label="Send now"]`))
      await sleep(5)
    })

    // page takes a bit to realize what just happened because we just did it so fast
    await sleep(100)
    click(qOne(`[class*="pagination"][aria-label="Next"]`))

    // loading the next page takes at most 2 seconds for me
    await sleep(2000)
  }
})()
With this done, I very quickly found a limit:

Turns out there is a 100 connection request per week limit.
This didnt tell me to stop what I was doing though, so I sent the script over to the person sitting next to me, Austin.

Why he got this when I didnt seemed puzzling at first, but then I realized exactly why. I spent a fair bit of time calibrating the delays. Throughout that time I got a lot of invites sent out, so when it was done it only sent out like 30 invites at once, not triggering the detection.
Not triggering anti-bot algorithms
Prelude
So, if you are at the point of triggering a anti-bot algorithm, the correct response is to stop.
Given that, this next section is completely for educational purposes. Don't do this.
Its super easy.
The finalized script had inhuman speed, sending one invite every 10 milliseconds. The duration of a human blink is on average 100–150 milliseconds.
We only ran into the anti-bot algorithm when we got the script to run at full speed. So... just slow it down to realistic human speeds.
(async ()=>{
  const qOne = (selector) => document.querySelector(selector);
  const qAll = (selector) => document.querySelectorAll(selector);
  const click = (node) => { if (node!==null)
    { node.dispatchEvent (new Event("click", {bubbles:true})) }}
  const sleep = (ms) => new Promise(resolve => setTimeout(resolve, ms));
  while (true) {
    // click connect and then confirm connection on every person
    for (const connectButton of qAll(`[aria-label^="Invite"][aria-label$="to connect"]`)) {
      click(connectButton)
      await sleep(500);
      click(qOne(`[aria-labelledby="send-invite-modal"] [aria-label="Send now"]`))
      await sleep(500);
    }
    await sleep(2000);
    // click the next page button
    click(qOne(`div[class*="pagination"] button[aria-label="Next"]`))
    await sleep(7000);
  }
})()
With this, you just have to start the script, then go about your day. Sure, its not fast, but it doesn't require any attention on your part.
How developers can stop this type of script
Anti-bot detection based on speed is stupid.
Despite this, it seems like this is the only type of bot detection actually used on websites, which is super shocking to me.
Let's look back at the basic javascript example for how buttons are linked up. More specifically, the data it gets:
button.addEventListener("click", (event) => {
  console.log(event)
})
I clicked once with a real mouse, and once using our click method.
These are the only attributes of that object that were different. First, the real click:
click {
  isTrusted: true
}
And second, the click method:
click {
  isTrusted: false
}
Hmmmmmmmmmmmmmmmmmm...
I wonder what this could possibly mean? Lets look at the docs!
The
isTrustedread-only property of theEventinterface is a boolean value that istruewhen the event was generated by a user action, andfalsewhen the event was created or modified by a script or dispatched viaEventTarget.dispatchEvent().
WOW, shocking, its almost as if we have an Event attribute specifically made for telling the difference between real and fake interactions!
Using this would be SUPER simple. If you don't want bots on your website, just add a check to your event listeners.
button.addEventListener("click", (event) => {
  if (event.isTrusted) {
    // do stuff
  }
})
If you want, you can even INSTANTLY warn users that make untrusted events to not do it!
button.addEventListener("click", (event) => {
  if (event.isTrusted) {
    // do stuff
  } else {
    // warn user
  }
})
WOW, that was super hard to fix. No wonder websites haven't done that yet. It would take an absolute g*ENiU*s to figure out how to add that singular if statement.
Conclusion
Making this type of automation is super easy.
No matter what the rules of your site are, many people (me included) will just find the limitations of your system of enforcement, and work around it.
The thing that utterly shocks me is how no website I have ever used uses isTrusted to differentiate real and fake clicks.


Top comments (0)