
It's In The Details
When working with Github, we might find ourselves sweating. Conflicts from XML? I don't even want to talk about it. But we can actually use Github itself to make a lot of what we hate be hands free. That's where GitHub Actions come into play!
One thing I dislike about Xcode in general is testing. I am a Test Driven Developer do not get me wrong. What I find dull is that testing is a whole extra step on top of building your app before making commits or merge. (This can be argued but for the sake of paragraphs I want to keep the topic pretty straight forward.)
With GitHub actions we can actually create a system where you can easily test your code, build your app, the list goes on. It is truly hard to grasp all that you can do with GitHub Actions. For this article we are going to keep it simple. Our GitHub Action is going to build the app using internal tests, check that everything runs correctly, and then and only then allow us to be able to commit/merge to the repository. Let's go!
Before we begin I am going to assume you have a rudimentary idea of what you are trying to accomplish, Xcode, and Swift in general. Besides, how did you read this far without falling asleep if not?
Github Actions utilizes YAML files to be able to execute the actual steps that you are trying to implement. And, you guessed it; it is not written in Swift, but YAML! If you follow the link, you can find a cheat sheet and some documentation on how the syntax is laid out.
Your YAML file has to be in the root directory of your repository, in it's own file setup like below 👇

Within that directory you will make your YAML (or .yml) file there as shown:

Great! Phew! The hard part is closer. But thankfully I did all the knocking the head off the desk for you. So you won't have to once we get there, what are friends for. Below I am going to post the test.yml file (or whatever you choose to call it). We will briefly go over what is happening. If you are still a little confused you can check out 'Building iOS apps with Github Actions, Jeroen Leenarts' which helped me immensely, and check out the documentation here.
name: Swift

on:

  push:
    branches:
      - main
  pull_request:
    branches:
      - main
jobs:
  Run_workspace_Tests:
    runs-on: macOS-latest
    steps:
    - uses: actions/checkout@v1
    - name: List available Xcode versions
      run: ls /Applications | grep Xcode
    - name: Select Xcode
      run: sudo xcode-select -switch /Applications/Xcode_12.2.app && /usr/bin/xcodebuild -version
    - name: Run unit tests
      run: xcodebuild test -scheme YourProject -workspace YourProject.xcworkspace -destination 'platform=iOS Simulator,name=iPhone 11,OS=14.2' | xcpretty && exit ${PIPESTATUS[0]}
Let's walk through the code above. on: is checking what the action is triggering on. In our case it is going to trigger when push and pull requests are made on our main branch.
jobs: is like a script, running a series of steps:. This is called a runner environment.
Run_workspace_Tests: is the name of the job I chosen for this specific project. Depending on what you are trying to achieve, I recommend naming this something very explicit to what the job itself is performing. You can also add more the one job to a YAML Action. You can add an unlimited amount of job workflows as long as it is within your workflow usage limits
From top to bottom, runs-on: is the specific virtual machine instance you are deploying to. We have steps: that we are running through. They can either be an action or a shell command. For more information on all of the keywords you can check out the documentation. I have also left a quick reference below.

With this simple implementation we can see that we are listing the Xcode versions and taking 12.2, the most recent version available as of this writing. Then we are running our unit tests within the Virtual Machine. And if they run success, our pull request or push onto the main branch will run the checks before allowing a merge!
After committing to the main, we should be able to now check our actions list within GitHub and see if our tests are passing.
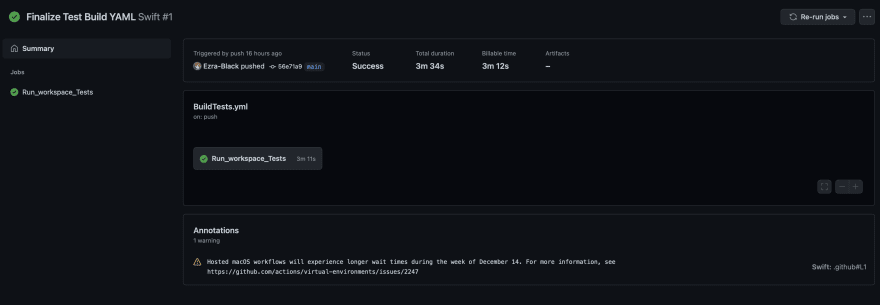
Congratulations! You now have an automated action that allows you to automate successful tests from outside users. Or to make sure you didn't forget to do it yourself!


Top comments (0)