In this guide, we are going to see how to List Sheets, Workbooks, Columns, Names, and Insert Auto Text in Excel Office 365 using Kutools. Get an official version of MS Excel from the following link: https://www.microsoft.com/en-in/microsoft-365/excel
Note: kutools for Excel has more than 180 features which are used to complete the difficult task with several clicks. If you want to use Kutools, you need to install it from Excel’s official website.
Workbook & Sheet Tab:
In this section, we will see how to list all opened workbooks and their worksheets in the Workbook & Sheet Tab.

- On the Kutools Tab, select the Navigation option*(1)*.
- It will open the Navigation Pane where you need to click
 button to enable the Workbook & Sheet pane*(2)*.
 - All opened workbooks are listed here. If you want to remove any workbooks, you need to click
 button to close the workbook*(3)*.
 - Then, you can see the following buttons in the opening workbooks section*(4)*.
-
 Sort Workbooks in Ascending Order: It will sort all opening workbooks in ascending order. If you want to restore it, then press this button again.
 -
 Sort Workbooks in Descending Order: Use this button to sort all opening workbooks in descending order. To recover the original sorting order, you need to press it again.
 -
 Workbook Tools: Click it to quickly access utilities in the workbook group on the Kutools Plus tab.
 -
 Refresh: It will refresh the information on the navigation pane.
 - All the worksheets of the current workbook are listed here, you can click to navigate between worksheets*(5)*.
- Then, you will see the below-given buttons in the list of worksheets section*(6)*.
-
 Toggle to unhide/hide all hidden worksheet(s): It will toggle all hidden worksheets to be visible. If you click this button again, it will toggle all visible worksheets to be invisible.
 -
 Show hidden sheet(s) in the worksheet pane: This will toggle all hidden worksheets to be visible in the worksheets pane.
 -
 Display protection status of the worksheet in the worksheet pane: It will mark all protected worksheets. Click again to hide the protection status.
 -
 Toggle between two latest sheets button: To switch between two sheets back and forth.
 - You can filter the worksheet by enabling the Filter function and entering the sheet name as you need*(7)*.
- Then, you need to right-click on any worksheet name to display the context menu of worksheets*(8)*.
- At the bottom of the pane, you can see the total number of all worksheets, visible sheets, and hidden sheets(9).
Resource Library Tab:
In the Resource Library Tab, you can save custom formulas, pictures, charts, and so on.

- First, you need to click the Kutools Tab, then select the Navigation option to enable the Navigation Pane.
- You need to click
 button to open the Resource Library pane*(1)*.
 - Then, you can see the group names of the resource library here. You can also create new groups, sub-groups, and delete any group that you don’t need*(2)*.
- The following buttons are given in the list of groups section*(3)*.
-
 Add group: Click this button to add a new root group or a subgroup to the currently selected group.
 -
 Rename current resource library group: You can rename the selected group name.
 -
Refresh : It will refresh the information of the resource library pane.
- To expand this group, click
 before a group name. You can also click
  before a group name to collapse this group*(4)*.
 - All the resource library entries of the selected group will be listed here*(5)*.
- you can see the below-given buttons above the list of resource library entries*(6)*.
-
Add selected content to Resource Library: It will add currently selected content to the Resource Library pane.
-
 Show preview in Resource Library list: This will display the custom resource library entries in the Resource Library pane.
 -
 Show floating preview of Resource Library entry: You need to click this button to enable it, and then put the cursor at the resource library entry.
 - At last, you can filter the resource library entries by enabling the Filter checkbox and enter the resource library name as you wish*(7)*.
Name Manager Tab:
In the Name Manager Tab, you can create a new name range, edit the named range, delete the name range, and so on.
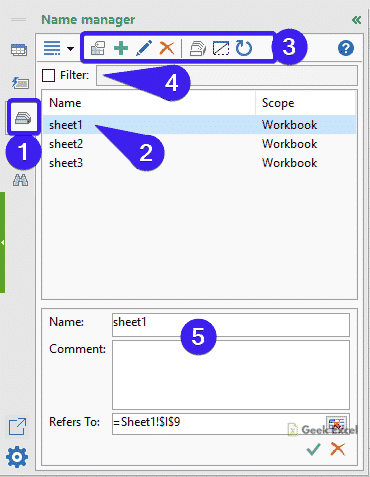
- Go to the Kutools Tab, select the Navigation option to display the Navigation Pane.
- You need to click
 button to open the Name Manager pane*(1)*.
 - Then, you can see all the range names within the active workbook are listed here*(2)*.
- You can use the following buttons if you need them*(3)*.
-
 Create names from the selection: It is used to create multiple range names based on a row or column labels.
 -
New name: It will add a new range name as you need.
-
Edit Name: Use this option to rename the selected range name and change the cell reference of the range name.
-
 Delete Name: It will delete the selected range name as you want.
 -
 Name Manager: You can click this button to open the Name Manager Dialog Box.
 -
Display hidden name: It will display the hidden names.
-
Refresh: Use this button to refresh the information of the Name ranges.
- You can filter a certain range name by enabling the Filter function and enter the range names as you need*(4)*.
- In this Edit Name section, you can rename the selected range name in the Name box. You can also change the reference of the range name in the Refers To text box.
- Then, you can click button to cancel the changes, click
 button to save the changes*(5)*.
Column List Tab:
The Column List pane in the Navigation pane cal list the column names and titles of the current worksheet. Let’s see them below.

- On the Kutools Tab, select the Navigation option to enable the Navigation pane.
-
 Column List tab: This button is used to enable the column list pane*(1)*.
 - In this pane, you will see the list of column titles of the current worksheet*(2)*.
- Use the following buttons if you need*(3)*:
-
 These arrows can help to move the column up or down.
 -
Toggle to unhide/hide all hidden column(s): It will toggle all hidden columns to be visible or invisible.
-
Refresh: It will refresh the information of the column list pane.
- List specific columns in the selected range*(4)*.
- You can also filter the columns by selecting the Filter checkbox and enter the column name as you need*(5)*.
- Then, you need to click
 button to hide the related column in the active sheet and click
 to show the related column in the active sheet*(6)*.
Advanced Find and Replace Tab:
To find and replace values in multiple worksheets and workbooks, use Advanced Find and Replace Tab in Excel.

- On the Kutools Tab, select the navigation option to enable the Navigation Pane.
-
 Advanced Find and Replace Tab: It will enable the advanced find and replace pane*(1)*.
 - You can switch between the Find tab and the Replace tab*(2)*.
- Here, you can type the search keywords based on your need*(3)*.
- Specify the finding or replacing scope: All workbook, Active workbook, Selected sheets, Active sheet, and Selection*(4)*.
- Then, you can select all or unselect all opening workbooks or worksheets*(5)*.
- Specify the search direction: By rows or By columns*(6)*.
- Then, you need to specify the special search scope such as formulas, cell values, comments, hyperlinks, or chart titles*(7)*.
- Match case – It will enable the case-sensitive search*(8)*.
- Match Entire Cell – You need to select this option if you want to enable an exact search*(9)*.
- Find All – click this button to find certain values in the specified searching scope*(10)*.
- Here, you can see the search results or replacement results*(11)*.
- You can click
 before a worksheet or workbook to collapse all search results in the worksheet and click
 button to expand all search results in the worksheet or workbook*(12)*.
 -
Delete: It will clear all searching results*(13)*.
- You need to click
 to float the Advanced Find and Replace pane in the workspace and click
  to collapse the search fields*(14)*.
Note:
- You can click
 button to open the Navigation Options Dialog Box.

- *Show number of worksheets – * If you check this option, the total number of worksheets, visible worksheets, and hidden worksheets are displayed in the status bar.
- **Using a shortcut key (Win+ Shift + A) to toggle between last two sheets – **It will toggle between the last two sheets.
- *Setting for previews of Resource Library entries – * This option will preview all text type of resource library entry in a big font.
- Settings for Name manager – ** If you check this option, the **Name editor will be displayed in the Name manager pane.
- *Apply the Find and Replace pane with shortcuts – * This will help you to apply the Advanced Find and Replace Function without opening the navigation pane.
Conclusion:
In the above guide, you can easily understand the steps to List Sheets, Workbooks, Columns, Names, and Insert Auto Text in Excel Office 365 using Kutools. ** Don’t forget to share your **feedback in the comment section. Thanks for visiting Geek Excel. Keep Learning!


Top comments (0)