
Whopeee! You've finally completed your project, so now it's time for the final step: throwing that code online for everyone to admire. Not sure how to convert your precious code to a functional website, though? Here's a step-by-step tutorial:
- Step 1 – Choose your webhosting package
- Step 2 – Secure your domain name(s)
- Step 3 – Verify your account
- Step 4 – Manage your hosting package
- Step 5 - Connect your domain name
- Step 6 - Connect your hosting package
- Step 7 - Upload your website files
Step 1 – Choose your webhosting package
Combell offers three webhosting packages: Business, Professional and Expert. For this project I chose the Business webhosting package for several reasons. Firstly, in all honesty, I got a discount code for this package making my website’s first year of hosting free. This is, of course, undeniably was a decisive factor. Secondly, Business offers everything you need for a simple website at an affordable price. If you’re unsure about which package works best for you, this is a safe bet that allows you to discover what you need in terms of hosting. You have , well - almost, nothing to lose. Thirdly, 73% of the people looking to host their website with Combell went for this package – as advertised by Combell itself - in which case it can’t be all that bad, right?
Step 2 – Secure your domain name(s)
After selecting your webhosting package of choice, Combell prompts you to enter your domain name to which your website will later be uploaded. The domain name is the string of text that appears as the URL of your website, for example google.com. Feeling a wee bit uninspired at the moment? You don’t necessarily have to order your domain name immediately when ordering your hosting package. You can also connect it through the control panel of your Combell account later.
If you can’t wait to finally own a little piece of the internet, though, this is your chance to go wild and enter puns, your archenemy’s name, or just the old, boring name of your business. The choice is mostly up to you. Mostly, because some domain names of course already exist and can therefore not be selected again.
Once you enter a domain name, Combell verifies your request and indicates its availability. Based on your request, Combell lists a number of suggestions, with various variations or extensions. Don't say you didn't have any options!
Step 3 – Verify your account
Once you’ve made up your mind about which domain name you want to birth into this world, slam dunk it into your shopping cart and pay up, you’ll receive:
- a confirmation of your order,
- a confirmation of successful domain name registration,
- an email address validation request,
- an account activation request;
Verifying and activating your account is nothing unexpected or complicated. Setting up a website’s hosting may feel overwhelming to beginners just like me, though, so I included this step for the sake of comprehensiveness. Simply read the instructions, click the one and only button mentioned in each email and you should be ready to smoothly moonwalk to step 4.
Step 4 – Manage your hosting package
Surf to mycombell.com and login with your username or customer ID and corresponding password. If you pushed all the right email buttons, you were already there. Yay! This is where the "magic" happens, or, you know, where you manage your hosting package.
Click the My Products drop-down menu and select Webhosting. Then simply select the hosting package you wish to connect.

Select Domain names & SSL in the left sidebar menu and you'll get a nice overview of your domain names. First, you'll see your main domain name, for example evaroets.com. Second is the www alias, connecting this URL to your main domain name. Third and last, you'll also see a temporary domain name. This is your username + your extension + .webhosting.be", for example evaroetscom.webhosting.be. As you can see, this username is created by taking your domain name and omitting the dot.

You may be thinking "Is all this really important?" Yes, kinda. If you're feeling like a little rebel today and don't connect your domain name to your package (yet), you can still preview your website using this temporary domain name. #hostinghack
Step 5 - Connect your domain name
For this step, we need the following ingredients:
- your IP address,
- your DNS records, more specifically A records,
- a connection between those two;
1. IP address
Hold your horses, no need to Google how you'll find your IP address. Select Overview in the left sidebar menu, and voilà, there is it! Copy the 10-digit number to your clipboard, as you'll need it to create A records.
2. A records
Click the My Products drop-down menu again and select DNS & Forwarding Management. Then simply click your hosting package. Select A-records in the left sidebar menu and you'll get an overview of your Address records.

3. Connecting...
In my case, the A records showed that the domain name was already linked as they displayed the IP address. If this is not the case for you, however, simply click the Add button, fill out the Record field with your host name (or leave it blank to select your main domain) and the IP address field. Completely ignore the TTL field by leaving it on the default value of 3600.
After a mere couple of hours of your patience, at most, your domain name(s) and hosting package will have become inseparable BFFs.
Step 6 - Connect your hosting package
1. Via FTP
Uploading local website files to a hosting package can easily be done through the commonly used FTP (File Transfer Protocol). First, you need to establish a connection between your computer and your hosting package.
Install a FTP program
For this website I chose for FileZilla (free!), but there are other many FTP program options available:
- For Windows: FileZilla, CuteFTP, SmartFTP, WS_FTP
- For Mac: FileZilla, CuteFTP, Transmit, Fetch, gFTP
- For Linux: FileZilla
Connect with FTA data
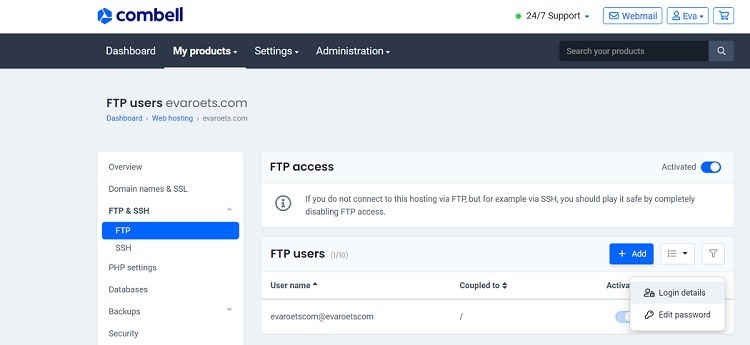
Click the My Products drop-down menu and select Webhosting > Manage hosting > FTP & SSH (in the left sidebar menu) > FTP. Next, click the nearly-impossible-to-find three vertical dots on the right side of the FTP user to view the login detail: FTP server, FTP port and FTP user.
Open the FTP program you previously downloaded and fill out the prompted data fields to establish a connection:
- Host: FTP server (see FTP user login details)
- Username: FTP username (see FTP user login details)
- Password: FTP user password
- Port: FTP port (see FTP user login details)
2. Via SSH
Looking for a more secure connection with more option than a regular FTP connection? SSH (Secure Shell) to the rescue!
Install a FTP program
Already installed FileZilla or another FTP program because of the previous steps? Not to worry, your efforts weren't in vain because you also need an FTP program when connecting via SSH.
Connect with SSH data
Click the My Products drop-down menu and select Webhosting > Manage hosting > FTP & SSH (in the left sidebar menu) > SSH and activate SSH access.

For Windows:
- Click the three vertical dots on the right side of the FTP user to edit password,
- Doublecheck/create your primary FTP user password, as this field may still be empty,
- Install Putty,
- Click on Session in the left sidebar menu,
- Enter host and port and click Open,
- Enter you primary FTP user password in Putty;
For Mac:
- Click the three vertical dots on the right side of the FTP user to edit password,
- Doublecheck/create your primary FTP user password, as this field may still be empty,
- Open Terminal and enter the SSH control panel command,
- Type “yes” and confirm with enter to the Terminal request to connect,
- Enter your primary FTP user password in Putty;
Hooray, you're now connected to your web hosting!
Step 7 - Upload your website files
For any projects that consist of a simple index file, simply drag and drop said file in FileZilla from your project folder on the left side panel to the www folder on the right side panel. Be sure to delete the index.html file that was already in the www folder, as it's just a default Combell landing page. And there you go. Ready, check, done! Time for a happy dance!
If you're looking to upload a Laravel project to Combell, go check this out!


Top comments (0)