
This is the fifth part of the "Deploying Django Application on AWS with Terraform" guide. You can check out the previous steps here:
- Part 1: Minimal Working Setup
- Part 2: Connecting PostgreSQL RDS
- Part 3: GitLab CI/CD
- Part 4: Namecheap Domain + SSL
In this step, we are going to:
- Add a Celery + SQS setup for local development.
- Create a periodic task using Celery Beat.
- Add create an SQS instance on AWS.
- Deploy worker and beat ECS services on AWS.
About Celery and SQS
As docs says:
Celery is a simple, flexible, and reliable distributed system to process vast amounts of messages, while providing operations with the tools required to maintain such a system. It’s a task queue with focus on real-time processing, while also supporting task scheduling.
So, you can run your long-running, CPU-bound, IO-bound tasks in separate docker containers. Your web server can schedule some tasks, and Celery will pick and execute them.
Web server and Celery communicate via some backend. It could be Redis or RabbitMQ. But we use AWS as a cloud provider. So, we can use the SQS backend. Celery docs says:
If you already integrate tightly with AWS, and are familiar with SQS, it presents a great option as a broker. It is extremely scalable and completely managed, and manages task delegation similarly to RabbitMQ.
You can check more info about SQS here.
Local development setup
Running SQS locally
SQS is a managed solution by AWS. And we could create a separate SQS instance for development purposes. But I want to run all things locally to be able to work without the Internet connection. Also, it's a good practice to run unit and integration tests without Internet access.
To run SQS locally, we will use softwaremill/elasticmq-native Docker image.
Go to the django-aws-backend folder and add a new service to docker-compose.yml in your Django project:
...

services:
  ...

  sqs:
    image: "softwaremill/elasticmq-native:latest"
    ports:
      - "9324:9324"
      - "9325:9325"
Run docker-compose up -d to run the SQS container. Then check http://127.0.0.1:9325/ in your browser to see the SQS management panel.

Also, check http://127.0.0.1:9324/ URL to ensure that SQS API is working. You will see an error XML output like this:
<ErrorResponse xmlns="http://queue.amazonaws.com/doc/2012-11-05/">
      <Error>
        <Type>Sender</Type>
        <Code>MissingAction</Code>
        <Message>MissingAction; see the SQS docs.</Message>
        <Detail/>
      </Error>
      <RequestId>00000000-0000-0000-0000-000000000000</RequestId>
    </ErrorResponse>
Now, we are ready to add Celery to our Django project.
Adding Celery to Django project
Let's add the Celery package to requirements.txt and run pip install -r requirements.txt. Be sure you activated venv before.
celery[sqs]==5.2.6
Then, create a new file django_aws/celery.py with the following content:
import os

from celery import Celery

# Set the default Django settings module for the 'celery' program.
os.environ.setdefault("DJANGO_SETTINGS_MODULE", "django_aws.settings")

app = Celery("django_aws")

# Using a string here means the worker doesn't have to serialize
# the configuration object to child processes.
# - namespace='CELERY' means all celery-related configuration keys
#   should have a `CELERY_` prefix.
app.config_from_object("django.conf:settings", namespace="CELERY")

# Load task modules from all registered Django apps.
app.autodiscover_tasks()
and add to the django_aws/settings.py these lines:
CELERY_BROKER_URL = env("CELERY_BROKER_URL", default="sqs://localhost:9324")
CELERY_TASK_DEFAULT_QUEUE = env("CELERY_TASK_DEFAULT_QUEUE", default="default")
CELERY_BROKER_TRANSPORT_OPTIONS = {
    "region": env("AWS_REGION", default="us-east-1")
}
Here we initialized the Celery app in django_aws/celery.py. We will use this app to specify and schedule tasks for Celery. Also, we provided connection parameters in django_aws/settings.py. As default values, we set our local setup. For production, we can pass parameters via environment variables.
Now, we are ready to create and run our first task. Let's create django_aws/tasks.py with the following code:
import logging
import time

from django_aws import celery


@celery.app.task()
def web_task() -> None:
    logging.info("Starting web task...")
    time.sleep(10)
    logging.info("Done web task.")
The web_task will run for 10 seconds and put messages in the log stream at the start and the end of execution.
Now, we need to add a way to add this task to the queue. Let's create a django_aws/views.py with the following view:
from django.http import HttpResponse
from django_aws.tasks import web_task


def create_web_task(request):
    web_task.delay()
    return HttpResponse("Task added")
Add this view to urls.py:
...
from django_aws import views

urlpatterns = [
    ...
    path('create-task', views.create_web_task),
]

...
Now, if we hit URL http://127.0.0.1:8000/create-task, the create_web_task view will add a new task to the local SQS. Start the local web server with python manage.py runserver, hit this URL several times, and look at the SQS admin page http://127.0.0.1:9325/.

So, we successfully add tasks to the queue. Now, let's execute them with celery. Run celery -A django_aws worker --loglevel info to start the worker process. The worker will immediately pick tasks from the queue and execute them:

Stop the celery process.
If you run into the problem
ImportError: The curl client requires the pycurl library, check out my post on StackOverflow
Also, we need to add some libraries to Dockerfile for compiling the pycurl in the docker image. Replace Dockerfile with the next one:
FROM python:3.10-slim-buster

EXPOSE 8000

ENV PYTHONUNBUFFERED 1
ENV PYTHONDONTWRITEBYTECODE 1
ENV DEBIAN_FRONTEND noninteractive

RUN apt-get update  \
    && apt-get --no-install-recommends install -y \
        build-essential \
        libssl-dev \
        libcurl4-openssl-dev \
    && rm -rf /var/lib/apt/lists/*

RUN pip install --no-cache-dir --upgrade pip
RUN pip install gunicorn==20.1.0

COPY requirements.txt /
RUN pip install --no-cache-dir -r /requirements.txt

WORKDIR /app
COPY . /app

RUN ./manage.py collectstatic --noinput
Adding Celery beat
Now, let's create a periodic task using Celery Beat. We will add a simple task like create_web_task and schedule it for execution once a minute. For this, let's add beat_task to tasks.py:
@celery.app.task()
def beat_task() -> None:
    logging.info("Starting beat task...")
    time.sleep(10)
    logging.info("Done beat task.")
Then, add the CELERY_BEAT_SCHEDULE setting in settings.py:
from datetime import timedelta
...
CELERY_BEAT_SCHEDULE = {
    "beat_task": {
        "task": "django_aws.tasks.beat_task",
        "schedule": timedelta(minutes=1),
    },
}
and run the beat process celery -A django_aws beat --loglevel info. Every minute beat process adds a new task to SQS. Check http://127.0.0.1:9325/ to see them.

Wait for several tasks in queue, stop the beat process and run the worker again celery -A django_aws worker --loglevel info. The worker will process beat_task tasks, and you will see the logs:
[2022-08-04 11:13:59,088: INFO/MainProcess] Task django_aws.tasks.beat_task[4189aa07-b75e-4743-94e0-2a0c3b84443a] received
[2022-08-04 11:13:59,089: INFO/MainProcess] Task django_aws.tasks.beat_task[0de67363-2e2a-421c-9630-1c6c7c685382] received
[2022-08-04 11:13:59,095: INFO/ForkPoolWorker-1] Starting beat task...
[2022-08-04 11:13:59,095: INFO/ForkPoolWorker-8] Starting beat task...
[2022-08-04 11:14:09,096: INFO/ForkPoolWorker-1] Done beat task.
[2022-08-04 11:14:09,096: INFO/ForkPoolWorker-8] Done beat task.
[2022-08-04 11:14:09,097: INFO/ForkPoolWorker-1] Task django_aws.tasks.beat_task[0de67363-2e2a-421c-9630-1c6c7c685382] succeeded in 10.002475121000316s: None
[2022-08-04 11:14:09,097: INFO/ForkPoolWorker-8] Task django_aws.tasks.beat_task[4189aa07-b75e-4743-94e0-2a0c3b84443a] succeeded in 10.002584206999018s: None
So, we successfully run Celery worker and beat processes using local SQS. Let's add the celerybeat-schedule file to .gitignore, commit and push our changes. Ensure that CI/CD passed successfully.

We are done with Django part, let's move to the AWS.
Deploying to AWS
Creating AWS SQS instance and user
Move to the django-aws-infrastructure folder, create a sqs.tf file with the following content, and run terraform apply.
resource "aws_sqs_queue" "prod" {
  name                      = "prod-queue"
  receive_wait_time_seconds = 10
  tags = {
    Environment = "production"
  }
}

resource "aws_iam_user" "prod_sqs" {
  name = "prod-sqs-user"
}

resource "aws_iam_user_policy" "prod_sqs" {
  user = aws_iam_user.prod_sqs.name

  policy = jsonencode({
    Version = "2012-10-17"
    Statement = [
      {
        Action = [
          "sqs:*",
        ]
        Effect   = "Allow"
        Resource = "arn:aws:sqs:*:*:*"
      },
    ]
  })
}

resource "aws_iam_access_key" "prod_sqs" {
  user = aws_iam_user.prod_sqs.name
}
Here we've created a new SQS instance, a new IAM user, granted access to this SQS instance to this user, and created an IAM Access Key to give access to SQS from Django application. Let's look at the new instance in AWS console:

Activating a region
Now, let's create an ECS for the Celery worker and beat.
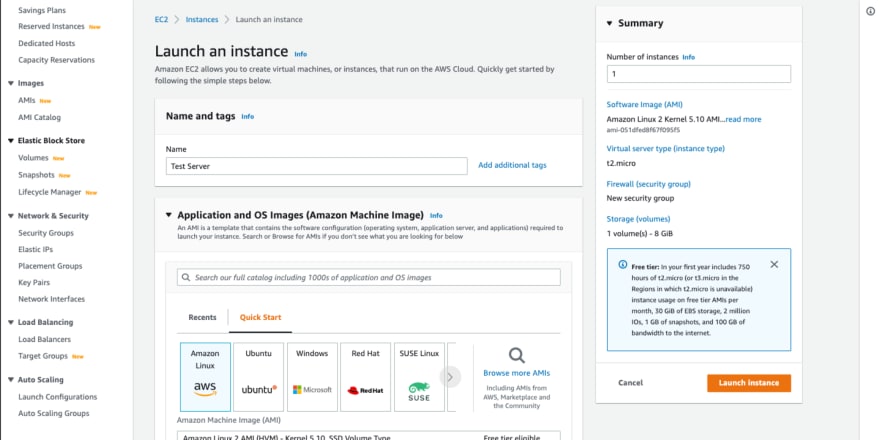
First, let's "activate" our region on AWS. For some reason, AWS doesn't allow you to create more than 2 ECS containers in the region. You need to create an EC2 instance in this region to remove this limit. Let's do it manually in EC2 Console. Be sure that you use your AWS region.
- Click "Launch Instance"

- Pick any name for your instance. I'll go with
Test Server
- Scroll down to the "Key pair" card and pick "Proceed without a key pair". We won't connect to this server, so we don't need one. Then click "Launch Instance" to create a new instance in your region.
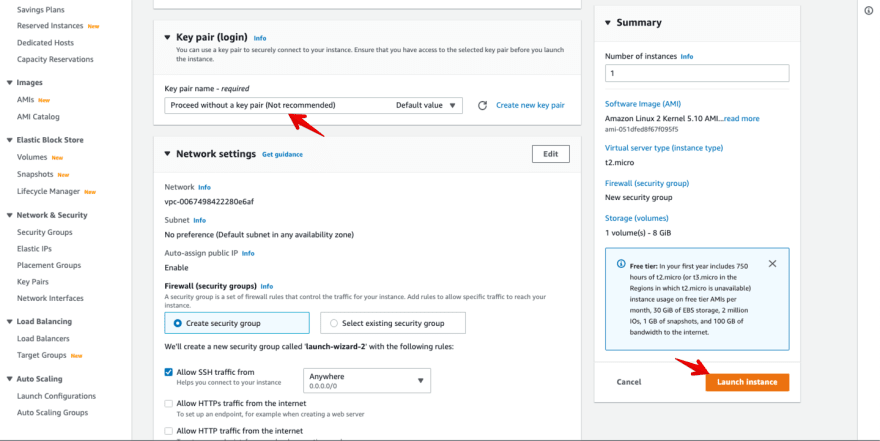
AWS will soon create an instance. Go to the Instances tab in EC2 Console and verify that you have 1 "Running" instance.
After that, you can terminate the instance because we don't need it. Pick the instance, click the "Instance state", then "Terminate instance", and confirm termination. AWS will permanently remove your EC2 instance.

So, now we can create more than two ECS containers. Let's continue creating Celery ECS.
Running a Celery via ECS
Now, let's define our Celery ECS service. First, add new variables in ecs.tf:
locals {
  container_vars = {
    ...

    sqs_access_key = aws_iam_access_key.prod_sqs.id
    sqs_secret_key = aws_iam_access_key.prod_sqs.secret
    sqs_name = aws_sqs_queue.prod.name
  }
}
and pass it to containers in backend_container.json.tpl:
[
  {
    ...
    "environment": [
      ...
      {
        "name": "AWS_REGION",
        "value": "${region}"
      },
      {
        "name": "CELERY_BROKER_URL",
        "value": "sqs://${urlencode(sqs_access_key)}:${urlencode(sqs_secret_key)}@"
      },
      {
        "name": "CELERY_TASK_DEFAULT_QUEUE",
        "value": "${sqs_name}"
      }
    ],
    ...
  }
]
So, we passed SQS credentials to ECS services. Then, add the following content in ecs.tf and run terraform apply:
...

# Cloudwatch Logs
...

resource "aws_cloudwatch_log_stream" "prod_backend_worker" {
  name           = "prod-backend-worker"
  log_group_name = aws_cloudwatch_log_group.prod_backend.name
}

resource "aws_cloudwatch_log_stream" "prod_backend_beat" {
  name           = "prod-backend-worker"
  log_group_name = aws_cloudwatch_log_group.prod_backend.name
}

...

# Worker

resource "aws_ecs_task_definition" "prod_backend_worker" {
  network_mode             = "awsvpc"
  requires_compatibilities = ["FARGATE"]
  cpu                      = 256
  memory                   = 512

  family = "backend-worker"
  container_definitions = templatefile(
    "templates/backend_container.json.tpl",
    merge(
      local.container_vars,
      {
        name       = "prod-backend-worker"
        command    = ["celery", "-A", "django_aws", "worker", "--loglevel", "info"]
        log_stream = aws_cloudwatch_log_stream.prod_backend_worker.name
      },
    )
  )
  depends_on = [aws_sqs_queue.prod, aws_db_instance.prod]
  execution_role_arn = aws_iam_role.ecs_task_execution.arn
  task_role_arn      = aws_iam_role.prod_backend_task.arn
}

resource "aws_ecs_service" "prod_backend_worker" {
  name                               = "prod-backend-worker"
  cluster                            = aws_ecs_cluster.prod.id
  task_definition                    = aws_ecs_task_definition.prod_backend_worker.arn
  desired_count                      = 2
  deployment_minimum_healthy_percent = 50
  deployment_maximum_percent         = 200
  launch_type                        = "FARGATE"
  scheduling_strategy                = "REPLICA"
  enable_execute_command             = true

  network_configuration {
    security_groups  = [aws_security_group.prod_ecs_backend.id]
    subnets          = [aws_subnet.prod_private_1.id, aws_subnet.prod_private_2.id]
    assign_public_ip = false
  }
}

# Beat

resource "aws_ecs_task_definition" "prod_backend_beat" {
  network_mode             = "awsvpc"
  requires_compatibilities = ["FARGATE"]
  cpu                      = 256
  memory                   = 512

  family = "backend-beat"
  container_definitions = templatefile(
    "templates/backend_container.json.tpl",
    merge(
      local.container_vars,
      {
        name       = "prod-backend-beat"
        command    = ["celery", "-A", "django_aws", "beat", "--loglevel", "info"]
        log_stream = aws_cloudwatch_log_stream.prod_backend_beat.name
      },
    )
  )
  depends_on = [aws_sqs_queue.prod, aws_db_instance.prod]
  execution_role_arn = aws_iam_role.ecs_task_execution.arn
  task_role_arn      = aws_iam_role.prod_backend_task.arn
}

resource "aws_ecs_service" "prod_backend_beat" {
  name                               = "prod-backend-beat"
  cluster                            = aws_ecs_cluster.prod.id
  task_definition                    = aws_ecs_task_definition.prod_backend_beat.arn
  desired_count                      = 1
  deployment_minimum_healthy_percent = 50
  deployment_maximum_percent         = 200
  launch_type                        = "FARGATE"
  scheduling_strategy                = "REPLICA"
  enable_execute_command             = true

  network_configuration {
    security_groups  = [aws_security_group.prod_ecs_backend.id]
    subnets          = [aws_subnet.prod_private_1.id, aws_subnet.prod_private_2.id]
    assign_public_ip = false
  }
}
Here we created:
- Cloudwatch Logs streams for worker and beat.
- Worker ECS task definition and ECS service. We specified
desired_count=2to show how multiple workers can run for the same queue. In the future we will scale worker ECS depending on CPU load. - Beat ECS task definition and ECS service. Here we specified
desired_count=1because we don't want to schedule duplicates for periodic tasks.
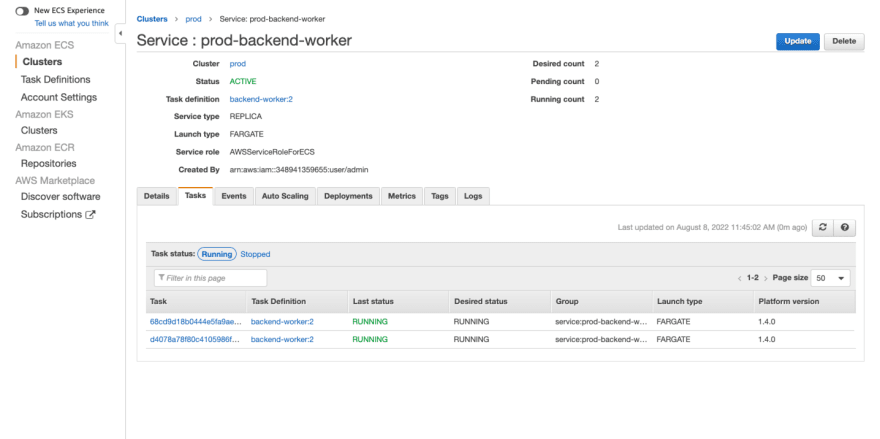
Let's check our services in the ECS console.
Here are our worker and beat service:

Here are worker and beat tasks. You can see that ECS creates two tasks for the worker service and only one task for the beat service:
Here are worker logs. For now, we see only beat tasks in logs:
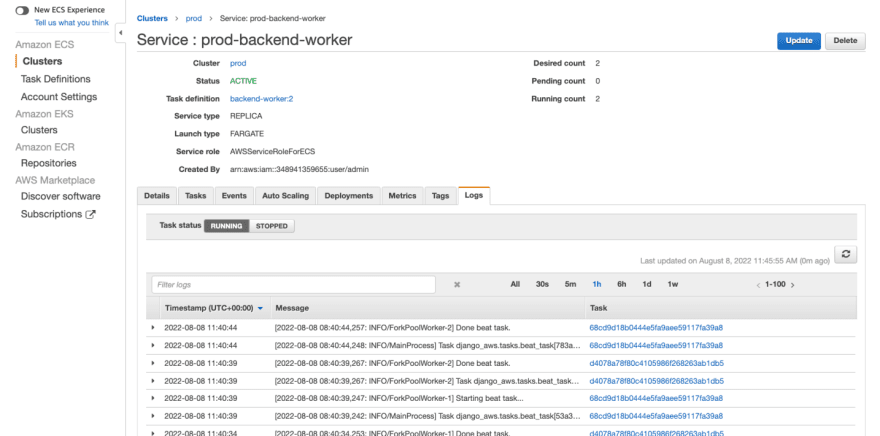
Let's add a new task from the web. Hit https://api.example53.xyz/create-task URL (replace a domain with your one). You should see a 'Task added' message in response. Then, return to ECS worker logs, and pick the '30s' interval to see the most recent log events. You should see 'Starting web task' and 'Done web task' messages in the logs.

So, we successfully run ECS for worker and beat processes and ensure that both web and beat Celery tasks are executed successfully.
We are done with the infrastructure repo so that you can commit and push the changes.
Updating deploy
There is still one more task. To ensure that we will update our ECS services with every deployment, we need to modify our ./scripts/deploy.sh. Let's add the same instruction as for the web service:
...

echo "Updating web..."
aws ecs update-service --cluster prod --service prod-backend-web --force-new-deployment  --query "service.serviceName"  --output json
echo "Updating worker..."
aws ecs update-service --cluster prod --service prod-backend-worker --force-new-deployment  --query "service.serviceName"  --output json
echo "Updating beat..."
aws ecs update-service --cluster prod --service prod-backend-beat --force-new-deployment  --query "service.serviceName"  --output json

echo "Done!"
So, we will force a new deployment for the worker and beat services on ECS with every push.
Commit and push changes. Wait for CI/CD and check your services in ECS Console. After some time, new tasks will arise:

You can schedule more web tasks and see them in logs to ensure that things work as expected.
The end
Congratulations! We've successfully created an AWS SQS instance and added Celery worker + beat services to ECS. Our Django application can run long-living tasks in the background worker process.
You can find the source code of backend and infrastructure projects here and here.
If you need technical consulting on your project, check out our website or connect with me directly on LinkedIn.


Top comments (1)
This series has been incredibly helpful, thank you!
I just wanted to mention your
has name
prod_backend_worker, instead ofprod_backend_beat