Howdy coders! We are going to discuss very basics of location based functionalities using Google Maps and Geolocation in Ionic with Capacitor. This is a simple, but very important post for early developers. In this post, you will learn how to
- Implement Geolocation in Ionic Capacitor apps using Capacitor APIs
- Convert map coordinates to location address (Reverse Geocoding)
- Convert location address to map coordinates (Geocoding)
- Displaying user position on Google Maps
- Continuous tracking of a user location by periodic location updates
We will test the functionalities in Web and Android device. iOS works pretty similar to Android, except the permissions required in info.plist
Complete code for this tutorial is available on Github repo ionic-angular-capacitor-geolocation
Disclaimer
Since this post is a mix of three frameworks — Ionic, Angular and Capacitor, it is possible you landed here by mistake. If you are looking for Geolocation etc in
- Geolocation in Ionic Angular / Geolocation plugin with Ionic 4(Cordova) apps — Please check this post
- Geolocation in React Native / Geolocation API in a React Native apps — Please check this post
- Ionic Angular (Capacitor) apps — Continue reading 😎
Following my blogging ritual, I’ll take you through the basics of each framework we are using, namely — Ionic, Angular and Capacitor. If you already know about these, feel free to skip to the main content.
What is Ionic 4?
You probably already know about Ionic, but I’m introducing Ionic 4 here just for the sake of beginners. Ionic is a complete open-source SDK for hybrid mobile app development. Ionic provides tools and services for developing hybrid mobile apps using Web technologies like CSS, HTML5, and Sass. Apps can be built with these Web technologies and then distributed through native app stores to be installed on devices.
In other words — If you create native apps in Android, you code in Java. If you create native apps in iOS, you code in Obj-C or Swift. Both of these are powerful, but complex languages. With Cordova (and Ionic) you can write a single piece of code for your app that can run on both iOS and Android (and windows!), that too with the simplicity of HTML, CSS, and JS.
Ionic Capacitor vs Apache Cordova
For quite some time, Cordova has been the only choice available for hybrid app developers. Cordova builds Ionic web app into a device installable app. But there are some limitations of Cordova, which Capacitor tries to overcome with a new App workflow.
What is Capacitor?
Capacitor is a cross-platform app runtime that makes it easy to build web apps that run natively on iOS, Android, Electron, and the web. Ionic people call these apps “Native Progressive Web Apps” and they represent the next evolution beyond Hybrid apps. We have seen how will it fit with ionic development.
Capacitor is very similar to Cordova, but with some key differences in the app workflow
Cordova to Capacitor
Here are the differences between Cordova and Capacitor (You’ll appreciate these only if you have been using Cordova earlier, otherwise you can just skip)
- Capacitor considers each platform project a source asset instead of a build time asset. That means, Capacitor wants you to keep the platform source code in the repository, unlike Cordova which always assumes that you will generate the platform code on build time
- Because of the above, Capacitor does not use
config.xmlor a similar custom configuration for platform settings. Instead, configuration changes are made by editingAndroidManifest.xmlfor Android andInfo.plistfor Xcode - Capacitor does not “run on device” or emulate through the command line. Instead, such operations occur through the platform-specific IDE. So you cannot run an Ionic-capacitor app using a command like
ionic run ios. You will have to run iOS apps using Xcode, and Android apps using Android studio - Since platform code is not a source asset, you can directly change the native code using Xcode or Android Studio. This give more flexibility to developers
In essence, Capacitor is like a fresh, more flexible version of Corodva.
Cordova Plugins and Ionic Native
Cordova and Ionic Native plugins can be used in Capacitor environment by using Capacitor with Ionic. However, some of the Cordova Plugin are not compatible with Ionic Capacitor — Incompatible Cordova Plugins with Capacitor. For Geocoding functionality, we’ll use the Ionic Native Geocode Plugin.
What is Geolocation? 🗺
The most famous and familiar location feature — Geolocation, is the ability to track a device’s whereabouts using GPS, cell phone towers, WiFi access points or a combination of these. Both mobile and desktop devices can use geolocation. There are apps which use location once, and there are apps which continuously track your location as well (😱)
There are some famous Location-Based Apps.
5 Geolocation Apps you may have come across
- Uber / Lyft — Cab booking (one time and continuous tracking)
- Google Maps (of course) — Map services
- Swiggy / Zomato/ Uber Eats — Food delivery
- Fitbit — Fitness app
- Instagram / Facebook — For tagging photos
What is Geocoding? What is Reverse geocoding?
Geocoding is the process of transforming a street address or other description of a location into a (latitude longitude) coordinate.
Reverse Geocoding — Address Lookup of location Coordinates to Addresses
Reverse geocoding is the process of transforming a (latitude, longitude) coordinate into a (partial) address. As Reverse Geocoding converts geographic latitude longitude coordinates to address so the amount of detail in a reverse geocoded location description may vary, for example, one might contain the full street address of the closest building, while another might contain only a city name and postal code.
Post structure
We will go in a step-by-step manner to explore the location features. This is my break-down of the blog
STEPS
- Create a simple Ionic 4 app and integrate Capacitor
- Implement Geolocation API and get current location
- Convert user Geolocation into an address (Reverse Geocoding)
- Displaying user position on Google Maps
- Convert user entered address into Geocode (Geocoding)
- Track user location
So ….. let’s dive right in!

Step 1 — Create a simple Ionic 4 app with Capacitor
I have covered this topic in detail in this blog.
In short, the steps you need to take here are
- Make sure you have node installed in the system (V10.16.0 at the time of this blog post)
- Install ionic cli using npm
- Create an Ionic app using
ionic start ionic-capacitor-geolocation tabs
You can create a tabs starter for the sake of this tutorial. I’ll use one tab each for
Tab 1 — Geolocation and reverse geocoding
Tab 2— Display location on Google Map and Geocoding
Tab 3— Tracking location continuously
Once the installation is done, run your app on browser using
$ ionic serve
You’ll see the default UI of Ionic starter. We’ll modify the UI as we go.
Integrate Capacitor
Capacitor can be attached to an existing Ionic app as well. To attach Capacitor to your existing Ionic app, run
$ ionic integrations enable capacitor
This will attach Capacitor to your Ionic app. After this, you have to init the Capacitor app with
$ npx cap init
It will ask you the app name and ID. Give app name whatever you want. App ID is the domain identifier of your app (ex: com.example.app). Note this ID as this will be required later when you create app in Facebook developer console.
Step 2 — Implement Geolocation API and get current location
Capacitor’s in-built Geolocation APIs can be used to get device location. This works for web, iOS and Android. This API provides information about the device’s location, such as latitude, longitude, speed, heading, altitude etc.
The code stays same for all types of devices. Just invoke the API from Capacitor in-built plugins and use it to get location.
2.1 Web
When you run the app using ionic serve , the geolocation API will ask location permission the first time. Fire the locate function to get your device’s location.
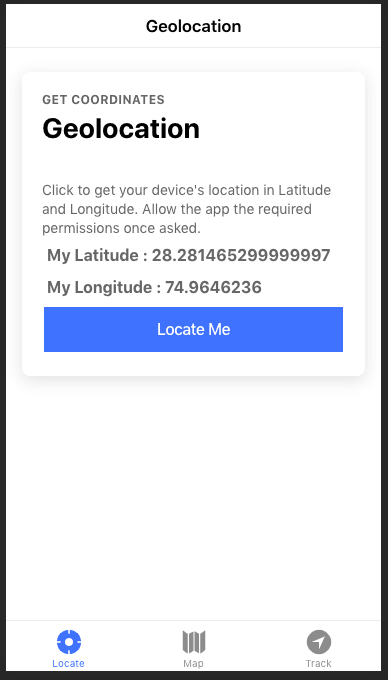
The result from Geolocation API looks like this

Notice there are extra parameters such as altitude, heading, speed etc. in the result. These are provided by the API whenever available.
2.2 Android
Build the app on Android using following commands
// Build web assets
$ ionic build
// Add android platform
$ npx cap add android
// Copy all changes to Android platform
$ npx cap sync
// Open the project in Android studio
$ npx cap open android
Geolocation API requires the following permissions be added to your AndroidManifest.xml:
<!-- Geolocation API -->
<uses-permission android:name="android.permission.ACCESS_COARSE_LOCATION" />
<uses-permission android:name="android.permission.ACCESS_FINE_LOCATION" />
<uses-feature android:name="android.hardware.location.gps" />
Build the app from Android studio in your device and test.
Android quirk
There is one weird implementation issue in Capacitor Geolocation API in Android. Here are the steps to reproduce:
- Turn off location services on your device
- Open capacitor app that calls
getCurrentPosition()- now it should fail because you turned off location services that’s okay so far - Turn on location services and switch back to your app and run
getCurrentPosition()again - now the call STILL FAILS even though location services are turned back on
This is because the API tries to run getLastKnownLocation which returns null, because no other App has requested a Location since you turned Location services back on. If you switch to Google maps and request your current location, getCurrentPosition starts working again because the Android location service has another location in memory. You can track the issue on official Capacitor Github Repo here.
2.3 iOS
Apple requires privacy descriptions to be specified in Info.plist for location information. These two keys are important to be specified.
Name: Privacy - Location Always Usage Description
Key: NSLocationAlwaysUsageDescription
Name: Privacy - Location When In Use Usage Description
Key: NSLocationWhenInUseUsageDescription
Build the app on iOS using following commands
// Build web assets
$ ionic build
// Add android platform
$ npx cap add ios
// Copy all changes to Android platform
$ npx cap sync
// Open the project in Android studio
$ npx cap open ios
The Geolocation function runs smoothly on iOS, same as Android
Step — 3 Convert user Geolocation into an address — Reverse Geocoding
This will be implemented using Ionic Native-geocoder plugin (Yes, it works with Capacitor too ! 👻). Since this is a Cordova based plugin, it won’t work in web. Install the plugin using
$ ionic cordova plugin add cordova-plugin-nativegeocoder
$ npm install @ionic-native/native-geocoder
Add this plugin to your app’s module to Providers of your app like this
Now time to import this plugin in yourtab1.page.ts where we will convert user’s location to address.
First, we will import the plugin like this
import { NativeGeocoder, NativeGeocoderResult, NativeGeocoderOptions } from '@ionic-native/native-geocoder/ngx';and inject it in our Constructor (Dependency injection) like this
constructor(private nativeGeocoder: NativeGeocoder) {}And use this code for reverse-geocoding coordinates into address
let options: NativeGeocoderOptions = {
    useLocale: true,
    maxResults: 5
};
this.nativeGeocoder.reverseGeocode(latitude, longitude, options)
  .then((result: NativeGeocoderResult[]) => console.log(JSON.stringify(result[0])))
  .catch((error: any) => console.log(error));
Android
Here’s the reverse geocoding result of the current user’s location.
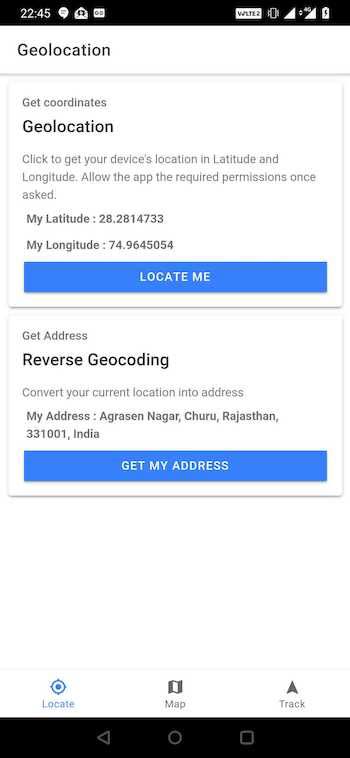
This is the result of reverse geocoding

Step 4 — Displaying user position on Maps
Let’s move on to next tab. Here, we will show user’s location fetched from Geolocation API on Google Map. We will also use this Google Map for Geocoding i.e. Show a user entered address as a marker on the map.
4.1 Integrate Google Map
Google Map can be easily integrated in an Angular Ionic app using Angular Google Maps. Install it using
$ npm install @agm/core
Import AgmCoreModule in app.module.ts
import { AgmCoreModule } from '@agm/core';
and add the following to imports in same file app.module.ts
...
AgmCoreModule.forRoot({
  apiKey: 'YOUR GOOGLE MAP API KEY',
  libraries: ['places']
}),
...
After this, import AgmCoreModule in tab2.module.ts as well, and add AgmCoreModule in imports in same file.
AGM map can be easily displayed in Tab 2 using following small piece of code
<agm-map [latitude]="lat" [longitude]="lng" [zoom]="15" [disableDefaultUI]="false">
<agm-marker [latitude]="lat" [longitude]="lng" [markerDraggable]=true></agm-marker>
</agm-map>
where lat and lng are the map center, as well as, market location.
4.2 Showing user current location on google maps
Similar to the first tab, we can get the current location from Capacitor Geolocation API. The latitude longitude thus obtained can be used as center of the map, as well as, marker location. Here’s the result

Code for this section can be found combined in next step.
STEP 5 — Geocode and show Geocoded location on Map
Geocoding uses the same plugin as reverse geocoding — Ionic native-geocoder. So let’s geocode addresses in google maps.
Import the plugin in tab2.page.ts in the same fashion as Tab1. Connect the screen’s text input to a variable, and Geocode the variable with following code
this.nativeGeocoder.forwardGeocode(this.address, options)
.then((result: NativeGeocoderResult[]) => {
 console.log('lat='+result[0].latitude+'long='+result[0].longitude);
})
.catch((error: any) => console.log(error));
Overall tab2.page.ts code will look like this, containing both current location display on map and geocoding
Notice, I have used parseFloat(result[0].latitude) for coordinates. Some specific issues cause the AGM map not to re-center or change marker location if the coordinates are in string format. So make sure you convert them in number to see changes on map.
Here’s how the geocoding and map re-centering looks like on Android

Step 6 — How to Track user location ?
We’ll see now real time location tracking in Tab 3. If you want continuous sharing of your real time location with others or tracking of the user location, you can use the Capacitor geolocation API itself to display user position on Maps.
let watch = this.geolocation.watchPosition();this.lat = position.coords.latitude;
watch.subscribe((data) => {
// data is output only when position changes
this.lng = position.coords.longitude;});
So this function will give you user current location latitude longitude. You can call clearWatch on any given watch to stop tracking user location.
Generally, watchPosition will only give you results when there is a change in location. So if you are testing on a browser, you’ll have to fake change location to see the actual effect. If you are testing on mobile device, start running ! 🏃
Here’s the code for starting and stopping the watch — tab3.page.ts
Web Browser
Here’s my track user testing on browser

As you can see from the values, I’m clearly fake changing the browser geolocation using Chrome tools.
Android
Here’s the same code on Android device

Hooray ! That’s your geolocation application right there which is continuously Tracking a User Location. 🎉
Conclusion
In this blog, we learned how to implement Geolocation in Capacitor apps with Ionic and Angular frameworks. We learnt how to convert coordinates into location address (Reverse Geocoding) and location address into coordinates (Geocoding) in a simple Ionic app and tested on Web and Android Google Map . We can use this for tracking users location and showing on google maps in android / javascript. These apps can collect location data with Ionic 4 and Capacitor.
You can use these functionalities in a number of professional apps, be it food delivery, e-commerce, ticket booking or just a chat app or simply share your real-time location with others or for real time journey tracking. Refer this for building an Ionic App for Real time Google Maps Geolocation Tracking App.
Complete code for this tutorial is available on Github repo ionic-angular-capacitor-geolocation
Next Steps
Now that you have learned the implementation of Geolocation functionalities in Ionic Capacitor app with Angular, you can also try following blogs for other Ionic apps
Ionic Angular Capacitor
- Music Player
- Create HTML5 games in Ionic Capacitor apps using Phaser
- Barcode and QR code scanning in Ionic Capacitor apps
- Facebook Login
If you need a base to start your next Capacitor app, you can make your next awesome app using Capacitor Full App

Ionic React Capacitor
- Facebook Login in Ionic React Capacitor apps
- Twitter Login in Ionic React Capacitor apps
- Google Login in Ionic React Capacitor apps
- How to make basic apps in ionic-react-capacitor
- Camera and Image gallery in Ionic-React-Capacitor
- Push notification in Ionic-React-Capacitor apps
- Adding Icon and Splash in Ionic React Capacitor apps
If you need a base to start your next Ionic 4 React app, you can make your next awesome app using Ionic React Full App

Ionic Angular Cordova
- Ionic 4 Payment Gateways — Stripe | PayPal | Apple Pay | RazorPay
- Ionic 4 Charts with — Google Charts | HighCharts | d3.js | Chart.js
- Ionic 4 Social Logins — Facebook | Google | Twitter
- Ionic 4 Authentications — Via Email | Anonymous
- Ionic 4 Features — Geolocation | QR Code reader | Pedometer
- Media in Ionic 4 — Audio | Video | Image Picker | Image Cropper
- Ionic 4 Essentials — Native Storage | Translations | RTL
- Ionic 4 messaging — Firebase Push | Reading SMS
- Ionic 4 with Firebase — Basics | Hosting and DB | Cloud functions
If you need a base to start your next Ionic 4 Angular app, you can make your next awesome app using Ionic 4 Full App


Oldest comments (0)