
In this post, you’ll learn how to implement Facebook login in your Capacitor apps, based on Ionic Angular framework. Following are the outcomes of this blogpost
- Login using Facebook in a Capacitor Ionic app (Angular)
- Retrieve user name and profile photo to show after login
- Auto-login users after first login
Disclaimer
Since this post is a mix of three frameworks, it is possible you landed here by mistake. If you are looking for Facebook login in
- Ionic Angular (Cordova) apps — Please check this post
- Ionic React Capacitor Apps — Please check this post
- React Native — Please check this post
- Ionic Angular (Capacitor) apps — Continue reading 😎
As you can see from above, there are several options available for Hybrid app development these days, and it is easy to get confused between them. This post is focussed on Ionic framework with Angular as the front-end framework, and Capacitor as runtime and build environment.
Code for this tutorial is available on Github repo ionic-angular-capacitor-facebook-login
Let’s see a brief intro to each of the included frameworks:
- Ionic
- Capacitor
What is Ionic ?
You probably already know about Ionic, but I’m putting it here just for the sake of beginners. Ionic is a hybrid mobile app development SDK. It provides tools and services for developing hybrid mobile apps using Web technologies like CSS, HTML5, and Sass. Apps can be built with these Web technologies and then distributed through native app stores to be installed on devices by leveraging Cordova environment.
So, in other words — If you create Native apps in Android, you code in Java. If you create Native apps in iOS, you code in Obj-C or Swift. Both of these are powerful but complex languages. With Cordova (and Ionic) you can write a single piece of code for your app that can run on both iOS and Android (and windows!), that too with the simplicity of HTML, CSS, and JS.
It is important to note the contribution of Cordova/Capacitor in this. Ionic is only a UI wrapper made up of HTML, CSS and JS. So, by default, Ionic cannot run as an app in an iOS or Android device. Cordova/Capacitor is the build environment that containerizes (sort of) this Ionic web app and converts it into a device installable app, along with providing this app access to native APIs like Camera etc.
Capacitor — How is it different from Cordova ?
Cordova has been the only choice available for hybrid app developers for quite some time. Cordova helps build Ionic web app into a device installable app. But there are some limitations of Cordova, which Capacitor tries to overcome with a new App workflow.
Capacitor is a cross-platform app runtime that makes it easy to build web apps that run natively on iOS, Android, Electron, and the web. Ionic people call these apps “Native Progressive Web Apps” and they represent the next evolution beyond Hybrid apps.
Capacitor is very similar to Cordova, but with some key differences in the app workflow
Here are the differences between Cordova and Capacitor (You’ll appreciate these only if you have been using Cordova earlier, otherwise you can just skip)
- Capacitor considers each platform project a source asset instead of a build time asset. That means, Capacitor wants you to keep the platform source code in the repository, unlike Cordova which always assumes that you will generate the platform code on build time
- Because of the above, Capacitor does not use
config.xmlor a similar custom configuration for platform settings. Instead, configuration changes are made by editingAndroidManifest.xmlfor Android andInfo.plistfor Xcode - Capacitor does not “run on device” or emulate through the command line. Instead, such operations occur through the platform-specific IDE. So you cannot run an Ionic-capacitor app using a command like
ionic run ios. You will have to run iOS apps using Xcode, and Android apps using Android studio - Since platform code is not a source asset, you can directly change the native code using Xcode or Android Studio. This give more flexibility to developers
In essence, Capacitor is like a fresh, more flexible version of Corodva.
Plugins
Cordova and Ionic Native plugins can be used in Capacitor environment. However, there are certain Cordova plugins which are known to be incompatible with Capacitor. For Facebook login functionality, we’ll use the Capacitor Facebook login plugin
Other than that, Capacitor also doesn’t support plugin installation with variables. Those changes have to be done manually in the native code. We will see it in this post.
Structure of post
I always go step-by-step for readers of all experience level. If you know certain steps, feel free to skip them
Step 1: Create a basic Ionic app with Angular
Step 2: Connect Capacitor with your app
Step 3: Create a Facebook app in Developer console
Step 4: Setup Facebook Login Plugin and functions
Step 5: Build and Test your app on Android
Let’s get started with Ionic Angular Capacitor Facebook login !
Step 1 — Create a basic Ionic app
First you need to make sure you have the latest Ionic CLI. This will ensure you are using everything latest. Ensure latest Ionic CLI installation using
$ npm install -g ionic@latest
(My node version at the time of writing the blog is 10.16.0)
Creating a basic Ionic-Angular app. Start a basic blank starter using
$ ionic start CapFbLogin blank --type=angular
The --type=angular told the CLI to create an Angular app, not a React app !!
Run the app in browser using (yes you guessed it right)
$ ionic serve
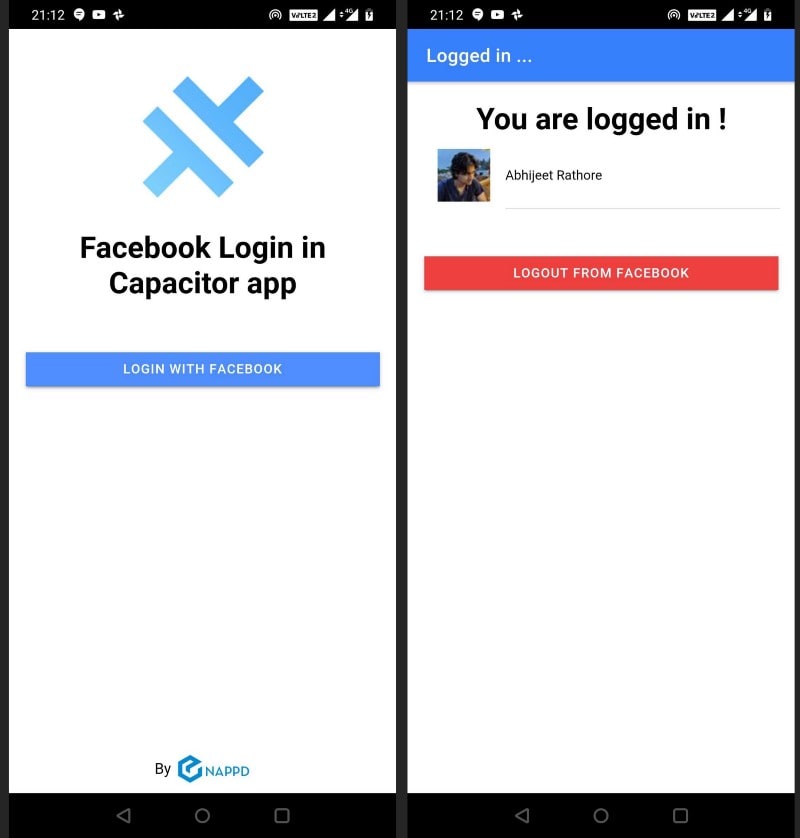
You won’t see much in the homepage created in the starter. Let’s modify this page to include a button, icon and a title for login. Also, I have created a Homepage, where the user is redirected after successful login. The user profile information in this page comes after login and single API call.
The code for this can be found in the attached Github repository.
Step 2 — Attach Capacitor to your Ionic app
Capacitor can be attached to an existing Ionic app as well. To attach Capacitor to your existing Ionic app, run
$ ionic integrations enable capacitor
This will attach Capacitor to your Ionic app. After this, you have to init the Capacitor app with
$ npx cap init
It will ask you the app name and ID. Give app name whatever you want. App ID is the domain identifier of your app (ex: com.example.app). Note this ID as this will be required later when you create app in Facebook developer console.
Step 3 — Create a Facebook app in Developer console
Next, we need to create a new app in Facebook’s developer dashboard. This app is the one that Facebook will use to ask our users for permission, when we try to log them into our Ionic app.
Go to Facebook developer console and create a new app.

Once you finish creating the app, go to Facebook app dashboard and pick App Id from there. It will be required for Facebook login in the Ionic app

Add your Platform to Facebook
We need to let Facebook know which platforms we’ll be using (if it’s just web, iOS, or Android).
For sample purpose, let’s add Android and iOS platforms .
To add the platform, go ahead inside your Facebook dashboard and click on Settings, go to the bottom of the page and you’ll see a button that says Add Platform.
You’ll see several options for the platforms you’re creating
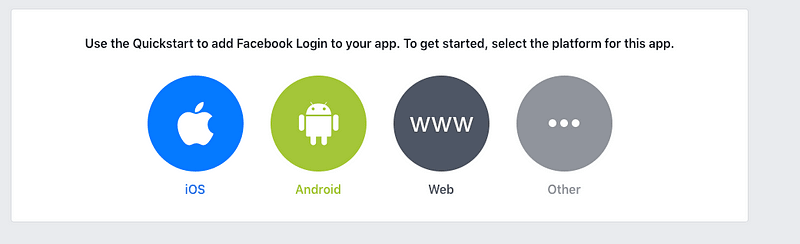
iOS :- You’ll see a form asking you for some information, right now we just need the Bundle ID. You bundle ID is same as the app ID you supplied to capacitor in Step 2.
Once you add the Bundle ID, just follow the process to create the app.
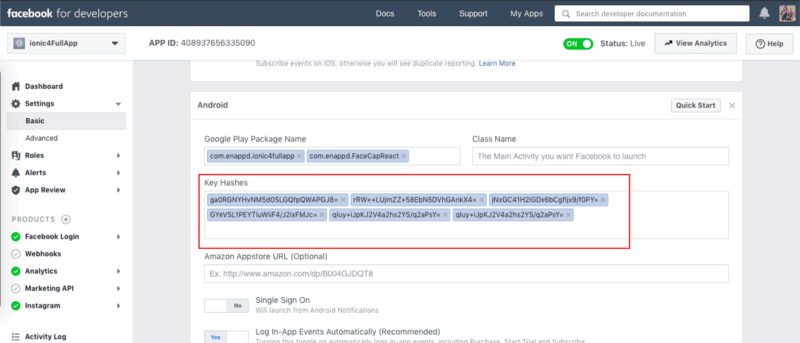
Android :- The difference is that instead of Bundle ID, Facebook calls it “Google Play Package Name” in case of Android.
Add/Generate Key Hash
Since Capacitor builds production builds, it signs your Android app with debug.keystore . When you try to login via Facebook, Facebook needs to know the Key Hash of your system to ensure it’s you who compiled the app. You can add more than one Key Hash as well.
Windows System: (Details here)
$ keytool -exportcert -alias androiddebugkey -keystore "C:\Documents and Settings\Administrator.android\debug.keystore" | "C:\OpenSSL\bin\openssl" sha1 -binary |"C:\OpenSSL\bin\openssl" base64
Mac System: (Details here)
keytool -exportcert -alias androiddebugkey -keystore debug.keystore | openssl sha1 -binary | openssl base64
Hacky solution to know Keyhash:
If you don’t want to go through all this hassle, just continue reading the post. Once you build the app in android device and try to login via Facebook, it will show you an error saying
“xxxxxxxxxxx hash key does not match any saved Hash keys”
At this point, copy the hash-key from the error, and save it in Facebook developer console. 😎
Step 4 — Setup Facebook Login Plugin and functions
To setup Facebook login in the app, we’ll do following things
4.1 Install Capacitor Facebook Login plugin
4.2 Setup plugin functions for login
4.3 Enable routing between two pages of the app
4.4 Control navigation via login / logout from Facebook
4.1 Install Capacitor Facebook Login plugin
Install the plugin using
$ npm i --save @rdlabo/capacitor-facebook-login
After this, build your app using following commands
// Build web assets
$ ionic build
Add Android platform to the app
// Add android platform
$ npx cap add android
After this, if you make any changes to the code or assets, you can copy all that in Android platform using
// Copy all changes to Android platform
$ npx cap sync
To build the app from Android Studio, open the editor using
// Open the project in Android studio
$ npx cap open android
In Android studio, locate file android/app/src/main/java///MainActivity.java, and add the plugin to the initialization list:
this.init(savedInstanceState, new ArrayList<Class<? extends Plugin>>() {{<br> ...<br> <strong class="markup--strong markup--pre-strong">add(jp.rdlabo.capacitor.plugin.facebook.FacebookLogin.class);</strong><br> ...<br>}});
In file android/app/src/main/AndroidManifest.xml, add the following XML elements under <manifest><application> :
<meta-data android:name="com.facebook.sdk.ApplicationId"
    android:value="@string/facebook_app_id"/>
<activity
    android:name="com.facebook.FacebookActivity"    android:configChanges="keyboard|keyboardHidden|screenLayout|screenSize|orientation"
    android:label="@string/app_name" />
<activity
    android:name="com.facebook.CustomTabActivity"
    android:exported="true">
    <intent-filter>
        <action android:name="android.intent.action.VIEW" />
        <category android:name="android.intent.category.DEFAULT" />
        <category android:name="android.intent.category.BROWSABLE" />
        <data android:scheme="@string/fb_login_protocol_scheme" />
    </intent-filter>
</activity>
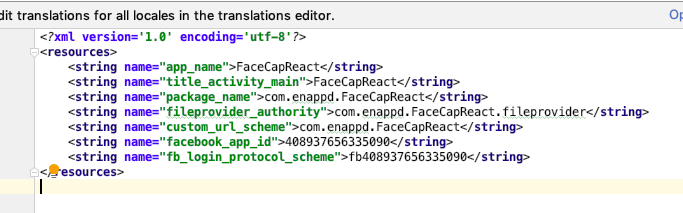
And, in file android/app/src/main/res/values/strings.xml add the following lines :
<string name="facebook_app_id">[APP_ID]</string>
<string name="fb_login_protocol_scheme">fb[APP_ID]</string>
Replace [APP_ID] by your Facebook application Id. Here’s how it looks like
4.2 Setup plugin functions for login
We have to setup four major functions for Facebook functionality
- Login
- Logout
- Check if user is logged in (for auto-log in)
- Get user profile information
Login page will have #1 and #3 functions, while the inner page (Home) will have #2 and #4.
Login Page
The complete code for Login Page looks like this
Some basic things
const FACEBOOK_PERMISSIONS = ['public_profile', 'email'];
asks for permission during login. This is the basic permission, but you can ask for more permissions.
let user = { token: result.accessToken.token, userId: result.accessToken.userId }
let navigationExtras: NavigationExtras =
{queryParams: {userinfo: JSON.stringify(user)}};
this.router.navigate(["/home"], navigationExtras);
Here, navigationExtras field contains navigation params . These will be accessed in next page from the ActivatedRouteobject .
Also, getCurrentState function gets the currentState of user. If the user logged in once, and closed the app without logging out, the state will still remain Logged In. That means, getCurrentState function will get the current state and auto-login the user.
Home Page
The complete code for Home Page looks like this
The userID and token sent from first page is accessed via this.route.queryParams object, where this.route is the ActivatedRoute
4.3 Enable routing between two pages of the app
The routes are defined in app-routing.module file like this
const routes: Routes = [
 { path: '', redirectTo: 'login', pathMatch: 'full' },
 { path: 'home', loadChildren: () =>  import('./home/home.module').then(m => m.HomePageModule) },
 { path: 'login', loadChildren: () => import('./login/login.module').then(m => m.LoginPageModule) }
]
4.4 Control navigation via login / logout from Facebook
Once user is successfully logged in, we want to redirect to Home page. And when user logs out, we want to come back to Login page.
On both pages, we use the following to redirect to pages. ExtraInfo carries info from one page to another in form of string
this.router.navigate(["/pageUrl"], ExtraInfo);
Step 5 — Build and Test your app on Android
At this point, you have all the Facebook Login stuff built-in, Android app setup and Facebook app also setup. Build the app once again after all changes using
// Build web assets
$ ionic build
// Copy all changes to Android platform
$ npx cap sync
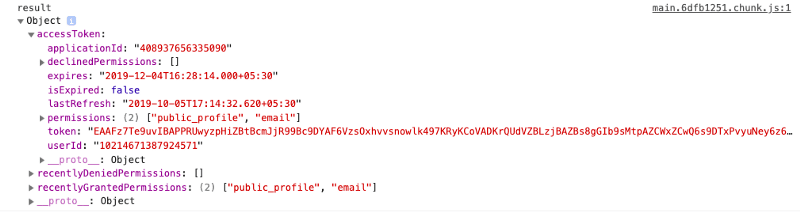
Build the app on Android device using Android studio. You should be able to login via Facebook, and reach the inner page where you see the user information. Following GIF shows the login flow in my OnePlus device

The login success response looks like following
When you call the graph API to fetch user’s profile picture, the response looks like this
{
   "id": "10214671387924571",
   "name": "Abhijeet Rathore",
   "picture": {
      "data": {
         "height": 50,
         "is_silhouette": false,
         "url": "https://platform-lookaside.fbsbx.com/platform/profilepic/?asid=10214671387924571&height=50&width=50&ext=1572869974&hash=AeSvjMz4Wkb3Y1dY",
         "width": 50
   }
}
Congratulations !! You have successfully integrated Facebook login in your Ionic Angular Capacitor app. 🎉
Conclusion
In this post you learnt how to implement Facebook login in your Ionic Capacitor app in Angular. Social logins are very important part of your apps, as they make users trust your apps more. It is also easy to use, and users don’t have to remember any passwords. You can always link the Social logins with your server as well. Firebase has a ready-to-integrate solution for this.
Code for this tutorial is available on Github repo ionic-angular-capacitor-facebook-login
Next Steps
Now that you have learned the implementation of Facebook Login in Ionic Capacitor app in Angular, you can also try following blogs for other Ionic apps
Ionic Angular Capacitor
- Music Player
- Create HTML5 games in Ionic Capacitor apps using Phaser
- Barcode and QR code scanning in Ionic Capacitor apps
If you need a base to start your next Capacitor app, you can make your next awesome app using Capacitor Full App

Ionic React Capacitor
- Facebook Login in Ionic React Capacitor apps
- Twitter Login in Ionic React Capacitor apps
- Google Login in Ionic React Capacitor apps
- How to make basic apps in ionic-react-capacitor
- Camera and Image gallery in Ionic-React-Capacitor
- Push notification in Ionic-React-Capacitor apps
- Adding Icon and Splash in Ionic React Capacitor apps
If you need a base to start your next Ionic 4 React app, you can make your next awesome app using Ionic React Full App

Ionic Angular Cordova
- Ionic 4 Payment Gateways — Stripe | PayPal | Apple Pay | RazorPay
- Ionic 4 Charts with — Google Charts | HighCharts | d3.js | Chart.js
- Ionic 4 Social Logins — Facebook | Google | Twitter
- Ionic 4 Authentications — Via Email | Anonymous
- Ionic 4 Features — Geolocation | QR Code reader | Pedometer
- Media in Ionic 4 — Audio | Video | Image Picker | Image Cropper
- Ionic 4 Essentials — Native Storage | Translations | RTL
- Ionic 4 messaging — Firebase Push | Reading SMS
- Ionic 4 with Firebase — Basics | Hosting and DB | Cloud functions
If you need a base to start your next Ionic 4 Angular app, you can make your next awesome app using Ionic 4 Full App


Top comments (0)