
The Raspberry Pi, developed by the Raspberry Pi Foundation in the UK, is an ARM-based microcomputer motherboard. It provides a USB interface and Ethernet interface to connect the keyboard, mouse and network cable. The motherboard has the basic functions of a PC, while Raspberry Pi has integrated Wi-Fi, Bluetooth and many GPIOs, and is widely used in teaching, home entertainment, IoT, etc.
MicroPython is a complete software implementation of the Python 3 programming language, written in C and optimized for a full Python compiler and runtime system running on top of MCU (microcontroller unit) hardware, providing the user with an interactive prompt (REPL) to immediately execute the supported commands. In addition to selected core Python libraries, MicroPython includes modules that give programmers access to low-level hardware, and is a streamlined implementation of the Python 3 language that includes a small portion of the Python standard library optimized to run on microcontrollers and in constrained environments.
MQTT is a lightweight IoT messaging protocol based on a publish/subscribe model that provides real-time reliable messaging to connected devices with minimal code and bandwidth, making it suitable for devices with limited hardware resources and network environments with limited bandwidth. Therefore, the MQTT protocol is widely used in IoT, Mobile Internet, Smart Hardware, Telematics, Power, Energy and other industries.
In this article, we will discuss how to write a simple MQTT client on Raspberry Pi using MicroPython, and implement the functions of connecting, subscribing and publishing between the client and MQTT broker.
Environment Setup
1.Install MicroPython
This project uses MicroPython for development, you can use the following command to install it.
   sudo apt-get update
   # Install MicroPython
   sudo apt-get -y install micropython
After the installation is complete, execute micropython in the terminal, and if MicroPython x.x.x (x means number) is returned, the installation is successful.

2.Install the MQTT client library
In order to easily connect to the MQTT server, we need to install the umqtt.simple library.
micropython -m upip install umqtt.simple
Connecting to the MQTT broker
This article will use the free public MQTT broker provided by EMQ, which was created based on the MQTT Cloud Service - EMQX Cloud. The broker access information is as follows.
- Broker:
broker.emqx.io - TCP Port:
1883 - Websocket Port:
8083
Subscribe
Open any editor, type the following code and save it as a sub.py file:
# sub.py
import time
from umqtt.simple import MQTTClient

SERVER="broker.emqx.io"
ClientID = f'raspberry-sub-{time.time_ns()}'
user = "emqx"
password = "public"
topic = "raspberry/mqtt"
msg = b'{"msg":"hello"}'

def sub(topic, msg):
    print('received message %s on topic %s' % (msg, topic))

def main(server=SERVER):
    client = MQTTClient(ClientID, server, 1883, user, password)
    client.set_callback(sub)
    client.connect()
    print('Connected to MQTT Broker "%s"' % (server))
    client.subscribe(topic)
    while True:
        if True:
            client.wait_msg()
        else:
            client.check_msg()
            time.sleep(1)

if __name__ == "__main__":
    main()
Publish
Open any editor, type the following code, and save it as a pub.py file:
# pub.py
import time
from umqtt.simple import MQTTClient

server="broker.emqx.io"
ClientID = f'raspberry-pub-{time.time_ns()}'
user = "emqx"
password = "public"
topic = "raspberry/mqtt"
msg = b'{"msg":"hello"}'

def connect():
    print('Connected to MQTT Broker "%s"' % (server))
    client = MQTTClient(ClientID, server, 1883, user, password)
    client.connect()
    return client

def reconnect():
    print('Failed to connect to MQTT broker, Reconnecting...' % (server))
    time.sleep(5)
    client.reconnect()

try:
    client = connect()
except OSError as e:
    reconnect()

while True:
  print('send message %s on topic %s' % (msg, topic))
  client.publish(topic, msg, qos=0)
  time.sleep(1)
In the above codes, we call the publish() function to send a message to the topic raspberry/mqtt. The parameter QoS is another MQTT feature. To learn more about QoS, please see the Introduction to MQTT QoS (Quality of Service). In this example we set it to 0.
Testing
We use the MQTT 5.0 client tool - MQTT X to perform the following tests.
Test Subscribe
1.Open a terminal, run the MicroPython code, and listen for messages.
micropython sub.py

2.Use the MQTT X client to connect with the MQTT server and send messages to the topic raspberry/mqtt.

3.Check the Raspberry Pi terminal information and you will see that the MQTT X publish messages have been successfully received.

Test Publish
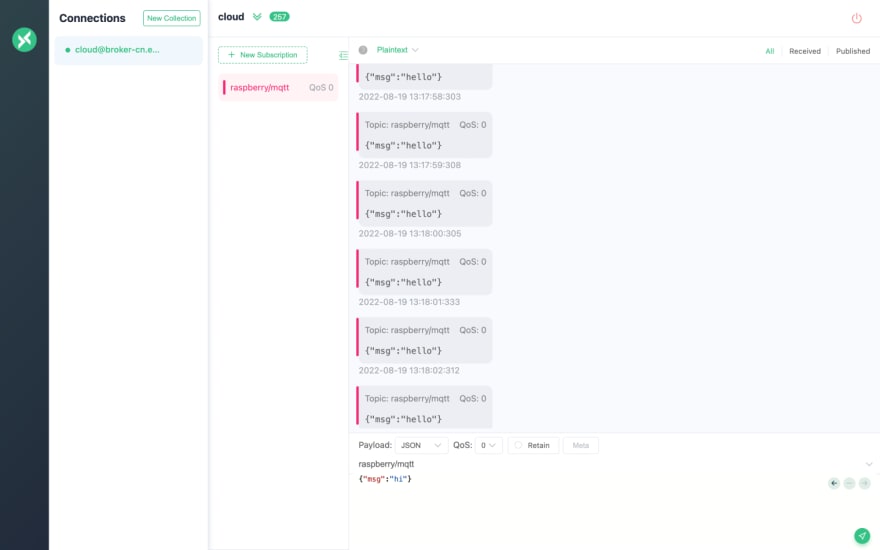
1.Subscribe to the raspberry/mqtt topic in the MQTT X client.
2.Run the MicroPython code in the terminal and publish the message.
micropython pub.py

3.In the MQTT X client, view the messages sent by the Raspberry Pi.
Summary
This is a simple example of programming with MicroPython on a Raspberry Pi. We implemented a simple test client with MicroPython umqtt.simple, and completed the connection and message sending and receiving between the client and the MQTT server. The biggest advantage of MQTT is that it provides real-time reliable messaging services for connected remote devices with very little code and limited bandwidth, while the Raspberry Pi is a small, low heat, low energy, and relatively comprehensive hardware module. Combining the two can help you develop more innovative applications, even in microcontrollers or constrained environments.
Originally published at https://www.emqx.com.


Top comments (0)