Python is an interpreted, high-level, general-purpose programming language. Created by Guido van Rossum and first released in 1991, Python's design philosophy emphasizes code readability with its notable use of significant whitespace. Its language constructs and object-oriented approach aim to help programmers write clear, logical code for small and large-scale projects.1
MQTT is a kind of lightweight IoT messaging protocol based on the publish/subscribe model, which can provide real-time and reliable messaging service for IoT devices, only using very little code and bandwidth. It is suitable for devices with limited hardware resources and the network environment with limited bandwidth. Therefore, MQTT protocol is widely used in IoT, mobile internet, IoV, electricity power, and other industries.
This article mainly introduces how to use the paho-mqtt client and implement connection, subscribe, messaging, and other functions between the MQTT client and MQTT broker, in the Python project.
Project Initialization
This project uses Python 3.6 to develop and test. Readers can use the following command to confirm the Python version.
➜  ~ python3 --version
Python 3.6.7
Choose the MQTT Client
The Paho Python Client provides a client class with support for both MQTT v3.1 and v3.1.1 on Python 2.7 or 3.x. It also provides some helper functions to make publishing one off messages to an MQTT server very straightforward.
Using Pip to Install the Paho MQTT Client
Pip is a management tool for the Python package. This tool provides find, download, install and uninstall functions for Python package.
pip3 install paho-mqtt
The Use of Python MQTT
Connect to the MQTT Broker
This article will use the free public MQTT broker provided by EMQX. This service is based on MQTT IoT cloud platform to create. The accessing information of the broker is as follows:
- Broker: broker.emqx.io
- TCP Port: 1883
- Websocket Port: 8083
Import the Paho MQTT Client
from paho.mqtt import client as mqtt_client
Set the Parameter of MQTT Broker Connection
Set the address, port and topic of MQTT Broker connection. At the same time, we call the Python function random.randint to randomly generate the MQTT client id.
broker = 'broker.emqx.io'
port = 1883
topic = "/python/mqtt"
client_id = f'python-mqtt-{random.randint(0, 1000)}'
# username = 'emqx'
# password = 'public'
Write the MQTT Connect Function
Write the connect callback function on_connect. This function will be called after connecting the client, and we can determine whether the client is connected successfully according to rc in this function. Usually, we will create an MQTT client at the same time and this client will connect to broker.emqx.io.
def connect_mqtt():
    def on_connect(client, userdata, flags, rc):
        if rc == 0:
            print("Connected to MQTT Broker!")
        else:
            print("Failed to connect, return code %d\n", rc)
    # Set Connecting Client ID
    client = mqtt_client.Client(client_id)
    client.username_pw_set(username, password)
    client.on_connect = on_connect
    client.connect(broker, port)
    return client
Publish Messages
First, we define a while loop. In this loop, and we will set the MQTT client publish function to send messages to the topic /python/mqtt every second.
 def publish(client):
     msg_count = 0
     while True:
         time.sleep(1)
         msg = f"messages: {msg_count}"
         result = client.publish(topic, msg)
         # result: [0, 1]
         status = result[0]
         if status == 0:
             print(f"Send `{msg}` to topic `{topic}`")
         else:
             print(f"Failed to send message to topic {topic}")
         msg_count += 1
Subscribe
Write the message callback function on_message. This function will be called after the client received messages from the MQTT Broker. In this function, we will print out the name of subscribed topics and the received messages.
def subscribe(client: mqtt_client):
    def on_message(client, userdata, msg):
        print(f"Received `{msg.payload.decode()}` from `{msg.topic}` topic")

    client.subscribe(topic)
    client.on_message = on_message
The Full Code
The Code of Publishing Messages
# python 3.6

import random
import time

from paho.mqtt import client as mqtt_client


broker = 'broker.emqx.io'
port = 1883
topic = "python/mqtt"
# generate client ID with pub prefix randomly
client_id = f'python-mqtt-{random.randint(0, 1000)}'
# username = 'emqx'
# password = 'public'

def connect_mqtt():
    def on_connect(client, userdata, flags, rc):
        if rc == 0:
            print("Connected to MQTT Broker!")
        else:
            print("Failed to connect, return code %d\n", rc)

    client = mqtt_client.Client(client_id)
    client.username_pw_set(username, password)
    client.on_connect = on_connect
    client.connect(broker, port)
    return client


def publish(client):
    msg_count = 0
    while True:
        time.sleep(1)
        msg = f"messages: {msg_count}"
        result = client.publish(topic, msg)
        # result: [0, 1]
        status = result[0]
        if status == 0:
            print(f"Send `{msg}` to topic `{topic}`")
        else:
            print(f"Failed to send message to topic {topic}")
        msg_count += 1


def run():
    client = connect_mqtt()
    client.loop_start()
    publish(client)


if __name__ == '__main__':
    run()
The Code of Subscribing
# python3.6

import random

from paho.mqtt import client as mqtt_client


broker = 'broker.emqx.io'
port = 1883
topic = "python/mqtt"
# generate client ID with pub prefix randomly
client_id = f'python-mqtt-{random.randint(0, 100)}'
# username = 'emqx'
# password = 'public'


def connect_mqtt() -> mqtt_client:
    def on_connect(client, userdata, flags, rc):
        if rc == 0:
            print("Connected to MQTT Broker!")
        else:
            print("Failed to connect, return code %d\n", rc)

    client = mqtt_client.Client(client_id)
    client.username_pw_set(username, password)
    client.on_connect = on_connect
    client.connect(broker, port)
    return client


def subscribe(client: mqtt_client):
    def on_message(client, userdata, msg):
        print(f"Received `{msg.payload.decode()}` from `{msg.topic}` topic")

    client.subscribe(topic)
    client.on_message = on_message


def run():
    client = connect_mqtt()
    subscribe(client)
    client.loop_forever()


if __name__ == '__main__':
    run()
Test
Publish Messages
Run the code of publishing messages, we will see that the client connects successfully and publishes messages successfully
python3 pub.py

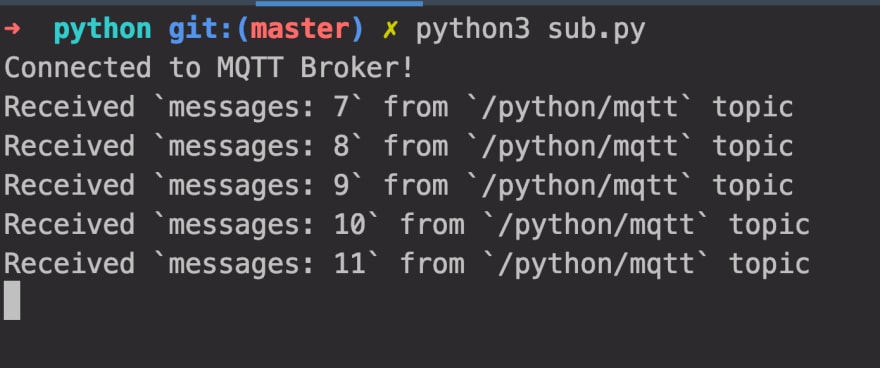
Subscribe
Run the code of subscribing to messages, we will see that the client connects successfully and receives the published messages successfully
python3 sub.py
Summary
So far, we have finished that use the paho-mqtt client to connect to the free public MQTT broker, and implemented the connect, publish messages and subscribe to messages between the test client and MQTT broker.
Python is different from the high-level languages like C++ or Java, it is more suitable for implementing the business logic on the device side. Using Python can reduce the logic complexity of code and reducing the cost of interaction with the device. We believe that Python will have wider applications in the field of IoT.
Next, we will publish more articles about IoT development and Python. Stay tuned.


Top comments (0)