Arduino UNO is a small microcontroller programmable board just like a small pc that is used for running electronic components, like controlling motors, robots, and much more. It can be attached to the external circuit boards in an embedded system for running different operations. It is Mostly used in science projects, controlling Lad’s, motors, and actuators.

The main difference between microcontrollers and the Aurdino board is that Arduino boards are easy to handle and they are complete boards with GPO pins PWM, analog pins, and much more, Moreover, we don’t need excessive devices for their operation.
Different Aurdino boards are available in the market as per functionality but Arduino UNO is the most reliable and the easiest device for the users. A glimpse of Arduino is shown below.
Board Overview:
The board is consists of three types of memory known as flash memory, SRAM, and EEPROM memory, the flash memory is 32KB, while SRAM AND EEPROM are 2KB and 1KB memory slots. The microcontroller used in this system is Ategma 328. three is Pins are available just behind them to program the stigma microcontroller.

For external connection a 2.0 USB chips are installed, they are used for programming and exchanging data. The software system used for programming is known as Arduino IDE known as the integrated development system. 14 Input and output pin systems were also installed on the board, in which 6 pins were reserved PWN input.
The board has an external output power source unit through which it gets operated. the output source voltage is mostly 5V and the recommended input voltage is between 8-11v.
Main components.
Stigma 328:
it is also known as the brain of the Arduino, it is a microcontroller installed on the chipboard, it saves the programming and commands given to the audio. The stigma 328 also strolls the functionality of the Arduino when installed in embedded devices.
Pins :
There are several types of pins installed in the chipboard that are differentiated according to their functionality. From programming to Controlling devices they are used as per desire.
Input/ output pins :
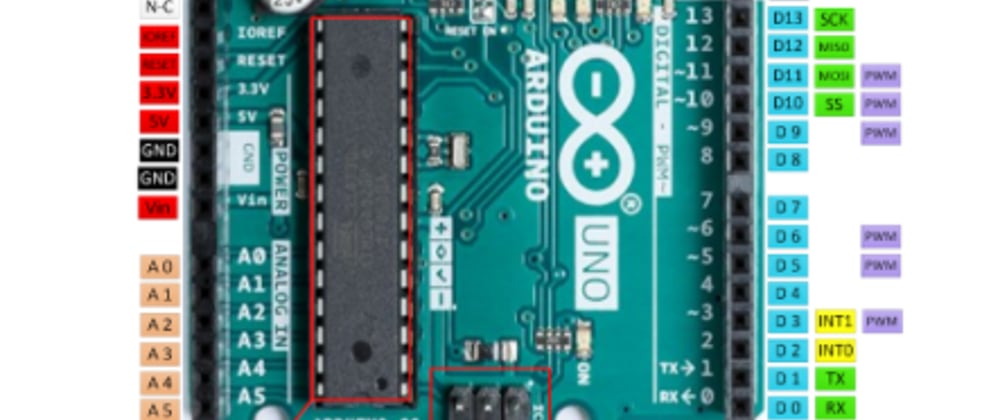
There are a total of 14 input and out pins that are available on the Arduino boards, they are available on both the right end and left end.
PWM PINS ;
Among these 14 pins, 6 pins are reserved for the PWM known as pulse width modulation, These pins are used when we used Arduino for controlling motors, actuators, LEDs.
Analog Pins: analog pins are used for the conversation of signals, they convert analog signals into digital signals. They are a total of 6 In number.
USB ports: used for external device connection.
Micro Sd card Port :
An SD card port is available on the board to store the information and commands. A Micro Sd card of any size can be installed in the device.
Power Sorce :
The power source of 5V can be attached to the device.
Power source LED :
A Power Source LED is installed on the board, that shows the connection of the device.
SPI:
SPI is known as Serial Peripheral Interface. These are a total of 4 pins known as 10(SS),11(MOSI),12(MISO),13(SCK).
Voltage Regulator AND VIN :
A voltage regulator controls the voltage that is supplied to the board, and it is attached to the VIN device known as voltage input.
Programming of Aurdino UNO :
Programming is the most key feature for the device to perform different functionality as per programmed. Arduino IDE is the official software introduced by the company to program this device, and it can only be programmed through this Software.
The program is a set of instructions, that were saved as per the work we are expected by the Arduino to perform. This programming code is known as a sketch in technical language.
There are two different types of sketch or programming save on aurdino.
Void LOOp:
As the name suggests it is a loop model and it is saved when we have to repeat a task done by the aurdino device.
Void setup :
If the Arduino is programmed to perform a task once in a cycle then it is known as Void setup.
How to install Drivers:
- When you attach the Aurdino device with the Computer system, the drivers were automatically installed if you use Windows 10 or XP, if you downloaded the zip file then you have to do some formalities such as.
- Firstly upon the device manager and go to go to the “ Arduino UNO “ if you can find it add it to other devices.
- Right-click the option and click update the software of the device, it will take you to a new window.
- From there choose the option “Arduino. inf” file and click ok if you are using an old version then it may be named “Arduino UNO.INF”.
The drivers started installing on the system.
- Now open the folder name as blink and go to the file section, then go to the example then to basis than to blink option.

- After that select the board type as mention below this option is available in the tools section, you will choose the option “Arduino UNO”.

- Now select the port type from where you want to operate it in the tools section. To locate the Port type or name you can have the device sketch in the menu section, But for that purpose, you firstly need to disconnect the board.


In the last stage go to the environment section then select the “Upload” button, the program starts uploading on the aurdino. When the desired program ends the LED light starts blinking, which signs that your device is ready to use. Now click the button Done Programming to end the procedure. Now disconnect the system and use the device as you need. Similarly you can delete the program and add another one through the same technique.


Top comments (0)