Introduction
In the previous article [How to use the Factory design pattern to create browser instances: the simple approach
(http://www.eliasnogueira.com/how-to-use-the-factory-design-pattern-to-create-browser-instances-the-simple-approach/), you have learned how to implement it. I’ve named it “simple” because the code created runs only locally, which is the simplest and most elegant way of using Java to do it.
Code explanation
To make this post/tutorial as short as possible I will refer, through links, to the existing code implementation where you can access and understand more about the solution applied.
Difference between local and remote execution
Local execution means the usage of the browser installed on the same machine you will run the tests, so we need the web browser and the browser drivers.
Remote execution means the execution of the tests in a different machine from the one you will trigger. This “machine” is actually any resource as a different real machine (bare-metal), a Docker container, or a remote service (E.g: SauceLabs, BrowserStack).
The technical differences in Selenium
In the local execution, we directly use the browser instance. Don’t forget you need also the browser driver and it can be easily configured using the WebDriverManager library.
// setting up the browser driver with the WebDriverManager library
WebDriverManager.getInstance(CHROME).setup();

// creating the local browser instance
WebDriver driver = new ChromeDriver();
The WebDriverManager will set up the Chrome driver and Selenium will look a the local Google Chrome installation and will use it to run your tests.
But, for the remote execution, things are a little bit different. You will need to:
- have the target machine URL
- use the RemoteWebDriver class, instead of the browser class with the following parameters:
- the URL for the target machine
- the “capability” to run
Code organization
Similar to the How to use the Factory design pattern to create browser instances: the simple approach article shows how to create a factory class to manage different browsers to run locally, we have now to create a way to determine when to run locally and when to run in a remote machine.
This is the class diagram that we will work on.
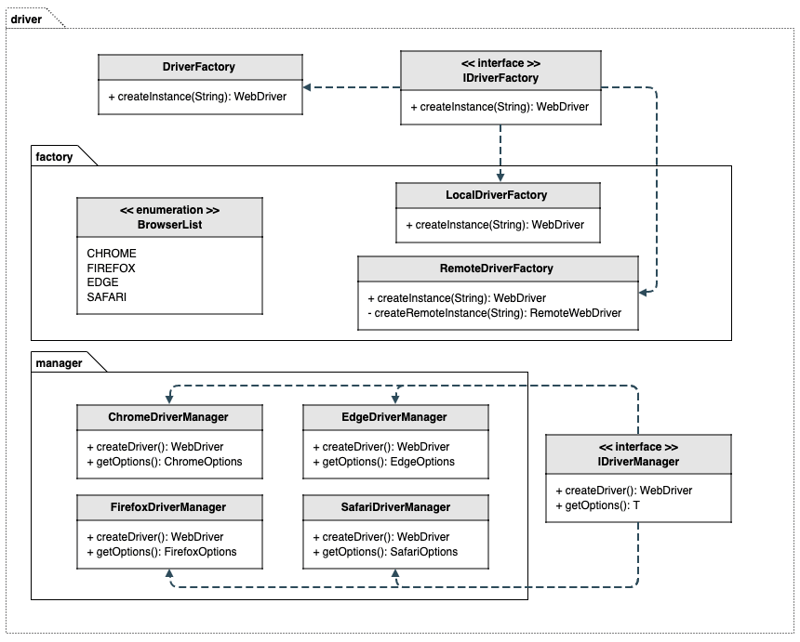
Diagram explanation
manager package
The IDriveManager is an interface that has the methods to implement in the manager classes. The manager classes have the implementation for the local, and now, remote execution.
The local execution is done by the method createDriver() and the remote execution is done by the getOptions() method. I will explain more about it later.
driver package
The DriverFactory class is the one responsible to know if the execution will be either local or remote. We manage this through a property value. Based on the target environment we will instantiate either the LocalDriverFactory or the RemoteDriverFactory. This class implemented the interface IDriverFactory.
factory package
The LocalDriverFactory class is responsible to create the local browser instance using the createDriver() method from the manager classes.
The RemoteDriverFactory class is responsible to create the remote browser execution using the getOptions() from the manager classes. The internal private method createRemoteInstance() will connect to the remote machine before the creation of the browser instance.
Implementation
I will explain here how to evolve code based on the simple approach. The following sub-items will explain it.
1. Manager the local and remote execution
New properties
The first thing we need to create is a way to run the test using either a local or remote machine. For the remote execution, we will need to parameterize the URL and port we will connect our tests. We also need to add a way to say when we need to execute it as local or remote.
The approach I’ve created is to add a new grid.properties file to add the Selenium Grid URL and port
# grid url and port
grid.url = localhost
grid.port = 4444
Note: the file is named grid, as well as the properties because the way to run Selenium tests in different machines implies the Selenium Grid features.
We also need to update the general.properties file to have the local property to tell, somehow, we can execute it locally or remote. Line 2 shows the new property.
Finally, in the Configuration class, you will see the new association to the new properties created in the gird.properties and general.properties. Also the load of the grid.properties in the @Config.Sources annotation from the Owner library.
New class to manage the local and remote execution
The previous DriverFactory was managing the local execution. Now, to maintain a better naming consistency, we are changing it to manage the execution into local or remote. It has a simple switch-case to instantiate the correct internal class.
public class DriverFactory implements IDriverFactory {

    @Override
    public WebDriver createInstance(String browser) {
        Target target = Target.valueOf(configuration().target().toUpperCase());
        WebDriver webdriver;

        switch (target) {
            case LOCAL:
                webdriver = new LocalDriverFactory().createInstance(browser);
                break;
            case REMOTE:
                webdriver = new RemoteDriverFactory().createInstance(browser);
                break;
            default:
                throw new TargetNotValidException(target.toString());
        }
        return webdriver;
    }

    enum Target {
        LOCAL, REMOTE
    }
}
Lines 21 to 23 show an internal enum named Target which has LOCAL and REMOTE as possible values.
Line 5 loads the target property from the general.properties file and converts it to Target enum, whereas line 8 applies a switch statement in the enum.
When the execution is from the local, the LocalDriverFactory class is in use to create the WebDriver instance based on the browser set in general.properties file. When the execution is remote the RemoteDriverFactory class is in use. The LocalDriverFactory class is the same as the previous DriverFactory from the basic-example branch.
New LocalDriverFactory
This class is identical to the previous DriverFactory. You can take a look at the implemented LocalDriverFactory class.
New RemoteDriverFactory class
We now have a new class to instantiate the different browsers for the remote execution. I will assume here you are already familiar with Selenium Grid, so I will skip the explanation of the code that creates the RemoteWebDriverInstance. If you need to learn more about it, please read the official Selenium Grid documentation and the code I’ve implemented for this solution.
Basically, we will have the same switch-case strategy for each browser compared to the LocalDriverFactory, but instead of instantiating the local browser, we need to instantiate the remote one.
@Override
public WebDriver createInstance(String browser) {
    MutableCapabilities capability;
    BrowserList browserToCreate = BrowserList.valueOf(browser.toUpperCase());

    switch (browserToCreate) {
        case CHROME:
            capability = new ChromeDriverManager().getOptions();
            break;
        case FIREFOX:
            capability = new FirefoxDriverManager().getOptions();
            break;
        case EDGE:
            capability = new EdgeDriverManager().getOptions();
            break;
        case SAFARI:
            capability = new SafariDriverManager().getOptions();
            break;
        default:
            throw new BrowserNotSupportedException(browser + "is not supported!");
    }

    return createRemoteInstance(capability);
}
Note that the RemoteDriverFactory class is now using the getOptions() method instead of the createDriver() from each manager driver class.
2. Additional getOptions() method in the driver manager classes
Each driver manager class will have, additionally, a new method to use when the execution is remote. As the RemoteWebDriver does not accept a browser instance directly, but a MutableCapabilities class, we need to specify the correlated option class of the browser.
Each browser has its own *Options class, like ChromeOptions, FirefoxOptions, and so on. Those classes exist for the remote execution and have pre-configured options as their identification plus methods that can extend their features. Internally the *Options classes have a hierarchy dependency on the MutableCapabilities class.
What we need to do is to add the getOptions() methods to each DriverManager class. This method must instantiate the related browser option and can add more features.
@Override
public ChromeOptions getOptions() {
    ChromeOptions chromeOptions = new ChromeOptions();
    chromeOptions.addArguments("--start-maximized");
    chromeOptions.addArguments("--disable-infobars");
    chromeOptions.addArguments("--disable-notifications");
    chromeOptions.setHeadless(configuration().headless());

    return chromeOptions;
}
The code above shows the getOptions() method for the ChromeDriverManager class where we are:
- creating an instance of its option on line 3
- adding additional arguments to the browser on lines 4 to 6
- setting it as headless based on the headless configuration value present in the
general.properties - returning the object instantiated to be used as the
RemoteWebDriver
You can see all the implemented DriverManager classes in the manager package.
How to run
The execution to local or remote will is based on the target property value in the general.properties file. We know that when the execution is local the DriverFactory will use the LocalDriverFactory class to create the local browser instance and when the execution is remote the DriverFactory will use the RemoteDriverFactory to create a remote browser instance.
Running it locally
Follow these steps:
- Open the
general.propertiesfile located insrc/test/java/resources - Change the
targetproperty value tolocal - Change the
browserproperty value to any browser you have installed - Run the
BookARoomWebTestclass
The expected result is the test being executed in your local machine for your set browser. This is the same way we did in the previous post.
Running it in a remote machine
Now things get more interesting. We need to find a way to execute the test on a remote machine. As written before a remote machine can be a physical or virtual machine existent in your network or a cloud provider. To be able to run it on your machine right now the Docker is one of your best choices.
The project has a docker-compose.yml file which will start a full Selenium Grid infrastructure containing the sessions, distributors, router, event bus, and the browsers. You can learn more about the Selenium Grid 4 on their official page and in their GitHub project.
As a pre-condition, you need to have Docker installed on your machine and then follow these steps:
- Start Docker
- Navigate, through your Command-Line/Terminal app to the project root folder
- Run
docker-compose upcommand - Access http://localhost:4444 to see the Selenium Grid page with the browsers available (Chrome, Edge, and Firefox)
- In the
general.propertiesfile, change thetargetattribute value toremote- the
grid.propertiesfile insrc/main/java/resourcesalready have the values to connect to a local grid
- the
- Run the
BookARoomWebTest- you can go to the Selenium Grid dashboard and click on the Sessions tab
- as soon as the test starts a session related to the browser in use will be listed
The complete example
You can navigate to the following GitHub repo to see a complete and functional example in the branch local-remote-example. Spare some time to look at the new classes added and understand how it was structured.
https://github.com/eliasnogueira/selenium-java-browser-factory/tree/basic-example


Top comments (0)