At the beginning of the year, I didn’t have a website. So I had “build a personal website” as one of my 2018 goals. By the last week of December 2018... I still don't have a website. Follow me as I build a simple landing page just so I can check at least one goal this year! 🤦🏽♀️✅
Previously:

Now, I'm going to set up my website with Gatsby by modifying the gatsby-starter-morning-dew starter site into my own site.
Choosing Gatsby
Gatsby is a wildly popular static(ish)* site generator running on React. I’ve been using it for an ongoing project and—like every developer and their uncle (and aunt, and cousins)—I find it impressive.
Some of Gatsby’s strong points are:
- super fast 🚀 (SSR, code splitting, prefetching, image optimization, etc)
- stellar documentation
- great community & ecosystem
- great developer experience (complex and powerful but designed to work out of the box with well-thought-out configurations and functionalities that do the heavy lifting for common use cases, thus easing developers' workload)
- flexibility to use any data source (local files, API, other CMS or database)
*) Gatsby compiles into static assets but utilizes “dynamic” capabilities of a regular React site where needed.
The hype aside, why am I building my personal site with Gatsby?
- Who can say no to super fast website?
- I can use Markdown files as data source.
- This is ideal as I can update my site without CMS, databases, or external API calls. Whenever I want to make a new post, I can open a text editor, type, save, build, and deploy. (I use VSCode so I can do all those in literally one single window!)
- I understand the basics of both React and Gatsby, but I’d like to get a stronger grasp of how they work.
- Gatsby provides integration with various modern front-end tools/libraries I’d like to learn down the road.
For this site, I will not be installing Gatsby from scratch, but rather from a boilerplate commonly known as a “starter site”.
Choosing and installing a Gatsby starter site

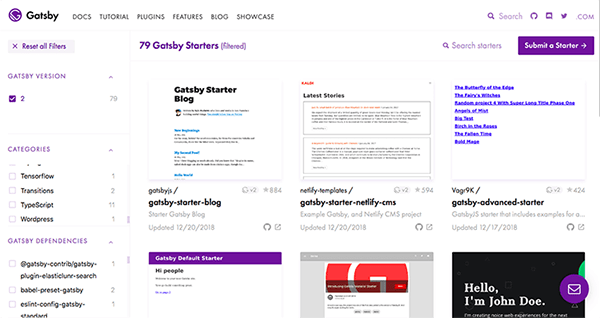
One of the cool things about the Gatsby ecosystem is the abundance of starter sites. Starter sites are time-saving and ideal for learning best practices of particular tools. You can filter the starters by technologies, dependencies, and keywords.
💡 Side note: The opposite approach, setting up a site from scratch and adding dependencies yourself, is ideal for familiarizing yourself with Gatsby’s basics.
Using starter sites is also a good way to pick up common front-end tools. You can check the scripts object in the package.json file. There are helpful commands for linting, formatting, cleaning, testing, and even checking your English! Were I to learn these tools separately on my own, it would take much more time—and willpower—than it took me to simply check package.json files and run, copy, modify as needed.
"scripts": {
  "develop": "gatsby develop",
  "serve": "gatsby serve",
  "build": "gatsby build",
  "build:pp": "gatsby build --prefix-paths",
  "build:gh": "npm run clean && npm run build:pp && gh-pages -d public",
  "clean": "rm -rf .cache && rm -rf public",
  "lint": "npm run lint:js && npm run lint:css && npm run lint:md",
  "lint:js": "eslint --ext .js,.jsx --ignore-pattern public --ignore-pattern static .",
  "lint:css": "stylelint --fix 'src/**/*.css'",
  "lint:md": "remark content/posts/",
  "write-good": "write-good $(glob 'content/posts/**/*.md')",
  "format:js": "prettier '**/*.{js,jsx}' --write",
  "release": "standard-version -a"
}
On the other hand, the large pool of starter sites might be overwhelming. To prevent being paralyzed by overchoice, I narrowed down my search criteria to these features:
- Post tags for the Blog section
- SEO metadata template with Helmet
- PWA (Manifest and Offline plugins)
- Linter and formatter (Prettier)
After spending almost two whole days dithering, I narrowed my search to:
- gatsby-advanced-starter by Vagr9K
- gatsby-v2-starter-casper by GatsbyCentral
- gatsby-starter-hero-blog by Greg Lobinski
- gatsby-v2-tutorial-starter by Justin Formentin
- gatsby-starter-morning-dew by Maxence Poutord
These starters have the features I want, so I just installed all five (yeah, I know… 😆). Only four could run, and I played with them briefly. I finally chose gatsby-starter-morning-dew because its architecture is closest to my needs and it has extra features such as generating social media preview image and siteConfig object that stores all site metadata in one single JSON file. Neat!
 maxpou
/
gatsby-starter-morning-dew
maxpou
/
gatsby-starter-morning-dew
🚀 A Gatsby theme/starter to build lightning-fast blog/websites

gatsby-starter-morning-dew

Features
-
💜 Gatsby v3 / React 16 -
🔍 SEO optimized -
💌 Write posts/pages in Markdown or MDX-
🎨 Code syntax highlight -
📚 Multilang support/i18n (blog post)
-
-
📱 Mobile Friendly (Responsive design) -
🌜 Dark mode -
✨ PWA ready-
✈️ Offline support -
📃 Manifest support
-
🔧 Fully configurable (see data/siteConfig.js)-
💬 Disqus support -
💅 css-in-js (with styled-components v5) -
🔖 Groups post with tags -
🐦 post preview image generation (Twitter, Facebook...) -
💎 Developer tools- eslint
- prettier
-
👷 Travis CI support
Installation (starter)
- with Gatsby-cli:
npm install --global gatsby-cli
gatsby new gatsby-blog https://github.com/maxpou/gatsby-starter-morning-dew
- without Gatsby-cli
git clone my-site git@github.com:maxpou/gatsby-starter-morning-dew.git
cd my-site
npm install
Then run npm run develop to try it locally.
Installation (theme)
You can also use gatsby-starter-morning-dew as a Gatsby theme!
- Add the theme
npm install…As I already have the Gatsby CLI installed, I just run the following commands in the CLI:
gatsby new ekaaa https://github.com/maxpou/gatsby-starter-morning-dew # creates a directory called `ekaaa` and install the starter site there

cd ekaaa # change directory

yarn install # install dependencies

gatsby develop # test if everything works
The app compiles successfully and I can view it at http://localhost:8000 in the browser. Yay, I’ve got a Gatsby web app!
Next, I’m going to examine the app architecture so I know what goes where, and modify the files to suit my needs. For now, I’m just going to modify app/site architecture—I’ll be working on the UI components in the next post.
💡 Tip: You can have your own website up and running just by changing the starter site details (title, author name, etc), adding your content in Markdown files, changing styles (colours, typography), and deploying—no further actions necessary. However, I personally find making further modifications to a starter site a fun way to improve my skills, even if I don’t fully understand everything yet. If this is your first time, I recommend starting from React and Gatsby official docs.
Examining the starter site architecture
Here is the files and folder structure of my chosen starter site. I left off miscellaneous configuration files that I don’t need for now.
├── content # Markdown and images content
│   ├── pages
│   └── posts
├── data # Site metadata and custom configuration
├── scripts # Custom script (generate preview image)
├── src
│   ├── assets # Maybe non-content images?
│   ├── components
│   ├── pages # 404 and custom pages
│   └── templates # Dynamically generated page templates (eg. Blog Post, Tag List)
├── static # Site images (logo, favicon, etc) and robots.txt
├── gatsby-config.js # App & plugins configuration
└── gatsby-node.js # Generate pages dynamically (post list, posts, default pages, post list by tags)
-
Blog Posts are generated by creating a Markdown file in
content/postsdirectory. It uses the post template insrc/templates/blog-post.js.- For example, adding
hello-world.mdwithslug: hello-worldautomatically creates a post at http://localhost:8000/hello-world and adds it to the Posts List Page.
- For example, adding
-
Default Pages are generated by creating a Markdown file in
content/pages. It uses the default page template insrc/templates/page.js.- For example, creating
contact.mdwithslug: contactautomatically creates a page at http://localhost:8000/contact. - Two pages of this type are provided out of the box, About and Installation. Posts List Page is automatically generated containing all Blog Posts excerpts. It has built-in pagination feature.
- For example, creating
-
Tag Pages are automatically generated for each
tagsitem in the Blog Posts’ frontmatter.- If you have a tag called eg. “javascript”, you can access that tag at http://localhost:8000/tags/javascript
- All the pages above are dynamically generated and populated using Gatsby’s
onCreateNodeandcreatePagesAPI ingatsby-node.js.- This starter uses Markdown and image data source via the gatsby-transformer-remark and gatsby-transformer-sharp plugins, but you can add any additional data sources you need.
- Pages can also be generated with custom template and data by creating a React component file in
src/pages.- For example, creating
contact.jsthat exports a default componentContactPagealso creates a page at http://localhost:8000/contact, but renders this component instead of the default page template. - Currently this directory only contains
404.js, which is automatically rendered for 404 error page
- For example, creating
- Site-wide settings (including navigation menu) can be configured in
data/siteConfig.js. - All other components (Layout, SEO, UI components) are in
src/componentsdirectory.
💡 Side note: Read more about Markdown text format and front matter if you’re not familiar with them.
Modifying the starter site
1) Blog (Posts List) page
I’m changing the “Posts List” page route from / (root) to /blog so I could make a custom landing page afterwards. I simply edit the path in gatsby-node.js.
// gatsby-node.js
Array.from({ length: nbPages }).forEach((_, i) => {
  createPage({
    path: i === 0 ? `/blog` : `/blog/page/${i + 1}`,
    component: ListPostsTemplate,
    context: {
      limit: postsPerPage,
      skip: i * postsPerPage,
      currentPage: i + 1,
      nbPages: nbPages,
    },
  })
})
Don’t forget to change the “next/previous page” link in Pagination component.
// src/components/Pagination.js
const previousUrl = currentPage === 2 ? '/blog' : `/blog/page/${currentPage - 1}`
return (
  // ...
    <NextBtn to={`/blog/page/${currentPage + 1}`}>Older posts ›</NextBtn>
  // ...
)
Result: The view is still the starter site’s default, but the route changes to /blog, /blog/page/2, etc.

2) Home (Landing) page
This is the only part I aim to deliver for the first iteration of my website this year (ie. in the next five days). I’m making a custom landing page that contains:
- Intro & Body text
- 2 latest posts
- 5 latest projects
- 1 randomized quote
Step 0: Open localhost:8000 and get 404 error page (because I already changed the Post List route to /blog).
Step 1: Make a custom page template called index.js in src/pages/ directory. I copied the content from existing page template 404.js and modified it slightly. Open localhost:8000, now the new template is loaded.
Step 2: Make a file landing.md in content/pages/ directory. This file holds content specific to the landing page.
--------
slug: landing
type: page
description: Enter landing page intro text here
quotes: [
  {
    'quoteBody': 'The quick brown fox jumped over the lazy dog.',
    'quoteSource': 'Anonymous'
  },
--------

Enter landing page body text here
Step 3: The starter comes with “post” and “page” content, but we don’t have the “project” content type yet. Make a new directory called projects in content and populate them with Markdown files. I don’t actually have any project content yet, so I just made dummy files. Add type: project in the frontmatter.
mkdir content/projects touch content/projects/project-one.md content/projects/project-two.md
Gatsby uses the gatsby-source-filesystem plugin to get data from Markdown files, so make sure you add the new source directory to the plugins array in gatsby-config.js.
// gatsby-config.js
module.exports = {
  plugins: [
    {
      resolve: `gatsby-source-filesystem`,
      options: {
        path: `${__dirname}/content/projects`,
        name: 'projects',
      },
    }
  ],
}
💡 To learn how to use Markdown files as data source, check out this tutorial.
Step 4: Pull the data from steps 2 to 3 to the index.js template with graphql. GraphQL is an open-source API query language that comes built-in with Gatsby. Here is my code, truncated for brevity.
// src/pages/index.js
export const pageQuery = graphql`
  query {
    posts: allMarkdownRemark(
      sort: { fields: [frontmatter___date], order: DESC }
      filter: { frontmatter: { type: { eq: null } } }
      limit: 3
    ) {
      edges {
        node {
          excerpt
          frontmatter {
            title
            # etc
          }
        }
      }
    }
    projects: allMarkdownRemark(
      sort: { fields: [frontmatter___date], order: DESC }
      filter: { frontmatter: { type: { eq: "project" } } }
      limit: 3
    ) {
      edges {
        node {
          excerpt
          frontmatter {
            title
            # etc
          }
        }
      }
    }
    landing: allMarkdownRemark(
      filter: { frontmatter: { slug: { eq: "landing" } } }
      limit: 1
    ) {
      edges {
        node {
          excerpt
          html
          frontmatter {
            title
            # etc
          }
        }
      }
    }
  }
`
Basically it says:
- get 3 latest entries where
typeis null (I make "post" as default type) - get 3 latest entries where
typeequalsproject - get 1 specific entry where
slugequaldlanding
You can see how GraphQL is more flexible than REST API call; these different types of data can be called with ONE query!
The posts, projects, landing objects are available to use in the component. You can use it like any regular React data props, for example:
// src/pages/index.js
class LandingPage extends Component {
  render() {
    // data from graphql query
    const posts = this.props.data.posts.edges
    const projects = this.props.data.projects.edges
    const landing = this.props.data.landing.edges[0].node
    const quotes = landing.frontmatter.quotes
    const quote = quotes[0]

    return (
      <div>
        <h3>{landing.frontmatter.description}</h3>
        <BodyText dangerouslySetInnerHTML={{ __html: landing.html }} />
        <section>
          <h3>Recent Projects</h3>
          <RelatedPosts posts={projects} />
        </section>
        <section>
          <h3>Recent Posts</h3>
          <RelatedPosts posts={posts} />
        </section>
        <div>
          <blockquote>{quote.quoteBody}</blockquote>
          <cite>{quote.quoteSource}</cite>
        </div>
      </div>
    )
  }
}
That is a highly simplified snippet just to give the idea of how it works. You can view the full code in my Github.
Gatsby provides a neat graphical interface for GraphQL called GraphiQL, which can be accessed at http://localhost:8000/___graphql. You can enter your query, see what fields are available, and what data is returned by your query call.

One last thing I did was to add import { graphql } from 'gatsby' to the top of my LandingPage component, as I got a warning that the global graphql tag is deprecated.
Result:

💡 To learn how to query data with GraphQL, check out this tutorial.
3) Blog Post page
Inspired by some personal sites I like, my posts will be divided into three different post formats:
- Articles — Serious long posts like this one
- Links — Links to external web pages
- Notes — Quick casual updates in the vein of social media status (this should be the default, ie. if post format is not specified, a post should be treated as “Notes”)
I want to use the post format for blog post routes, eg:
- ekaaa.me/articles/serious-tech-article
- ekaaa.me/links/link-to-interesting-article-john-doe
- ekaaa.me/notes/back-from-vacation
Step 0: Add post_format: articles to the frontmatter of one post for testing.
Step 1: Add post_format to gatsby-node.js in two places—in graphql object, and in the createPage method. This makes sure the Blog Post pages are generated at the new route that contains post format.
// gatsby-node.js

// generate blog posts
posts
  .forEach((post, index, posts) => {
    // ...
    const post_format = post.node.frontmatter.post_format || 'notes'; // if post_format is not filled, define it as "notes"
    createPage({
      path: post_format + '/' + post.node.frontmatter.slug, // instead of ekaaa.me/post-title, now we have eg. ekaaa.me/notes/post-title
      component: BlogPostTemplate,
      // ...
    })
  })
Step 2: Add post_format to all templates and components that display the Blog Post. This make sure all links point toward the new route. Click on each link to look at the code.
-
components/PostsList.js — add post_format to props sent to
PostsListItem.js -
components/PostsListItem.js — add post_format to link
toattribute - components/RelatedPosts.js — same
- pages/index.js — same
-
templates/blog-list-template.js — add post_format to graphql query for
postsobject sent toPostsList.js - templates/tag.js — same
Result:

That’s all for now!
I’m still halfway from finishing this site, but I’m calling it a day for now. To wrap up, making a Gatsby site by modifying a starter site is a good way to get started quickly and learn various features. This is the commit for this article.
There are some related modifications I want to make, such as “Post List by Format” (ekaaa.me/articles etc) and “Year/Month Archive” pages. However, I don’t have the energy nor time to do it now, so I’ll defer that til next year. 😉

Tomorrow we are going to setup Storybook for UI components development and additional libraries. Again, if you read this far, thank you for reading!


Top comments (7)
CMIIW.
As great as Gatsby is I see a lot of people mentioning Gatsby is SSR out of the box. But Gatsby is not SSR.
Gatsby only generates static files from your code.
Unless you serve your files rendered from a node server, your site is not SSR.
Yeah, I was using the term very loosely I realised, as in "not rendered in the client (browser)".
Good insight, and yes I agree (incidentally, this is discussed briefly in this article I've just been reading: dev.to/narative/understanding-gats...).
Great post! I'm taking a similar route with my personal blog and find that developing with Gatsby is so much fun. Also adding
write-goodto my toolbelt.That's really a very detailed article on Gatsby especially the use of starter sites.
I would suggest the use of Google analytics plugin for your blog to analyse which post are doing well.
I used a starter template gatsbyjs.org/starters/LekoArts/gat... I was able to customize it and have it run they way I wanted locally even a build on local:9000 however when I up the files to github ( github.com/jasonmuldoon/Scrolling )it reverts back to boilerplate template. Even though I still run it fine on my machine. I made sure my gitbash says nothing to commit, working tree clean. I am trying to figure this out
Superb post man! It will be very helpful for me to set up my new webdev blog. Kudos from Brazil!
Here is a step by step guide about how to create your blog site using Gatsby.
zeptobook.com/create-your-blog-sit...