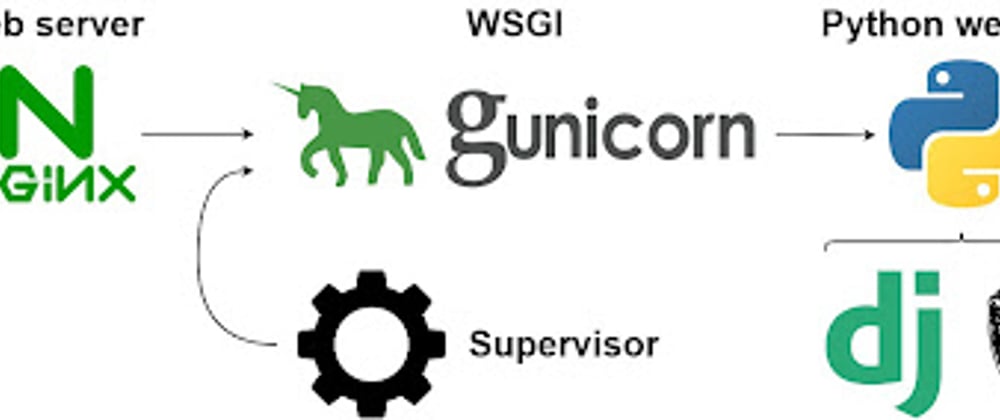
Django is a high-level Python web framework that encourages rapid development and clean, pragmatic design. However, Django, an inbuilt development server, is not suitable for deploying your Django application since it isn’t scalable enough for production use.
NGINX is open-source software for web serving, reverse proxying, caching, load balancing, media streaming, and more. NGINX is the best-in-class load‑balancing solution used by high‑traffic websites such as Dropbox, Netflix.
Gunicorn, coined from ‘Green Unicorn’, is a Python HTTP Server for UNIX. Gunicorn interfaces with both Nginx and your actual python web-app code to serve dynamic content, as Dev Zero demonstrates in his project on Education Ecosystem.
This article will explain how to deploy our Django web application via Nginx and Gunicorn.
Setting your Django project.
Once your code has moved to the server, make sure all required installations are present on the server.
This code will install Python, pip, and Nginx.
sudo apt install python3-pip python3-dev nginx
Next, install all the packages required by your application in your virtual environment next. Install gunicorn with pip.
Pip install gunicorn
Then, open the port where we want to run the application.
sudo ufw allow 8100
Configuring Gunicorn
A socket is a special file for interprocess communication, which enables two processes to communicate. You now need to create a socket file for gunicorn.
Use the following command to create your file;
sudo vim /etc/systemd/system/gunicorn.socket
Create a service file for Gunicorn and specify a user name, the working directory for our project, the virtual environment for our project, and a sock file. Gunicorn is the Django web server that needs to know the user. Gunicorn needs to know the working directory for the project and to know the virtual environment folder. You also need to create a sock file for the project. The sock file communicates with Nginx, and they are both able to communicate through this socket.
sudo vim /etc/systemd/system/gunicorn.service
Enable the Gunicorn socket using this command;
sudo systemctl start gunicorn.socket
sudo systemctl enable gunicorn.socket
Configuring Nginx
Now you need to create the configuration file for Nginx, using the following command;
sudo vim /etc/nginx/sites-available/Lorem_Test_Project
Activate your configuration, then finish by a restart of Nginx.
sudo ln -s /etc/nginx/sites-available/Lorem_Test_Project /etc/nginx/sites-enabled/
sudo systemctl restart nginx
Your application is up and running!
Summary
Running a local Django server is not recommended in production because it’s just a test server, not a production-ready server.
This article is a guide to show you how to run Django in production with Gunicorn. It uses Nginx as the reverse proxy to make your application more secure.


Top comments (1)
Dear Michael,
Congrats for your contribution! Can you help me? What the content of Gunicorn sock file and Nginx conf?
TKS