About this project
Hey people, I started this project a couple of weeks ago as a side project.
I built a custom PC with Linux to use as a home lab server. The main idea was to buy a NAS to handle this job, but, sadly the prices right now are quite high here in my country, so, I decided to go one step further and build this home-lab server with some spare parts that I got from the internet.
Computer specs, nothing too fancy:
- 2 x HDD 1TB
- AMD Ryzen 3
- 8 GB of RAM DDR4
- 1 M2 disk with 250GB of memory for the OS (ubuntu server)
Let's get started
Pre-requirements
First, We have to create a simple ubuntu server bootable USB. The ISO file can be downloaded free on the Ubuntu site. just go to the Download page and select > Manual server installation.
After that, we should flash and USB with enough memory to be able to store the ISO file.
There are some good guides out there, I suggest taking a look at this guide if you are using a Linux OS: This guide
And if you are in Windows, RUFUS is a great tool for this job.
Then, install the OS into your server to start with our configuration. Here is a quick official tutorial
Don't forget to install OpenSSH during the installation process, we'll need that later.
Ubuntu server configuration.
First, we need to set up our environment to handle auth users and disable possible security concerns in the future.
Let's start with the server user's configuration
Login with the user's data provided in the ubuntu configuration (home/pass)
Create a new user (don't forget to replace the username)
sudo adduser newusername
The user's creation process will request you to add a new password.
Then add this new user to the admin group.
sudo usermod -aG sudo newusername
SSH configuration
If we installed the OpenSSH tool, we should be able to connect our new server remotely.
The SSH secure configuration is required to add an extra layer of security to our server and avoid unknown login requests.
To do that we can set up the ssh key of our remote terminal/computer.
More details here: https://www.digitalocean.com/community/tutorials/how-to-set-up-ssh-keys-on-ubuntu-20-04
Copy our local RSA key to the server
cat ~/.ssh/id_rsa.pub | ssh username@remote_host "mkdir -p ~/.ssh && touch ~/.ssh/authorized_keys && chmod -R go= ~/.ssh && cat >> ~/.ssh/authorized_keys"
And then remove password access, to avoid others to access the server without setting up the ssh key.
Before that, verify if you can access the server :s
sudo nano /etc/ssh/sshd_config
Update ssh access to disable the password
. . .
PasswordAuthentication no
. . .
And finally, restart the ssh service
sudo systemctl restart ssh
Disk configuration
First, we need to inspect disks and look for the names and the partitions that are inside of them with
sudo fdisk -l
with this information, we can select one disk to work with i.e "Disk /dev/sda:" sudo fdisk /dev/sda
If the disk has older partitions (this is my case because both disks were used before), we should remove each partition. (this process requires repeating the same operation until the partitions are gone.)
- Inside, the CLI will request you to ask for the next operation. You can press "m" to get more info,
- but we want to delete all the partitions inside the disk
- Select "d"
- keep with the default option until you delete all the partitions
- After that, verify the disk with "p"
and save the changes with "w"
Repeat the same process with the extra disks (This is kind of tedious but I don't know another way to do it right now).
After all of that, we are ready to create new RAID partitions.
RAID partitions.
Now that we have clean disks, we can create the partitions we'll use for the RAID configuration.
- Select the disk
sudo fdisk /dev/sda
- Select "n" to create a new partition.
- you can choose the default configuration by pressing enter (unless you want to have a custom configuration)
- then select the limit of registries, I will use the default as well.
- then, we need to update the partition type, to do so, let's check the valid partitions
- and then format with the option "t" writing the number of partitions we want, for this case it's "29" = "Linux RAID"
and finally, save all the changes with "w"
Important: Repeat the process with the other disk
Now that we have the partitions ready we can generate the RAID with the following command:
sudo mdadm --create /dev/md0 --level=1 --raid-devices=2 /dev/sda1 /dev/sdb1
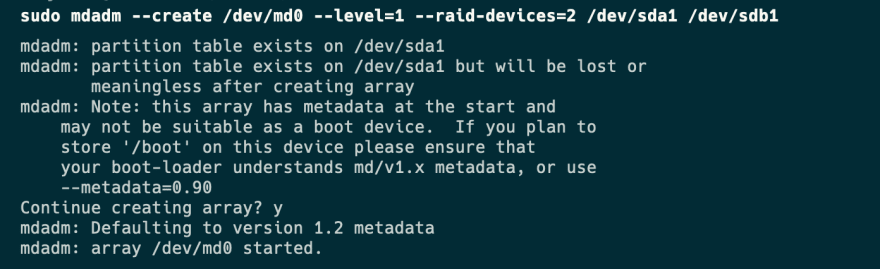
Remember to use the names of the devices you created, in my case I made 2 (sda1, sdb1).
we can check the status of the operation with:
sudo cat /proc/mdstat

when the operation is done, we can assign a format, Ext4 is ok considering Samba doesn't care about the format.
sudo mkfs.ext4 /dev/md0

Finally, we can mount the RAID partition.
Let's create a new directory to bind it with the disk.
sudo mkdir /mnt/macos_back
To allow the OS to link the disk with the directory we must update the fstab configuration to allow the mounting point to be persistent.
sudo nano /etc/fstab
Put the next line at the bottom
/dev/md0 /mnt/macos_back ext4 defaults 0 0
finally, restart the server to mount the new partition with the RAID
sudo reboot
SAMBA time
First we'll install samba with:
sudo apt install samba
then we need to provide permissions to all the users.
Add users that will require access to the network share
sudo adduser myuser
sudo smbpasswd -a myuser
sudo usermod -g users myuser
Just for safety lets create a default config backup
sudo mv /etc/samba/smb.conf /etc/samba/smb.conf.bak
Now, let's write the samba config that we need to use timemachine.
sudo nano /etc/samba/smb.conf
and put the following configuration
Remember to update the configuration file with your variables.
[global]
workgroup = myhostname
min protocol = SMB2

# security
security = user
passdb backend = tdbsam
map to guest = Bad User

# mac Support
spotlight = yes
vfs objects = acl_xattr catia fruit streams_xattr
fruit:aapl = yes
fruit:time machine = yes

#NetShares

[volumes]
comment = Time Machine
path = /mnt/macos_back/volumes
valid users = @users
browsable = yes
writable = yes
read only = no
create mask = 0644
directory mask = 0755
And finally, save the changes. Then we have to create a new folder to contain the data we are going to share
sudo mkdir /mnt/macos_back/volumes
To be accessible to samba we need to change the permissions and add the users in the directory.
sudo chmod 777 /mnt/macos_back/volumes
sudo chown root:users /mnt/macos_back/volumes
With all that done, let's restart the service and create a new rule in the firewall to allow SAMBA to be accessible.
sudo service smbd restart
sudo ufw allow samba
Connect TimeMachine with your SAMBA server.
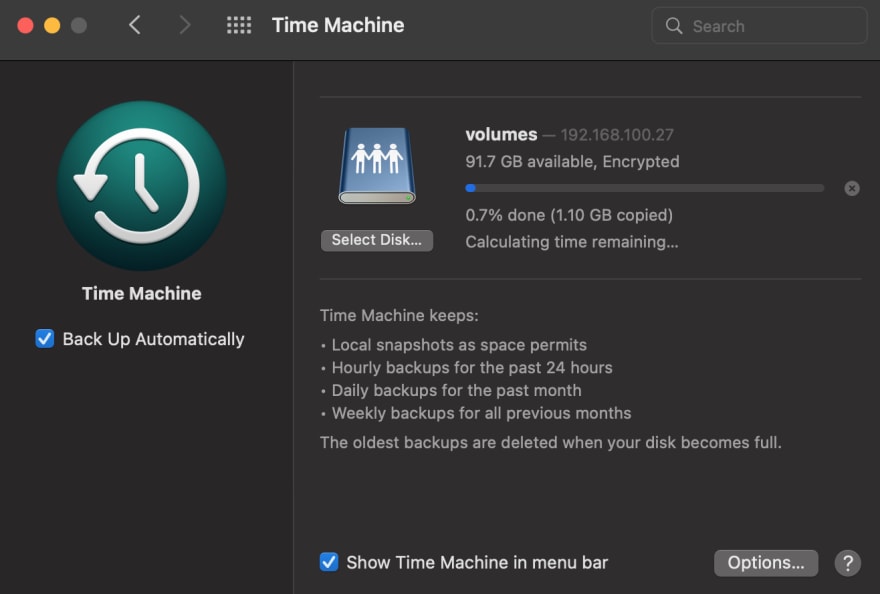
The only requirement to use Time Machine with our server is to provide a connection with the server. To do that we can start a connection with Finder, Open the application, and select Go > Connect to server....

That will display the connection window. Let's add a new connection with the UI. We have to write the connection URL, something similar to this: smb://<your_server_ip_address>/<your_samba_volume>

If you don't know the ip of your server, you could verify it with
ifconfig.
For this example we usedvolumesas a volume, so, the connection URL will look like this: smb://192.168.100.27/volumes
If the connection was successful, now we should be able to see the new server in our Time Machine settings. Open select disk and find our new SAMBA Server to start with the backup process.
First impressions
After the connection the time-machine will take some time to perform the first backup (4hrs in my case), but, I was able to be testing the consistency of this implementation and so far the time-machine backups look good, the subsequent updates were way more faster and the file is stored safely in the disk in our server.
One possible caveat for this implementation could be the availability of the network, so make sure the local network is stable.
I hope this post will be useful for someone looking to implement something similar.
Thanks for reading!


Oldest comments (0)