Mirrored from my blog: https://david.coffee/teaching-my-unifi-udm-how-to-ipv6/
I recently ventured into IPv6 territory with one goal: Get rid of the router my ISP gave me.
I am a fan of UniFi gear and own an UniFi Dream Machine (upgraded from a UniFi Secure Gateway last year) which is more than capable of handling IPv6, so how hard can it be?
I went into this not knowing a thing about IPv6 and just assumed it was identical to IPv4, just bigger, but boy was I wrong. This is my writeup of what I learned and what my endresult is (spoiler: I got it working)
IPv6 misconceptions
As I explained above, I just assumed that IPv6 was IPv4, but longer. So you have some gateway/subnet-mask combo, your router gets an IP assigned from the ISP and all devices inside the network use that IP outwards facing when interacting with things (= “NAT”). Internally, the router assigns IPv4 addresses based on the gateway/subnet-mask, with each device receiving a unique IPv4 address from the router through DHCP. So far so good.
IPv6 on the other hand does not work at all like this. In IPv6-land, each device receives unique (actually multiple) IPv6 addresses. There is no NAT, so when my iPhone that’s connected to my WiFi communicates with a website, that website will see the unique IPv6 address my iPhone has assigned, not my router’s IP. There are also (unless specifically setup) no local network addresses - each IPv6 address is global. And how can the router assign IPv6 addresses? Enter prefix delegation or IPv6-PD.
The router, after authenticating with the ISP when PD is enabled, receives an entire address space (like /64 or /48) delegated to it. In simple words, the ISP tells the router: “Here’s a chunk of addresses that you can use for your devices, handle it.”
Not all IPv6 addresses are created equal
Let’s take a look at this ifconfig output of my Mac:
en0: flags=8863<UP,BROADCAST,SMART,RUNNING,SIMPLEX,MULTICAST> mtu 1500
        options=50b<RXCSUM,TXCSUM,VLAN_HWTAGGING,AV,CHANNEL_IO>
        ether 4c:20:b8:e7:3b:be
        inet6 fe80::1449:6fa5:65a9:a313%en0 prefixlen 64 secured scopeid 0x6
        inet6 fd74:d39f:a55f::8c prefixlen 64 dynamic
        inet 192.168.1.2 netmask 0xffffff00 broadcast 192.168.1.255
        inet6 240f:78:<snip> prefixlen 64 dynamic
        inet6 240f:78:<snip> prefixlen 64 autoconf secured
        inet6 240f:78:<snip> prefixlen 64 autoconf temporary
It doesn’t just have 1 IPv6 address, no that would be far too simple. Instead, it has 5!! Why? Because apparently, we have so many IPv6 addresses now that we don’t need to be sparse with them /s.
There are different kinds of IPv6 addresses assigned to my mac:
inet6 240f:78:<snip> prefixlen 64 dynamic
inet6 240f:78:<snip> prefixlen 64 autoconf secured
inet6 240f:78:<snip> prefixlen 64 autoconf temporary
The secured address is my permanent IPv6 address. This address rarely ever changes and will stick around even after reboots.
The temporary address is, you guessed it, a temporary address.
Lastly we have 2 more:
inet6 fe80::1449:6fa5:65a9:a313%en0 prefixlen 64 secured scopeid 0x6
inet6 fd74:d39f:a55f::8c prefixlen 64 dynamic
fe80::, while not obvious whatsoever, is a prefix for localhost or local link. This is an address that’s only usable locally.
fd74::, more specifically the fd:: prefix is designated for the local network. Didn’t I just earlier say that there are no local network addresses in IPv6? By default, yes, but I specifically setup my router to hand out local network addresses. Keyword here is “Unique local address” (ULA).
IPv6 implementations - Native, 6to4, IPv6oE
Are you still with me?? Okay, because there is more. Not all IPv6 implementations are equal either. Very common implementations are either IPv6 “native” or “IPv6-in-IPv4 tunnel”. There are more exotic implementations like SoftBanks “IPv6高速ハイブリッド IPv6 IPoE + IPv4” that’s utilizing IPoE for authentication and assigning addresses. (Note here: I used SoftBank in the past and was not able to get IPv6 without their router working due to the proprietary way their router authenticates)
I’m not going into detail here and don’t fully understand everything either, but a 6to4 tunnel is like the name implies an earlier implementation that tries to build the IPv6 stack on top of a IPv4 network stack. Read more about it here.
“Native” IPv6 is the one that’s nice to work with, but also the one not every ISP supports. I made sure to pick an ISP that has a native IPv6 stack and doesn’t use IPv6-over-IPv4
Getting started - figuring out what my ISP router is doing
The first step to getting IPv6 working was to actually figure out what my ISP router is doing when I plug it in. Specifically: How does it actually get the IPv6 prefix assigned, how does it authenticate, and what does the handhshake look like.
Now how do we actually do this? Wireshark and a couple of USB-C network dongles to the rescue!
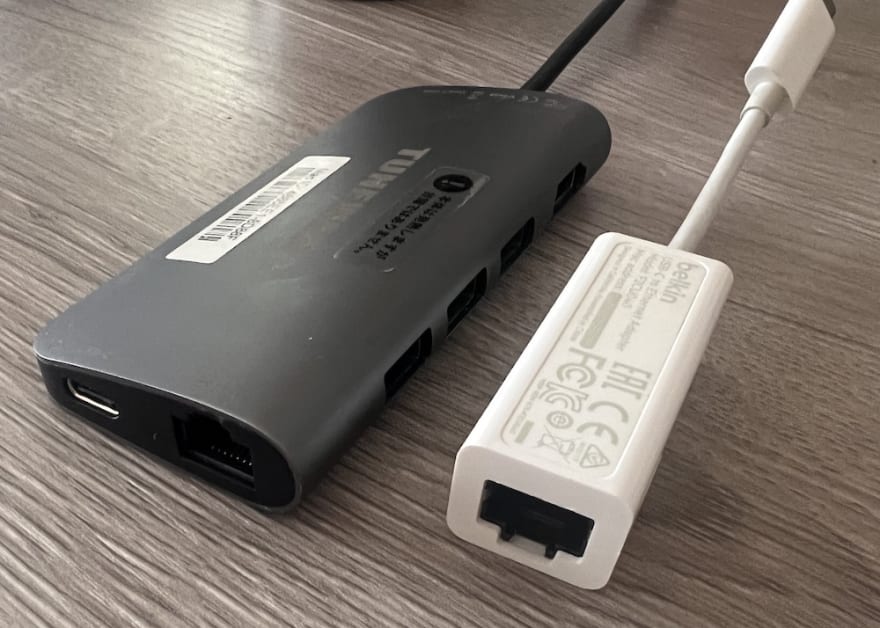
Mac has a lot of nice networking features, one of them is the ability to bridge 2 network interfaces, effectively creating a tunnel between them. This can be done through the CLI, but also through the network preferences pane after plugging multiple network dongles into the Mac.
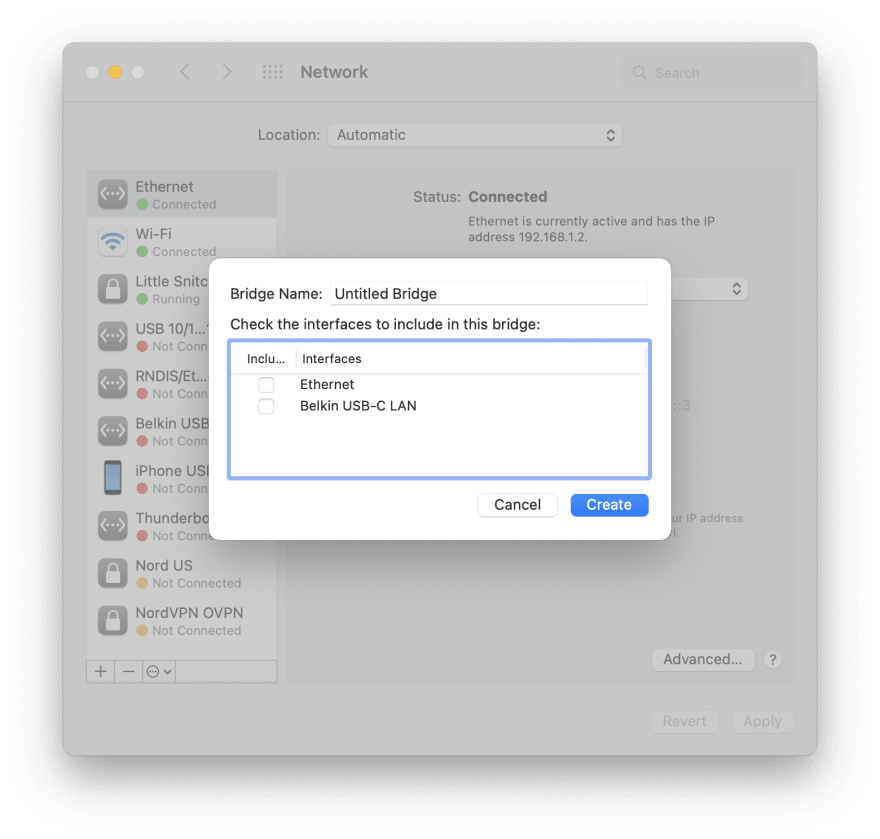
Specifically, we want to make it so the MacBook is in between the ISP Router and the network out and acting as a transparent bridge. So Internet <-> MacBook <-> ISP Router
Once the virtual bridge is created, we can use Wireshark to monitor the new device for any traffic that happens between the ISP router and the mothership. Now start Wireshark, plug the ISP router in, and….
… it works!
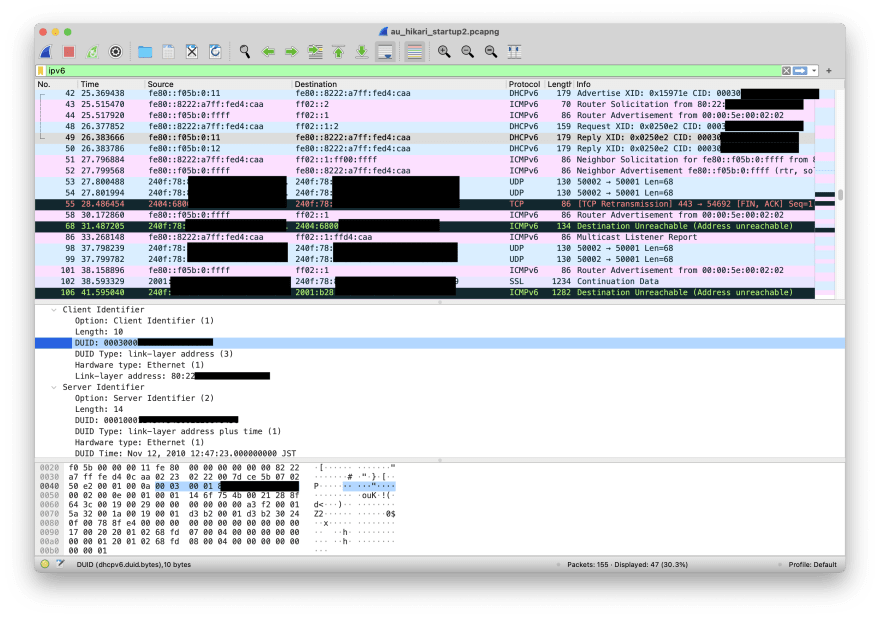
Lot’s of new information here for a non-network engineer like me, but also some familiar words: DHCPv6, ICMPv6, UDP, SSL. The *v6 protocols are IPv6 variants of the same things we have in IPv4, but beefed up and more important in IPv6 land.
Specifically, ICMPv6 is much more important than the IPv4 version that we use for pinging stuff and is used extensively for the Neighbor Discovery Protocol, that’s those “Router Solicitation” and “Router Advertisement” messages you see in the screenshot above.
So from this startup dump we can see:
- My ISP router inquires with ISP uplink through Router Solicitation where the uplink router is
- Uplink responds with Router Advertisement
- ISP router advertises itself through DHCPv6, uses a DUID (“DHCP unique identifier”) to identify itself, this DUID is generated off the mac address
- ISP responds to DHCPv6 request and assigns IPv6 prefix
- Neighbor Discovery Protocol continues with Neighbor Solicitation and Neighbor Advertisement
(the XID stuff you see in there is a transaction id that’s being calculated on each request)
So to summarize : This ISP is using fully native IPv6, the IPv6 prefix space is assigned through DHCPv6, and authentication happens through a DUID identifier that’s being used in all DHCPv6 requests.
If we are able to replicate this handshake on the UDM, we should have IPv6 working. Now how do we actually do that…
Teaching the UDM how to DHCPv6
From the wireshark dump above, we know that the ISP router is using DHCPv6 to authenticate and get its prefix assigned. We also know which DUID the ISP router uses for identifying itself, and we know the prefix size that we get assigned from the ISP (/48).
Let’s enable IPv6 through DHCPv6 through the UniFi admin on WAN:

Then grep for dhcp to see what’s happening on the UDM:
# ps aux | grep dhcp
 3537 root /sbin/udhcpc --foreground --interface eth4 --script /usr/share/ubios-udapi-server/ubios-udhcpc-script -r 124.214.62.19
 3895 root /usr/sbin/odhcp6c -R -f -e -v -s /usr/share/ubios-udapi-server/ubios-odhcp6c-script -P 48 eth4
 7715 root grep dhcp
The UDM is spinning up udhcpc and odhcp6c with the closed-source binaries ubios-odhcp6c-script, both on the eth4 interface (my WAN port).
We can also print our own duid by running cat /config/dnsmasq.lease, and since the DUID being used is not the one that our ISP router uses, we have to do something about it.
odhcp6c that is being used here is is a DHCPv6 client by openwrt and it being open-source and widely used means we can dig deeper into what it’s doing with all those parameters:
Usage: odhcp6c [options] <interface>

Feature options:
        -S <time> Wait at least <time> sec for a DHCP-server (0)
        -N <mode> Mode for requesting addresses [try|force|none]
        -P <length> Request IPv6-Prefix (0 = auto)
        -F Force IPv6-Prefix
        -V <class> Set vendor-class option (base-16 encoded)
        -u <user-class> Set user-class option string
        -c <clientid> Override client-ID (base-16 encoded 16-bit type + value)
        -i <iface-id> Use a custom interface identifier for RA handling
        -r <options> Options to be requested (comma-separated)
        -R Do not request any options except those specified with -r
        -s <script> Status update script (/usr/sbin/odhcp6c-update)
        -a Don't send Accept Reconfigure option
        -f Don't send Client FQDN option
        -k Don't send a RELEASE when stopping
        -t <seconds> Maximum timeout for DHCPv6-SOLICIT (120)
        -m <seconds> Minimum time between accepting updates (30)
The flag we’re after is -c <clientid> Override client-ID (base-16 encoded 16-bit type + value). So theoretically, if we are able to pass -c into the startup of the odhcp6c command, we should be able to receive a valid IPv6 address from the ISP. Let’s give it a try!
Disable DHCPv6 again through the admin UI, wait until the process fully stopped, then manually run the command above, but with -c flag:
/usr/sbin/odhcp6c -R -f -c <DUID from our wireshark dump> -e -v -s /usr/share/ubios-udapi-server/ubios-odhcp6c-script -P 48 eth4
Wait a bit, then ip -6
# ip -6 addr show scope global
10: br0: <BROADCAST,MULTICAST,UP,LOWER_UP> mtu 1500 state UP qlen 1000
    inet6 fd74:d39f:a55f::1/64 scope global
       valid_lft forever preferred_lft forever
    inet6 240f:78:<snip>/64 scope global dynamic
       valid_lft 108367sec preferred_lft 108367sec
Hello there, IPv6 :)
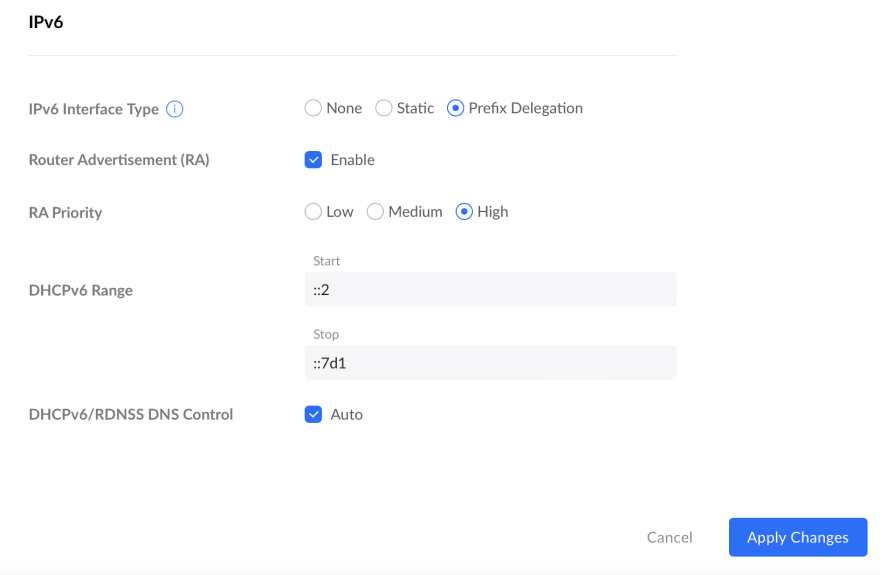
Back on the UDM admin, let’s enable IPv6 on the LAN network. We want to do prefix delegation and also advertise ourselves as a router (remember Neighbor Discovery Protocol above?)
Wait a bit, then let’s enable IPv6 on my mac and renew the DHCPv6 lease:
en0: flags=8863<UP,BROADCAST,SMART,RUNNING,SIMPLEX,MULTICAST> mtu 1500
        inet6 240f:78:9464::<snip> prefixlen 64 dynamic
        inet6 240f:78:9464:0:<snip> prefixlen 64 autoconf secured
        inet6 240f:78:9464:0:<snip> prefixlen 64 autoconf temporary
Nice!!
And what about https://test-ipv6.com?

Persisting changes to the UDM
Now that we got an IPv6 address, let’s persist those changes so we don’t have to manually run odhcpv6 every time.
Pre-req: Extending the UDM with boot-scripts
UniFi gear is hackable which allows us to do more than just what’s possible through the admin UI. The USG had a very advanced customization flow baked in, but the UDM is a tad more annoying to work with.
Luckily there is this awesome project called udm-utilities by boostchicken, a “A collection of things to enhance the capabilities of your Unifi Dream Machine or Dream Machine Pro.”
Basically what this project does is, it installs a custom package that extends the UDM with the ability to run scripts on boot that persist in between reboots. We put our shell scripts into /mnt/data/on_boot.d, and udm-utilities makes sure those are run when the router boots.
There are a lot of really cool things you can do with it, from configuring the UDM to even running podman containers like homebridge or adguard, but we’ll be focusing on the network aspects only for this writeup.
Changing DUID on boot
Now the next problem is, how do we actually start odhcp6c with our own options? The UDM launches it on boot through ubios-udapi-server, which is closed-source. We could decompile the binary with ghidra and see if we can hack our own arguments in, how hard can it be?
But there is an easier (more hacky) way of achieving just that. What if the binary at /usr/sbin/odhcp6c isn’t actually a binary, but an executable script that runs odhcp6c for us? The UDM will continue to execute odhcp6c like usual and we can inject our custom flags. Here’s what I mean:
# cat /usr/sbin/odhcp6c
#!/bin/sh
# workaround script to inject odhcp6 options
/usr/sbin/odhcp6c-real -R -f -c 0003000<snip> "$@"
The custom script that we put in /usr/sbin is calling odhcp6c transparently and adds the extra -c flag.
Using udm-utilities, we can automate this with the following boot script:
#!/bin/sh
mv /usr/sbin/odhcp6c /usr/sbin/odhcp6c-real
cp /mnt/data/odhcp6c/odhcp6c /usr/sbin/odhcp6c
chmod +x /usr/sbin/odhcp6c
killall odhcp6c
- We move
odhcp6ctoodhcp6c-real - Copy the custom
odhcp6cto the old location - Make it executable
- Kill odhcp6c
Once killed, ubios-udapi-server will automatically attempt to restart it by executing /usr/sbin/odhcp6c, which is no longer the real binary but our custom script.
And does it work?
# ps aux | grep dhcp
 3891 root {odhcp6c} /bin/sh /usr/sbin/odhcp6c -e -v -s /usr/share/ubios-udapi-server/ubios-odhcp6c-script -P 64 eth4
 3895 root /usr/sbin/odhcp6c-real -R -f -c 0003000<snip> -e -v -s /usr/share/ubios-udapi-server/ubios-odhcp6c-script -P 64 eth4
It absolutely does!
Was it worth it?
Worth it in terms of performance or network benefit? Probably not. The world doesn’t feel different when interacting with IPv6 and speed for me is pretty much on par as it was with IPv4.
But it has been a very nice learning experience. Without this venture into IPv6-land I would have never learned about the differences between IPv6 and IPv4.
My network is now fully IPv6 compatible which it wasn’t before, and that’s an achievement in itself.


Oldest comments (0)