
In this article, I will describe a scenario, in which you have two projects: dev and prod. Upon the successful deployment of your Cloud Function in the development project, it will also be deployed to the production.
For that, I will use a GitHub repository, to which I will be pushing the files for my function. In turn, this will be triggering the Cloud Build to deploy the functions.
I will first configure it for the development project only (steps 1–7), but then I will describe how you can automate the deployments to the production as well (steps 8–10).
GCP documentation reference — link.
Step 1
Create a GitHub repository for your Cloud Function.
Step 2
Create the files for your function. For simplicity purposes, I will grab the sample from the Node.js Quickstart for Cloud Functions.
index.js:
/**
* Responds to any HTTP request.
*
* @param {!express:Request} req HTTP request context.
* @param {!express:Response} res HTTP response context.
*/
exports.helloWorld = (req, res) => {
  let message = req.query.message || req.body.message || ‘Hello World!’;
  res.status(200).send(message);
};
package.json:
{
  “name”: “sample-http”,
  “version”: “0.0.1”
}
Step 3
Push your function files to the GitHub repository you created in Step 1. I will also create a branch called dev to later use it for the trigger.
git init
git add .
git commit -m “First commit”
git branch dev
git remote add origin _[LINK-TO-THE-GITHUB-REPO]_
git push -u origin dev
Step 4
Go to the Cloud Build settings in your development project and enable the suggested roles for Service Accounts and Cloud Functions.

Step 5
Navigate to the Cloud Build Triggers page to create a trigger:
- Enter the name for your trigger.
- Make sure that “ Push to a branch ” is selected for the event.
- Under “ Source ” click “ CONNECT NEW REPOSITORY ” and select “GitHub (Cloud Build GitHub App)”.
- Authorize your GitHub and select the repository you created in Step 1.
- Select the branch , pushing to which you want the build to be triggered.
- Click CREATE.

Step 6
Create a config file for your build. I have created the following cloudbuild.yaml for that:
steps:
- name: ‘gcr.io/cloud-builders/npm’
  args: [‘install’]
- name: ‘gcr.io/cloud-builders/npm’
  args: [‘test’]
- name: ‘gcr.io/cloud-builders/gcloud’
  args: [‘functions’, ‘deploy’, ‘cicdFunction_dev’, ‘ — trigger-http’, ‘ — runtime’, ‘nodejs10’, ‘ — entry-point’, ‘helloWorld’]
GCP documentation reference — link
Note: “helloWorld” is the name of the function in my index.js file, while “cicdFunction_dev” will be the name of the deployed Cloud Function.
Step 7
Push the config file to the GitHub repository and wait for the Cloud Build to deploy the function.
git add cloudbuild.yaml
git commit -m “Added cloudbuild.yaml”
git push -u origin dev
You can check the build status and details by visiting the Cloud Build History page.
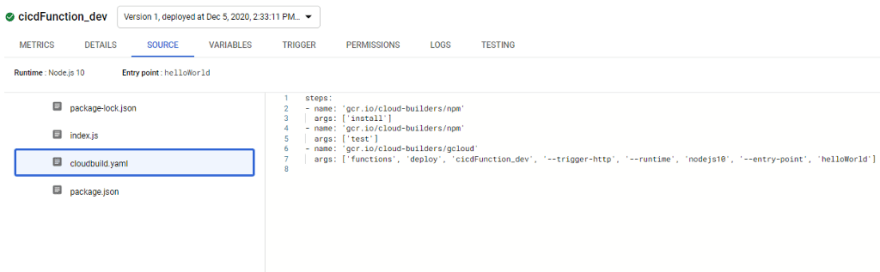
Check the Cloud Functions page in Cloud Console and you will see that your function has been deployed:

You will notice that it also contains the Cloud Build config file:
Step 8
Now set up the prod project.
Add the Cloud Build service account from the dev project as an IAM member (Cloud Console -> IAM & Admin -> IAM), giving it the Cloud Functions Deployer and Service Account User roles in your production project.
Make sure to give the new roles a few minutes to propagate.
Step 9
Add another deployment step in your Cloud Build config file, specifying the production project.
- name: ‘gcr.io/cloud-builders/gcloud’
  args: [‘functions’, ‘deploy’, ‘cicdFunction_prod’, ‘ — trigger-http’, ‘ — runtime’, ‘nodejs10’, ‘ — entry-point’, ‘helloWorld’, ‘ — project’, ‘PRODUCTION_PROJECT’]
Step 10
Push the updated config file to the GitHub repository.
git add cloudbuild.yaml
git commit -m “Added production deployment step”
git push -u origin dev
This will trigger the build that will also deploy the function to the production project.

From now on, this function will be getting deployed in production project as well (after pushing to the GitHub repository or triggering the build manually) if the deployment to development is successful.
Note: Successful deployment of a function still doesn’t guarantee that there are no logical errors within your code. Therefore, you may want to include additional testing before deploying your function to the production environment.


Top comments (0)