
Since the arrival of frontend frameworks and the advent of SPA (Single Page Application) type applications, the volatility of the frontend ecosystem and the adherence to frameworks make it difficult to produce robust and durable applications today.
The objective of this article is to show how the application of hexagonal architecture on the frontend can address this issue.
Presentation
Matthieu
Software architect and backend developer, I mostly develop in Java, JS and Go. Right now, I am starting to dabble in Rust.
I love everything about CI/CD (Gitlab 🦊 ❤️), imagining and creating robust, high-performance, and resource-efficient applications.
I share my insights and discoveries through blog posts.
When I'm not in my office tinkering with my 3D printer, you can find me on the water 🛶 !
Sebastián
Software architect and backend developer.
Former C# developer, until I got seduced by open source and NodeJS. I love Rust (but I am not yet sure that it's mutual 😅).
Linux ❤️ is my co-pilot. Like Matthew, I am a CI/CD enthusiast (Gitlab 🦊 gang), I like to optimize/automate anything that is optimizable/automatable.
I do more monitoring than I should, or maybe it's just that the day isn't long enough.
If you speak "un poquito de español", feel free to talk to me in the language of Cervantes 🙂
Acknowledgements
We want to thank Simon Duhem for his help on the styling part and the web components.
Thanks also to Julien Topçu who advised us on the hexagonal architecture part and who answered our questions all along the project.
And thanks to Dawson Brown for helping us with the english translation.
Observations
Today most frontend applications are produced using frameworks.
The three main frameworks on the market are React, VueJS and Angular.
UI frameworks allow for faster application development. They natively manage the reactivity as well as the compatibility of applications with different browsers.
Issues
All the code dedicated to frontend business logic will generally also be linked to the functioning of the framework.
When a framework becomes deprecated, the whole application must be rewritten in a new framework.
Focus on AngularJS
2009: Google releases the first version of AngularJS.
The framework is going to become very popular, and many developers are going to build their SPA using this framework.
2018 : The team announces the end of the development of the framework and an end of maintenance on December 31, 2021 (https://blog.angular.io/stable-angularjs-and-long-term-support-7e077635ee9c).
Following this announcement, the teams in charge of maintaining angularjs apps were faced with a choice of how to maintain their apps:
- Migrate from AngularJS to Angular?
- Rewrite the application to use another framework?
- Keep their legacy code and cross their fingers that no one finds a flaw?
The chosen solution will most likely involve a more or less complex rewriting of the code, including the front-end business logic of the application.
How to avoid it?
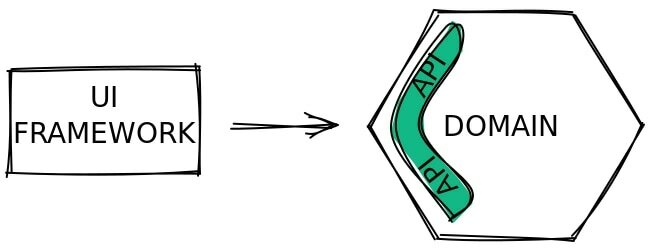
To avoid falling into this kind of trap, you need to try to decouple the frontend business logic from the UI / Framework part.
The idea is simple: build an application where on one side the framework is only in charge of html rendering and the reactivity of the components and on the other side the frontend business logic is isolated in agnostic code.
Advantages :
- The code associated with the framework is isolated
- Our business code becomes sustainable because it is agnostic
On paper the idea seems simple, but how to implement this division?
Hexagonal architecture for the front end
Hexagonal architecture is an architecture pattern created by Alistair Cockburn that places the business layer at the centre of the application (the hexagon) while ensuring a loose coupling with the technical blocks.
Basic concepts:
- The business domain is agnostic and has no dependencies.
- The tightness of the business domain is guaranteed by the port system.
- The layers (adapters) gravitating around the hexagon must respect the interfaces defined in the ports to communicate with the domain.
To go deeper into hexagonal architecture, see the resources in the links section.
Here is an example of frontend application breakdown using the hexagonal architecture:

Starting project
The different steps to follow will be based on the migration of a legacy AngularJS app to a hexagonal model.
https://gitlab.com/thekitchen/frontend-legacy-app
This application is a simplified Twitter server that contains the following features:
- authentication
- account creation
- creation of tweets
- display of tweets
- likes
It has been built in AngularJS to be an application built with a deprecated framework.
Goal
The goal of the article is to show step by step how to start from a legacy project and get to a hexagonal architecture that will allow us to easily change the framework of our application.
It will not be a magic recipe applicable to all applications but rather the steps of the migration process that we have undertaken during our research.
Organization of the new project
A project of this type needs some technical prerequisites to allow a trouble free development, in addition to providing a strict isolation of the technical blocks associated with the domain.
To focus purely on the code, and not on the tooling, we feel that the use of a monorepo is a must.
Obviously, the choice of a package management tool is secondary. On our side we have chosen pnpm + turborepo (if the need arises).
The hierarchy of the monorepo will be as follows:
.
├── package.json
├── pnpm-lock.yaml
├── pnpm-workspace.yaml
├── apps
│   ├── angular-app
│   ├── angularjs-app
│   ├── backend-api
│   ├── react-app
│   └── vue-app
├── configs
│   ├── eslint-config-hexademo
│   └── tsconfig
├── e2e
│   ├── package.json
│   └── tests
├── packages
│   ├── adapters
│   ├── domain
│   ├── loader
│   ├── style
│   └── web-components
The purpose and implementation of each file will be explained as the article progresses.
Identify your business requirements
The business requirements of our application is composed of two parts:
- Account management
- Tweet management
For the account part, the application enables:
- Account creation
- User authentication
- Logging out
- Knowing if the user is authenticated
- Getting the jwt of the authenticated user
- Getting the name of the authenticated user
For the tweets part, the application enables:
- Creation of tweets
- Retrieving tweets
- Liking tweets
Domain - API interfaces creation
Once our business requirements have been identified, we can now write our domain interfaces.
The API layer contains all the interfaces allowing communication with the business layer.
This layer is defined by the domain to guarantee its integrity.
Account API
Here is the API created from the account business logic layer described above
ports/api/account.ts
interface IAccountAPI {
    authenticate(username: string, password: string): Promise<string>;
    isAuthenticated(): boolean;
    logout(): Promise<void>;
    register(username: string, password: string): Promise<Registration>;
    getToken(): string;
    getUsername(): string;
}

export type { IAccountAPI };
Tweet API
And here is the API created from the business logic layer for tweets
ports/api/twitter.ts
interface ITwitterAPI {
    tweet(message: string): Promise<Tweet>;
    like(tweetId: string): Promise<Tweet>;
    listTweets(): Promise<Array<Tweet>>;
}

export type { ITwitterAPI };
Domain - SPI interfaces creation
The SPI (Service Provider Interface) layer contains all the interfaces required and provided by the domain to interact with the data.
It is here that we will define the interfaces allowing the domain to retrieve / create tweets, authenticate etc...
These interfaces will then be implemented by the adapter layer.

ports/spi/iauthentication-adapter.ts
interface IAuthenticationAdapter {
    auth(username: string, password: string): Promise<string>;
    register(username: string, password: string);
}
ports/spi/itweet-adapter.ts
interface ITweetAdapter {
    listTweets(): Promise<Array<Tweet>>;
    createTweet(tweet: Tweet): Promise<Tweet>;
    likeTweet(tweetId: string): Promise<Tweet>;
}
Domain - Writing the business logic
Now that our API and SPI are coded, we can move on to writing the business logic.
Account logic
For the account part, we have the following business rules to apply:
It is not possible to create an account without a user/password
It is not possible to authenticate with an empty password
The token must be persisted during authentication
account.ts
import { IAccountAPI } from "./ports/api";
import { Registration } from "./types/registration";
import { IAuthenticationAdapter } from "./ports/spi/iauthentication-adapter";
import { ISessionAdapter } from "./ports/spi/isession-adapter";

class Account implements IAccountAPI {
    private authAdapter: IAuthenticationAdapter;

    private sessionAdapter: ISessionAdapter;

    private defaultSessionDuration: number;

    constructor(
        authAdapter: IAuthenticationAdapter,
        sessionAdapter: ISessionAdapter
    ) {
        this.authAdapter = authAdapter;
        this.sessionAdapter = sessionAdapter;
        this.defaultSessionDuration = 120;
    }

    async authenticate(username: string, password: string): Promise<string> {
        this.checkThatUserIsFilled(username);
        this.checkThatPasswordIsFilled(password);

        try {
            const token = await this.authAdapter.auth(username, password);

            this.sessionAdapter.storeValue(
                "auth-token",
                token,
                this.defaultSessionDuration
            );

            return token;
        } catch (error) {
            throw new Error(
                "Something went wrong during the authentication. Check your username and password."
            );
        }
    }

    async register(username: string, password: string): Promise<Registration> {
        this.checkThatUserIsFilled(username);
        this.checkThatPasswordIsFilled(password);

        try {
            await this.authAdapter.register(username, password);
            return {
                username,
                status: "CREATED",
            };
        } catch (error) {
            return {
                username,
                status: "ERROR",
            };
        }
    }

    async logout(): Promise<void> {
        this.sessionAdapter.flush();
    }

    getToken(): string {
        const token = this.sessionAdapter.getValue("auth-token");
        if (!token) {
            throw new Error("Token not found");
        }

        return token;
    }

    getUsername(): string {
        const token = this.getToken();
        const [user] = atob(token).split(":");
        if (!user) {
            throw new Error("Invalid token format");
        }
        return user;
    }

    isAuthenticated(): boolean {
        try {
            const token = this.getToken();
            if (token.length) {
                return true;
            }
            return false;
        } catch (error) {
            return false;
        }
    }

    checkThatUserIsFilled(username: string) {
        if (!username.length) {
            throw new Error("Username could not be empty");
        }
    }

    checkThatPasswordIsFilled(password: string) {
        if (!password.length) {
            throw new Error("Password could not be empty");
        }
    }
}

export { Account };
Tweets logic
For tweets, we have the following business rules to apply when creating a tweet:
It is not possible to create an empty tweet
It is not possible to create a tweet without an author
A tweet must not be longer than 144 characters
To start with, we will create a Tweet type with the attributes required by our front-end domain.
⚠️ This type does not have to match the format returned by our backend.
It is the representation of the business entity from our frontend.
types/tweet.ts
type Tweet = {
    id?: string;
    author: string;
    message: string;
    likes?: number;
    createdAt?: string;
};

export type { Tweet };
We can then move on to our business rules:
twitter.ts
import { Tweet } from "./types/tweet";
import { ITweetAdapter } from "./ports/spi/itweet-adapter";
import { IAccountAPI, ITwitterAPI } from "./ports/api";
import { ITweetDispatcher } from "./ports/spi/itweet-dispatcher";

class Twitter implements ITwitterAPI {
    accountAPI: IAccountAPI;

    tweetAdapter: ITweetAdapter;

    tweetDispatcher: ITweetDispatcher;

    constructor(
        accountAPI: IAccountAPI,
        tweetAdapter: ITweetAdapter,
        tweetDispatcher: ITweetDispatcher
    ) {
        this.accountAPI = accountAPI;
        this.tweetAdapter = tweetAdapter;
        this.tweetDispatcher = tweetDispatcher;
    }

    async listTweets(): Promise<Tweet[]> {
        const tweets = await this.tweetAdapter.listTweets();
        return tweets.reverse();
    }

    async tweet(message: string): Promise<Tweet> {
        this.#checkThatMessageIsFilled(message);
        this.#checkTweetLength(message);

        const author = this.accountAPI.getUsername();
        this.#checkThatAutorIsFilled(author);

        const tweet = await this.tweetAdapter.createTweet({ message, author });
        this.tweetDispatcher.emitTweetCreated(tweet);
        return tweet;
    }

    like(tweetId: string): Promise<Tweet> {
        return this.tweetAdapter.likeTweet(tweetId);
    }

    #checkThatMessageIsFilled(message: string) {
        if (!message.length) {
            throw new Error("Message could not be empty");
        }
    }

    #checkThatAutorIsFilled(author: string) {
        if (!author.length) {
            throw new Error("Author could not be empty");
        }
    }

    #checkTweetLength(message: string) {
        if (message.length > 144) {
            throw new Error("Message length must be lower than 144 characters");
        }
    }
}

export { Twitter };
Domain - setting up the stubs
To test the business code of our domain without needing to deploy the associated backend, we will set up adapter stubs that we will inject in place of the real adapters.
A stub is a technique used to isolate a portion of code in order to make it autonomous. In our case the stubs will be in-memory implementations which will return dummy data.
Some important points to know in our case:
- the stubs must implement the SPI interfaces and thus respect the method signatures
- to guarantee the integrity of the domain, the stubs are created in the domain
- a good stub must return the necessary data sets to test all the business cases
In our project, we have placed the stubs in a stubs directory next to the SPI interfaces.
ports/spi/stubs/authentication-inmem-adapter.ts
import { IAuthenticationAdapter } from "../iauthentication-adapter";

class AuthenticationInMemAdapter implements IAuthenticationAdapter {
    users;

    constructor() {
        this.users = [
            {
                username: "unicorn",
                password: "rainbow",
            },
        ];
    }

    async auth(username: string, password: string): Promise<string> {
        const found = this.users.find((user) => user.username === username);
        if (!found || found.password !== password) {
            throw new Error("Bad credentials");
        }
        return btoa(`${username}:${password}`);
    }

    async register(username: string, password: string) {
        const found = this.users.find((user) => user.username === username);
        if (found) {
            throw new Error("User already exists");
        }
        this.users.push({
            username,
            password,
        });
    }
}

export { AuthenticationInMemAdapter };
ports/spi/stubs/tweet-inmem-adapter.ts
import { nanoid } from "nanoid";
import { Tweet } from "../../../types/tweet";
import { ITweetAdapter } from "../itweet-adapter";

class TweetInMemAdapter implements ITweetAdapter {
    tweets: Tweet[];

    constructor() {
        this.tweets = [];
    }

    async listTweets(): Promise<Tweet[]> {
        return this.tweets;
    }

    async createTweet(tweet: Tweet): Promise<Tweet> {
        const tweetToCreate: Tweet = {
            id: nanoid(10),
            createdAt: new Intl.DateTimeFormat("fr-FR", {
                weekday: "short",
                year: "numeric",
                month: "short",
                day: "numeric",
                hour: "2-digit",
                minute: "2-digit",
                second: "2-digit",
            }).format(new Date()),
            likes: 0,
            ...tweet,
        };
        this.tweets.push(tweetToCreate);
        return tweetToCreate;
    }

    async likeTweet(tweetId: string): Promise<Tweet> {
        const tweet = this.tweets.find((t) => t.id === tweetId);
        if (!tweet) throw new Error(`Tweet ${tweetId} not found`);

        if (!tweet.likes) {
            tweet.likes = 0;
        }
        tweet.likes += 1;

        return tweet;
    }
}

export { TweetInMemAdapter };
Test your business logic domain
Now that we have stubs, we can easily test our business domain.
Unlike normal front-end testing, thanks to the hexagonal division we will be able to test the business rules of our domain rather than mounting UI components to test their behavior.
⚠️ : we don't mean to say that component tests are useless but rather that this division allows us to perform new types of tests on our front-end application.
Since our business is decoupled from the framework, we can easily test our business rules directly.
Business tests examples:
Twitter class instantiation with stub adapters:
const twitter = new Twitter(new TweetInMemAdapter());
Test of the rule on the number of characters:
test("should throw error if new tweet message is longer than 144 chars", async () => {
    await expect(() => twitter.tweet(new Array(160).join("x"))).rejects.toThrow(
        "Message length must be lower than 144 characters"
    );
});
Test of “like” of a tweet:
test("should like a tweet", async () => {
    const tweet = await twitter.tweet("Hi !");
    expect(tweet).toHaveProperty("id");
    expect(tweet).toHaveProperty("likes", 0);

    const updated = await twitter.like(tweet.id as string);
    expect(updated).toHaveProperty("likes", 1);
});
You can find all the application's test files next to the source code files *.spec.ts : https://gitlab.com/thekitchen/frontend-hexagonal-demo/-/tree/main/packages/domain/src
Writing adapters
Now that our business code is written and tested, we can proceed to the implementation of the adapter layer.
The adapter layer of our hexagon is where the SPI type interfaces are implemented.
This layer will be responsible for interacting with the data, usually through API calls (REST, GraphQL, etc...) for frontend applications.
In our case, the adapter layer will be responsible for calls to our backend which exposes a REST API.
As for the business logic, we split it into two adapters. One responsible for calling the accounts API, the other for calling the tweets API.
As seen above in the SPI section, these adapters must implement the interfaces defined in the domain SPI layer.
Here are our adapters used to communicate with our REST API:
authentication-rest-adapter.ts
import { IAuthenticationAdapter } from "@hexademo/domain";

class AuthenticationRestAdapter implements IAuthenticationAdapter {
    async auth(username: string, password: string): Promise<string> {
        const response = await fetch("http://localhost:8080/signin", {
            method: "POST",
            headers: {
                Accept: "text/plain",
                "Content-Type": "application/json",
            },
            body: JSON.stringify({
                username,
                password,
            }),
        });
        const token = await response.text();
        return token;
    }

    async register(username: string, password: string) {
        const response = await fetch("http://localhost:8080/signup", {
            method: "POST",
            headers: {
                Accept: "application/json",
                "Content-Type": "application/json",
            },
            body: JSON.stringify({
                username,
                password,
            }),
        });
        if (response.status !== 201) {
            throw new Error("Registration error");
        }
    }
}

export { AuthenticationRestAdapter };
tweet-rest-adapter.ts
import type { Tweet, ITweetAdapter } from "@hexademo/domain";

/**
 * Generate output date
 *
 * @param {Date} date input date
 * @returns {string} output
 */
function formatDate(date: Date): string {
    return new Intl.DateTimeFormat("fr-FR", {
        weekday: "short",
        year: "numeric",
        month: "short",
        day: "numeric",
        hour: "2-digit",
        minute: "2-digit",
        second: "2-digit",
    }).format(date);
}
class TweetRestAdapter implements ITweetAdapter {
    async listTweets(): Promise<Tweet[]> {
        const response = await fetch("http://localhost:8080/tweets");
        const jsonResp = await response.json();
        const tweets: Array<Tweet> = [];
        for (const tweet of jsonResp) {
            tweets.push({
                id: tweet.id,
                message: tweet.message,
                author: tweet.author,
                createdAt: formatDate(new Date(tweet.created_at)),
                likes: tweet.likes,
            });
        }
        return tweets;
    }

    async createTweet(tweet: Tweet): Promise<Tweet> {
        const response = await fetch("http://localhost:8080/tweets", {
            method: "POST",
            headers: {
                Accept: "application/json",
                "Content-Type": "application/json",
            },
            body: JSON.stringify({
                message: tweet.message,
                author: tweet.author,
            }),
        });

        const jsonResp = await response.json();

        return {
            id: jsonResp.id,
            message: jsonResp.message,
            author: jsonResp.author,
            createdAt: formatDate(new Date(jsonResp.created_at)),
            likes: jsonResp.likes,
        };
    }

    async likeTweet(tweetId: string): Promise<Tweet> {
        const response = await fetch(
            `http://localhost:8080/tweets/${tweetId}/like-tweet`,
            {
                method: "POST",
                headers: {
                    Accept: "application/json",
                    "Content-Type": "application/json",
                },
            }
        );
        const jsonResp = await response.json();
        return {
            id: jsonResp.id,
            message: jsonResp.message,
            author: jsonResp.author,
            createdAt: formatDate(new Date(jsonResp.created_at)),
            likes: jsonResp.likes,
        };
    }
}

export { TweetRestAdapter };
The advantage of this technique is that it guarantees the scalability of the communication layer with our backend.
If in the future we want to use a GraphQL API or even another external API to retrieve the data. We'll just have to create a new adapter for the new requirement.
The key is that it is the domain that determines the interface contract (inputs and outputs) and that the adapter layer respects this contract.
Hexagon loading
To instantiate the hexagon, we need to connect the adapters to the SPI ports of the domain.
From a technical point of view, we need to inject the dependencies (adapters) via the existing constructors in our domain layer.
To facilitate this orchestration, we have chosen to create a utility package called @hexademo/loader. This package takes care of instantiating classes in the right order.
Here is the code of our loader:
packages/loader/index.ts
import {
    AuthenticationInMemAdapter,
    SessionCookieAdapter,
    TweetIndexedDbAdapter,
    TweetEventsDispatcher,
} from "@hexademo/adapters";
import { Account, IAccountAPI, Twitter, ITwitterAPI } from "@hexademo/domain";

namespace AppLoader {
    const sessionAdapter = new SessionCookieAdapter();
    const authenticationAdater = new AuthenticationInMemAdapter();

    // nous avons le choix, en fonction de nos besoins
    // nous pouvons choisir le IndexedDBAdapter, InMemAdapter ou bien RestAdapter
    const tweetAdapter = new TweetIndexedDbAdapter();
    // const tweetAdapter = new TweetInMemAdapter();
    // const tweetAdapter = new TweetRestAdapter();

    const accountServiceAPI = new Account(authenticationAdater, sessionAdapter);
    const twitterServiceAPI = new Twitter(accountServiceAPI, tweetAdapter, tweetEventsDispatcher);

// Les instances API sont exposées, pour une utilisation dans un framework front
    export function getTwitterInstance(): ITwitterAPI {
        return twitterServiceAPI;
    }
💡 ️If the domain becomes complex, the integration of a dependency injection engine would be a wise choice.
We used manual injection (aka poor man's injection) to keep the example simple.
Connecting the domain to the framework
With this structure, our hexagon can be integrated from any client, whether it is coded in vanilla JS or using a front-end framework from the market.
To better show the flexibility of the domain, we have created 4 applications using the most widely used frameworks on the market:
- AngularJS (example based on our initial legacy application, but framework still widely used in production)
- VueJS
- Angular
- React
The package @hexademo/loader is simply to expose an instance of the domain.
Since each framework may have its own way of injecting its variables/dependencies, the responsibility of the loader stops here.
Depending on the framework used, you will have to consult the corresponding documentation to inject the domain.
React application example
Loading the domain instances using the loader in our App.tsx.
import { AppLoader } from "@hexademo/loader";

const twitterAPI = AppLoader.getTwitterInstance();
const accountAPI = AppLoader.getAccountInstance();
We then pass the instances to the components that will call the domain layer.
<HomeView accountAPI={accountInstance} twitterAPI={twitterInstance} />
The component can thus use the methods of the domain.
type HomeViewProps = {
    twitterAPI: ITwitterAPI;
    accountAPI: IAccountAPI;
};

function HomeView(props: HomeViewProps) {
    /**
     * Get tweets
     *
     * @returns {Promise<void>}
     */
    async function listTweets() {
        const resp = await props.twitterAPI.listTweets();
        await setTweets(resp);
    }
}
VueJS application example
- Declaration of the domain by using injection keys.
- Injection of the domain instance.
- Call to the domain within a component.
And the injection into our legacy AngularJS application?
The beauty of this breakdown is that we can even make it work with our old legacy AngularJS application!
First of all we get the domain instances via the loader as we did for the React application.
This time we use the angularjs constants to make the instances accessible through our application.
import angular from "angular";
import { AppLoader } from "@hexademo/loader";

const accountAPI = AppLoader.getAccountInstance();
const twitterAPI = AppLoader.getTwitterInstance();

// Pour une meilleur organisation, le domain est déclaré dans un module angularjs indépendant.
export default angular
    .module("domain", [])
    .constant("accountAPI", accountAPI)
    .constant("twitterAPI", twitterAPI).name;
import angular from "angular";
import domain from "@/modules/domain/domain.module";

// le domain est une dependance du module "myApp"
// "myApp" aura accès à toutes les instances du domain
angular.module("myApp", [domain]);
This way the domain instances can be injected on demand
class HomeController implements IHomeController {
    tweets: Tweet[] = [];

    constructor(private twitterAPI: ITwitterAPI) {}

    async getTweets() {
        const tweets = await this.twitterAPI.listTweets();
    }
}
To summarize, even if each technology/framework implements its own way of injecting its dependencies, the loader and the hexagon remain independent bricks, with no link to the library or framework used in the application.
How to use a business domain from within another business domain?
Simply by declaring the dependency in the domain constructor using the API in question.
Use case: I want to use my account domain in the twitter domain to retrieve the name of the connected user.
We declare the API account in the constructor of the Twitter class
class Twitter implements ITwitterAPI {
    accountAPI: IAccountAPI;

    tweetAdapter: ITweetAdapter;

    constructor(
        accountAPI: IAccountAPI,
        tweetAdapter: ITweetAdapter,
    ) {
        this.accountAPI = accountAPI;
        this.tweetAdapter = tweetAdapter;
    }
Once declared, I can use it in the code of the class.
async tweet(message: string): Promise<Tweet> {
    this.#checkThatMessageIsFilled(message);
    this.#checkTweetLength(message);

    const author = this.accountAPI.getUsername();
    this.#checkThatAutorIsFilled(author);

    const tweet = await this.tweetAdapter.createTweet({ message, author });
    return tweet;
}
How to manage business events?
Some application events make sense to be taken out of the framework layer and integrated into the business domain layer.
In our case we identified the tweet-created event as a good candidate to experiment with.
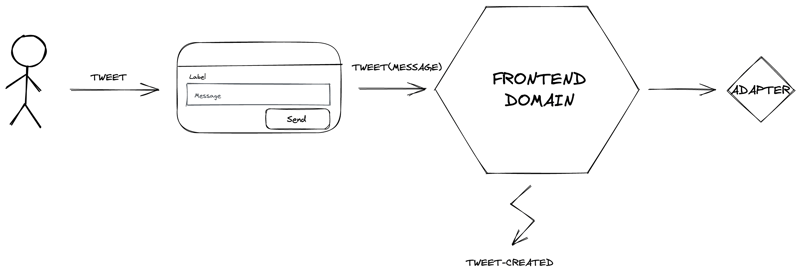
To do this we will add a new dispatcher type adapter (adapter in charge of sending messages, events ...).
In our case, we will use the custom events natively supported in the browser to send our events.
import { ITweetDispatcher, Tweet } from "@hexademo/domain";

class TweetEventsDispatcher implements ITweetDispatcher {
    emitTweetCreated(tweet: Tweet): void {
        const event = new CustomEvent("tweetCreated", {
            detail: tweet,
        });
        document.dispatchEvent(event);
    }
}

export { TweetEventsDispatcher };
Then we will add it to our Twitter business class:
class Twitter implements ITwitterAPI {
    accountAPI: IAccountAPI;

    tweetAdapter: ITweetAdapter;

    tweetDispatcher: ITweetDispatcher;

    constructor(
        accountAPI: IAccountAPI,
        tweetAdapter: ITweetAdapter,
        tweetDispatcher: ITweetDispatcher
    ) {
        this.accountAPI = accountAPI;
        this.tweetAdapter = tweetAdapter;
        this.tweetDispatcher = tweetDispatcher;
    }
    ...
Now we can use it in the tweet() method:
async tweet(message: string): Promise<Tweet> {
    this.#checkThatMessageIsFilled(message);
    this.#checkTweetLength(message);

    ...

    const tweet = await this.tweetAdapter.createTweet({ message, author });

    // Event broadcasting
    this.tweetDispatcher.emitTweetCreated(tweet);

    return tweet;
}
And consume it from node code on the framework side 🙂
// Refresh the list of tweets when a new tweet is created
document.addEventListener("tweetCreated", refresh);
How to manage persistence (session, cookies …) ?
The information that we want to persist on the client side can be vary - sessions, JWT, preferences of the connected user, etc.
For this, we have different techniques at our disposal such as local storage, cookies or more recently the browser's IndexedDB API.
We can consider that it is the role of the business code of our application to manage the data persistence.
Data persistence will be the responsibility of the adapter layer.
For this, like for data consumption, we will create an SPI that we will name ISessionAdapter.
This interface will be used to define the session methods.
In our case, the interface is the following:
interface ISessionAdapter {
    storeValue(key: string, value: string, duration: number): void;
    getValue(key: string): string;
    flush(): void;
}

export type { ISessionAdapter };
We can now implement this interface in our adapter layer.
Here is an example of a session implementation with storage in the browser cookies.
session-cookie-adapter.ts
import { ISessionAdapter } from "@hexademo/domain";

class SessionCookieAdapter implements ISessionAdapter {
    storeValue(key: string, value: string, duration: number): void {
        document.cookie = `${key}=${value}; path=/; max-age=${duration}; SameSite=Strict`;
    }

    getValue(key: string): string {
        const value = `; ${document.cookie}`;
        const parts = value.split(`; ${key}=`);
        return parts.pop()?.split(";").shift() as string;
    }

    flush(): void {
        const cookies = document.cookie.split(";");

        for (const cookie of cookies) {
            const eqPos = cookie.indexOf("=");
            const name = eqPos > -1 ? cookie.substring(0, eqPos) : cookie;
            document.cookie = `${name}=;expires=Thu, 01 Jan 1970 00:00:00 GMT`;
        }
    }
}

export { SessionCookieAdapter };
If in the future we want to change to local storage or Indexed DB, we just have to write the corresponding adapter and load it instead of the adapter previously injected in the domain.
Use of web components
After testing the domain agnostic side, and connecting applications written in different frameworks, the realization comes quickly...
**⚠️ However, if in the future I change the framework, my pages will be deprecated too, right ?
That's a very good point, and the answer is a big yes 😕
The goal being to separate the business layer from the technology/framework used and especially to limit the impacts of a framework change, we still have one final hurdle to overcome: the interfaces.
Key interfaces can also be considered as an additional layer of the business.
The solution: use Web components 🪄 (aka custom elements)
Web components, allow you to create standard components, embeddable in any page whether it is made using a framework, or even in vanilla js/html.
For the creation of web components, even though writing in vanilla js is an option,
we have chosen to do it via a dedicated framework, which will solve
many potential integration/bundling problems. The choice of the framework will be made according to
different factors that are not part of the scope of this article.
Here is how a frontend application looks like once the web components are added:
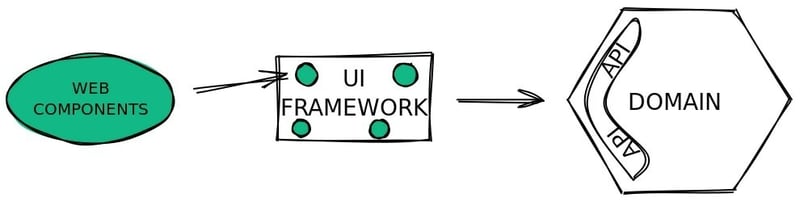
For our application, we have identified the following components as being externalizable as web components:
- The login / account creation form
- The tweet creation component
- The tweet display component
And here are the associated web components:
- tweet-sign : login / account registration
- tweet-card : display a tweet + like action
- tweet-create : input message + create action
End-to-End Tests (E2E) with Playwright
End-to-end tests (or E2E) are designed to test the entirety of our application.
For this project, we decided to use Playwright to perform our tests on various browsers.
Playwright is an E2E testing framework compatible with all operating systems.
It supports Chromium, WebKit and Firefox which allows running tests on all major browsers on the market.
For a detailed presentation, you can watch the excellent video of Grafikart (FR) on the subject: https://www.youtube.com/watch?v=UgF2LwlNnC8
The various options of the framework (browsers, server to launch, screenshot ...) are configurable in the file playwright.config.ts.
E2E test example
For our application, we wrote a simple test case:
- An existing user logs into our application
- The user posts a tweet
- The user likes a tweet
- The user logs out
And here is what it looks like in terms of code :
e2e/tests/existing-user.spec.ts
import { test, expect } from "@playwright/test";

test("should login with unicorn account, like, post a message and disconnect", async ({
    page,
}) => {
    // login
    await page.goto("http://localhost:5173");
    await expect(page).toHaveURL("http://localhost:5173/#/signin");
    await page.locator("#username").click();
    await page.locator("#username").fill("unicorn");
    await page.locator("#password").click();
    await page.locator("#password").fill("rainbow");
    await page.locator("text=Login").click();
    await expect(page).toHaveURL("http://localhost:5173/#/home");

    // create a tweet
    await page.locator("#message").click();
    await page.locator("#message").fill("hello world !");
    await page.locator("text=Honk 🚀").click();
    const newTweet = await page.locator(
        "tweet-card:first-of-type .tweet-card__like-button"
    );
    await expect(newTweet).toHaveText("0 ❤️");

    // like a tweet
    const likes = await page.locator(":nth-of-type(3) .tweet-card__like-button");
    await expect(likes).toHaveText("3 ❤️");
    await likes.click();
    await expect(likes).toHaveText("4 ❤️");

    // logout
    await page.locator("text=Logout").click();
    await expect(page).toHaveURL("http://localhost:5173/#/signin");
});
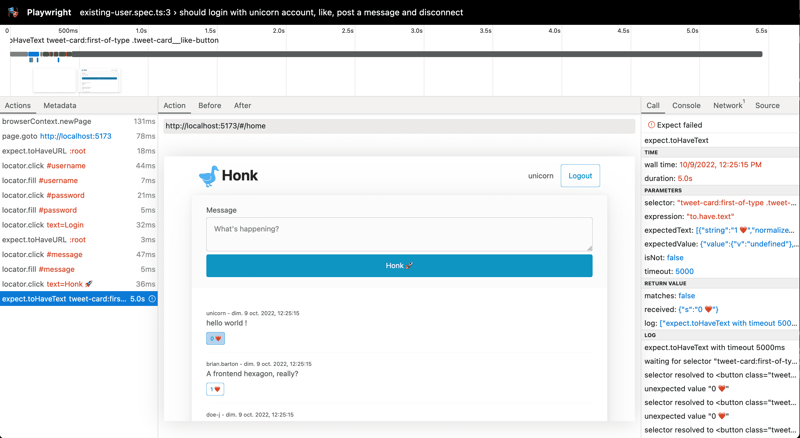
Test report
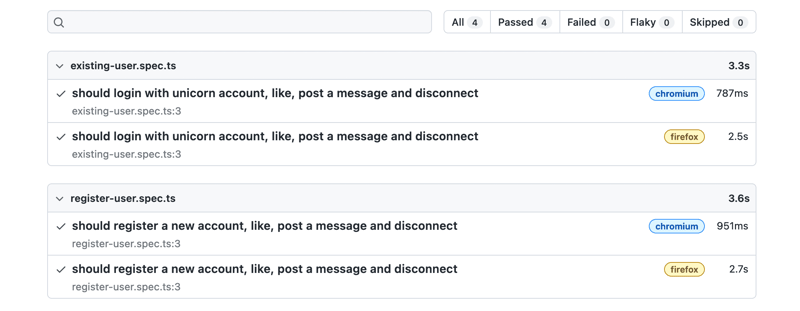
Once the tests are finished, the command npx playwright show-report allows you to consult the test report.
Example of OK report
In case of errors, it is also possible to view the trace which allows you to see the browser rendering at the time of the error.
Test integration in Gitlab CI
In our case, we have integrated our E2E tests in Gitlab CI to test our different framework implementations.
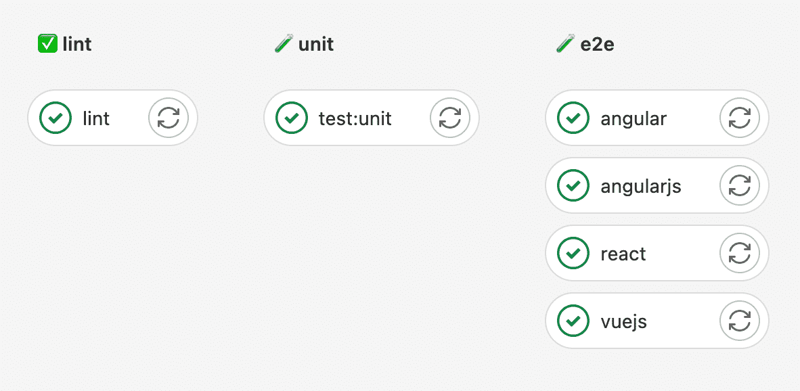
This pipeline allows us to run the same test suite on our legacy Angularjs application as well as on the Vuejs, React and Angular.
The pipeline code is available here: https://gitlab.com/thekitchen/frontend-hexagonal-demo/-/blob/main/.gitlab-ci.yml
Final project
The completed project is available here: https://gitlab.com/thekitchen/frontend-hexagonal-demo
Conclusion
In conclusion, the realization of this project has allowed us to increase our skills in building and splitting front-end applications.
The implementation of the hexagonal architecture in the frontend allows us to build durable applications whose business code can survive even after the depreciation of a UI framework.
With this division, it is also possible to integrate backend developers in the development of applications on the domain part and to adapt it in the same way as backend Javascript.
And finally, the fact that our application becomes testable without backend and only in memory with the help of stubs has made it easier for us to deploy it for end-to-end testing.
If you have any questions about the code or the project execution, don't hesitate to contact us!
Thanks for your attention 🙇♂️.
Matthieu and Sebastian
Links
- https://alistair.cockburn.us/hexagonal-architecture/
- https://beyondxscratch.com/2017/08/19/hexagonal-architecture-the-practical-guide-for-a-clean-architecture/
- https://www.youtube.com/watch?v=UgF2LwlNnC8
- https://thekitchen.gitlab.io/
- https://gitlab.com/thekitchen/frontend-legacy-app
- https://gitlab.com/thekitchen/frontend-hexagonal-demo


Top comments (7)
And in doing so you are still exposing yourself to same dangers as choosing a non-web component framework. Currently many WC proponents like to recommend Google's Lit. It needs to be noted that Lit itself is the last of a line that started with Polymer 1.0 (2015), 2.0 (2017), 3.0 (2018), [lit-html (2017)], Lit 1.0 (2019), 2.0 (2021). So if something is maintained and under active development there is going to be churn (don't get me wrong custom elements are extremely useful).
Your discussion focuses on the Gen 2 approach to the web (AngularJS is classified as a Gen 1 technology). The prediction is that for Gen 3 “frontend development will shift away from the client-side and lean much more heavily on server-first architectures”.
That means that front end development is shifting to a model that should be familiar from the 2012 Netflix API redesign where the server becomes the “client adapter” to the business logic (or otherwise known as a BFF—Backend for Frontend). This effectively shifts the decoupling boundary from the network boundary between browser and server to behind the server (which itself could be running on an edge worker).
eBay embraced this model as far back as 2012 when they developed Marko which is now marching steadily towards version 6. A fullstack JavaScript solution was only going to be accepted if it matched or outperformed the existing Java + sprinkling of JS system. In the process Marko also eliminated the “one app for the price of two” problem (the server application written in a traditional server language while client interactivity is added separately with JavaScript—WebAssembly/Rust isn't really going to solve this problem as issues keep surfacing).
Yes, even by choosing Lit (or another one) you're exposed to a framework depreciation (and even worse if google is behind it).
In software development, you always need to make a choice, and the choice is never a silver bullet. The ecosystem now, will change in the future, and we must design our software to be adaptable to these changes with the minimal impact.
We cannot do everything in vanilla, we must make choices.
Important to know: this article is not saying that your backend business or BFF doesn't exists, there is always a surface business layer in the frontend, that is commonly strongly tied to a framework, this article shows how to avoid this.
AngularJS is a deprecated framework, but the reality is that is one of the most used frameworks in legacy production apps, and these teams cannot afford a total rewrite in the new shiny technology of today, and risking to have the same problem within 5 years.
Finally, all these concepts can be perfectly applied to almost any language or render pattern, client or server.
It matters where those 5 years fall in terms of technology generations.
It's easy to imagine in hindsight in 2022 that if an AngularJS application was implemented between 2010-2016 and observed the described implementation that the UI could be more easily modernized today—but that is largely an intra-generational upgrade.
The next 5 years will likely require an inter-generational upgrade that can cause physical boundaries to shift and require interfacing technologies to be updated which means even more modernization work.
And while “Port and Adapters” dates back to about 2005, few were paying attention to it in the front end space during the AngularJS days and if anything the drive towards native-app like SPAs encouraged business logic to be pulled into the client side.
So implementing something now that would have been helpful 5-10 years ago isn't necessarily going to have the same payoff in 5 years.
This isn't to say that the Hexagonal Architecture is useless, far from it. It's value largely comes from the awareness of where the conceptual boundaries and interfaces occur in the current physical implementation and practicing the discipline to not let capabilities arbitrarily cross those boundaries.
More often than not capabilities start to appear in the wrong place because of organizational issues.
This is absolutely going to blow! Thanks for sharing
I love this idea. Definitely going to try it in a future project
Great work and analysis. Thnks
Interesting approach and great write up. In my experience I have found the API layer in the front-end codebase to be UI framework agnostic already. The aspects that tend to be framework specific and would require significant rework when migrating to another framework is the display logic within the components. While aspects of that could be extracted into domain services that can be framework agnostic, I have found their design to be fairly coupled to the UI framework conventions and architecture. While a lot of it can be hidden behind a BFF there is always some need for logic in the components themselves.
Have you found this approach to be helpful when extracting UI display logic as well?
Hexagonal design is great. Even having a domain layer is enough to gain huge advantages. Using the Command Pattern you can design your business logic as independent, testable objects (or functions if you prefer), and you can then compose them to create more complex business rules and actions.