Quality is critical when it comes to releasing any software, whether it’s in order to ensure an excellent experience of your product with minimal bugs, or even for security reasons, and it’s been well established that good code comes coupled with good tests. The hierarchy of tests as they relate to quality assurance are from unit tests through E2E testing, so just so we’re on the same page––I’ll briefly dive into each, and why the ultimate goal is to reach E2E testing of your product.
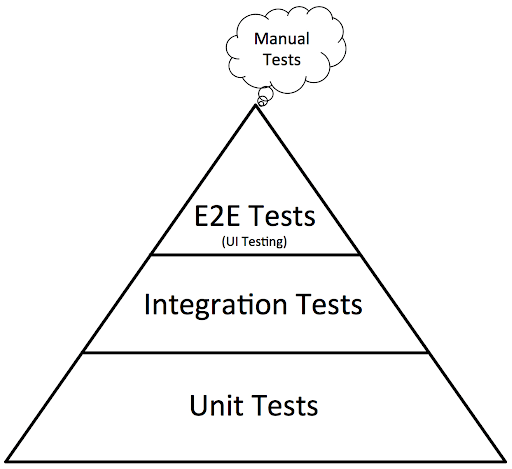
Unit tests are at the bottom of the pyramid, as they’re just what they sound like, the smallest self-contained unit of testing. This means that you take the component or piece of code that you wrote, and test it as a standalone unit. This code is completely disconnected from anything else in the software stack and system it is going to live in, and the tests check if it performs as expected, as a standalone entity.
Once we complete this basic testing of our code, we need to dive a little deeper, and test the code with more context of where it is actually going to exist in the stack, and this is where integration testing comes in. Integration testing is when we start integrating our code with other modules and services to see how it performs and functions in a more realistic ecosystem. While these can provide some context, they still need to be fast, and so they really don’t cover all scenarios, and don’t cover how users interact with your product at all.
While some would argue that unit tests are the simplest unit of testing, sometimes you need to actually write mock modules to ensure the code actually works, whereas with integration tests you plug into actual existing modules. At this point you verify that your assumptions when mocking and injecting dependencies for unit testing do hold. So it’s a toss up - but both of these test types usually present fairly different challenges than end-to-end (E2E) testing.
E2E testing is likely the most important testing you will need to perform on your product. It’s mission-critical to the company to ensure that the core business and value you are trying to provide the end-user is fulfilled. It involves simulating the end user as closely as possible, and ensuring the product works as expected––with many considerations in mind: usability, performance, user experience, and much more.
E2E testing usually involves the impersonation of an end-user journey, such as logging in, integrating it with the user's existing environment, interacting with it and much more. Since there is so much involved with getting this right, and extracting realistic results, many companies choose to do this manually.
Companies usually employ QA teams whose sole purpose is to spin up the product in testing environments, and use the product like a regular user. However, what the company will quickly discover is that they need to do this at a greater velocity and scale that doesn’t keep up, with repeated ticket back-and-forths between the QA and Engineering teams and this is a tedious and tiresome process that largely just frustrates engineers.
So they decide to automate the tests, by creating a test automation team.
At Diversion, as an early stage startup, we needed all our engineers focused on writing great code to reach our product release targets quickly. However, we knew we couldn’t compromise quality, so we went to work designing a solution for automating our E2E tests from day one. We’ll walk you through how we built and automated our E2E testing framework with Docker Compose, RPyC, and Puppeteer.
Automate All the Tests
It’s core to our philosophy that developers should be happy, and enjoy their day to day work. Yet, as engineering managers, one of the most common sources of pain for developers is testing which we can’t compromise on.
Automation is a great way to remove human error from all processes, as well as streamline repeatable processes, and remove the pain of manual testing. We understood that if we invest in the technical design of our test automation, we would be able to offload this from our engineers. In addition, by automating our E2E we created greater satisfaction and ownership of our product by our engineers, who focus on building an excellent product, with built-in quality guardrails while minimizing friction.
However, automating the end-to-end user experience of your product is quite challenging. We needed to ensure the testing covers all of the critical parts in the chain of the E2E user flow and the typical operations they would perform, such as:
Signing in and entering credentials in a web page, checking file system operations such as creating a file, writing to it and then moving it somewhere, make this happen on several machines in parallel, and enabling these machines to communicate with each other. On top of this, we needed to be able to trust the accuracy of the results.
The Stack
After some research and understanding of what we need to design and build, we chose Docker Compose, RPyC, and Puppeteer for our test automation suite. The tech stack for our E2E testing is completely independent of the stack we chose for our product of course (we’ll dive into this in a separate post), and it can run with any product that is able to run Docker and Docker Compose in their environment.
We chose Docker Compose because the service requires several hosts to be spun up and communicate with each other. Docker Compose provides a convenient solution for this, as it sets up a single flat network for your application by default. This means that each container for a service joins a default network and is reachable by other containers on that network at a hostname identical to the container name. Docker Compose is also a very popular tool in the ecosystem, so it was easy to integrate and run it with other popular CI tools like Github Actions. Making the automation really easy to set up.
RPyC enabled us to run the test scenario from a single script, as one host can control other hosts that participate in the test script. Much of our backend code is Python, so this was a sensible choice for us, as the entire team is comfortable with it. RPyC also enables us to do any random operations we need from within the testing scenario, such as executing any binary.
Puppeteer is an automation tool for Chrome that enables you to take control of web pages, and is able to click buttons, fill in forms, and perform other web-based actions. When you start using the Diversion CLI, the sign-in process takes you from the terminal to a webpage for authentication. It then uses a Proof Key for Code Exchange flow (RFC7636) to fetch the credentials from the server. Puppeteer enabled us to emulate a user performing the web sign-in process.
Show Me the Code
We launch three services, one for Puppeteer, and the other two are the mock users/participants in the test scenario (we create two machines for the same user). Next we dive into the different parts of this test scenario setup.
# docker-compose.yml
version: '3'

services:
 cli-1:
   image: cli_user_image
   build:
     context: .
     dockerfile: Dockerfile.cli
   volumes:
     - ../:/repos/diversion
   environment:
     - AWS_REGION  # forward AWS credentials, for accessing AWS Secrets Manager
     - AWS_ACCESS_KEY_ID
     - AWS_SECRET_ACCESS_KEY
   command: >
     sh -c "REPOS_PATH=/repos/dv_repos &&
           /repos/diversion/system-tests/prepare_test_env.sh &&
           cd /repos/diversion/system-tests/tests/ &&
           su -c 'dv login' cliuser &&
           su -c 'rpyc_classic.py --host 0.0.0.0' cliuser"
 cli-2:
   image: cli_user_image
   volumes:
     - ../:/repos/diversion
   environment:
     ...  # same vars
   command: >
     sh -c "REPOS_PATH=/repos/dv_repos &&
           /repos/diversion/system-tests/prepare_test_env.sh &&
           cd /repos/diversion/system-tests/tests/ &&
           su -c 'dv login' cliuser &&
           REPOS_PATH=$$REPOS_PATH PLAYER2_RPYC=cli-2 su -c 'python3 -m unittest discover .' cliuser"
 puppeteer:
   build:
     context: .
     dockerfile: Dockerfile.puppeteer
   stdin_open: true
   cap_add:
     - SYS_ADMIN
   depends_on:
     - 'cli-1'
     - 'cli-2'
   volumes:
     - ../:/repos/diversion
   environment:
     ...  # same vars
   command: >
     sh -c 'cd /usr/app &&
           /repos/diversion/system-tests/wait_for_it.sh --strict --timeout=240 cli-2:5002 &&
           LOGIN_PW=$$(aws secretsmanager get-secret-value --secret-id test/e2e/login | jq -r .SecretString | jq -r .password) &&
           node --unhandled-rejections=strict ./loginscript.js $$(nc -w 1 cli-1 5001) "$$LOGIN_PW" &&
           /repos/diversion/system-tests/wait_for_it.sh --strict --timeout=120 cli-1:5002 &&
           node --unhandled-rejections=strict ./loginscript.js $$(nc -w 1 cli-2 5001) "$$LOGIN_PW"'
The first CLI instance signs in, then opens an RPyC socket, and is then controlled by the test scenario on the other CLI instance. For signing in, our CLI calls xdg-open on Linux machines with a preconfigured URL. To automate it, we placed the following script at /usr/bin/xdg-open:
#!/usr/bin/env bash
# xdg-open override
nohup sh -c "echo '""$1""' | nc -l 5001" >/dev/null 2>&1 &
nohup sh -c "echo ready | nc -l 5002" >/dev/null 2>&1 &
When the CLI calls xdg-open <url>, this script publishes the sign-in URL on port 5001 using netcat, then announces that the address is available via port 5002:
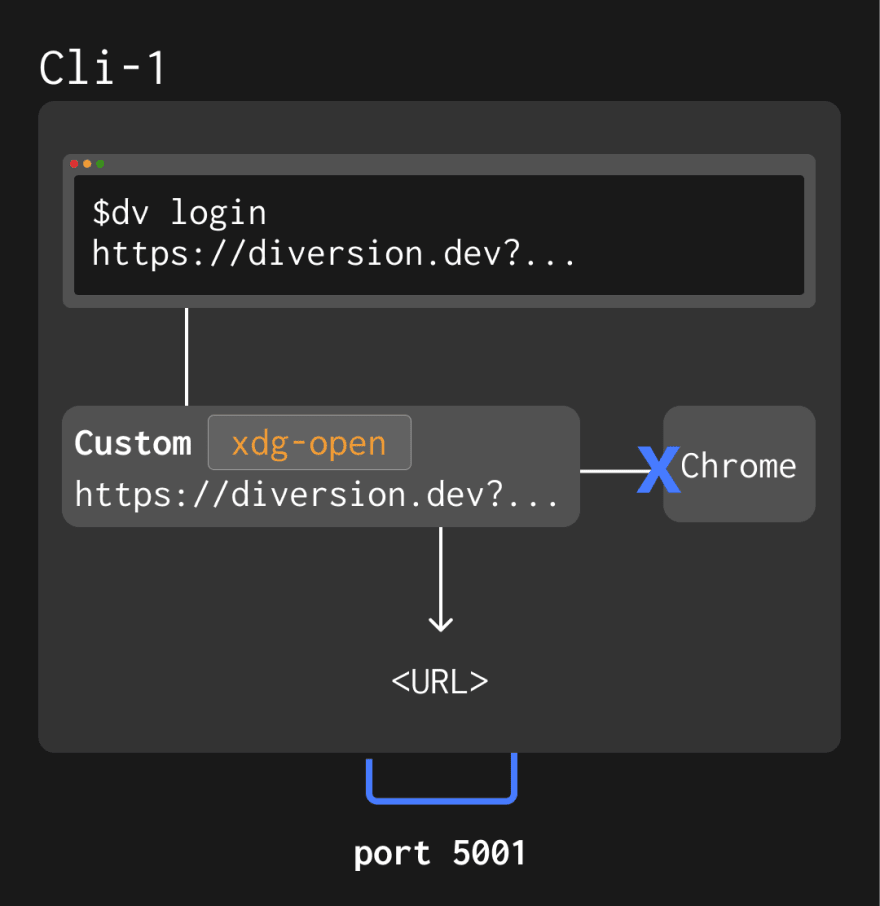
This is then used in the puppeteer service, as we see in the docker-compose file: it first waits for the URL to be available by calling wait_for_it.sh (project on Github) on port 5002 of host cli-1, then reads the address that should be opened from port 5001 ($$(nc -w 1 cli-2 5001)) and passes it to loginscript.js.
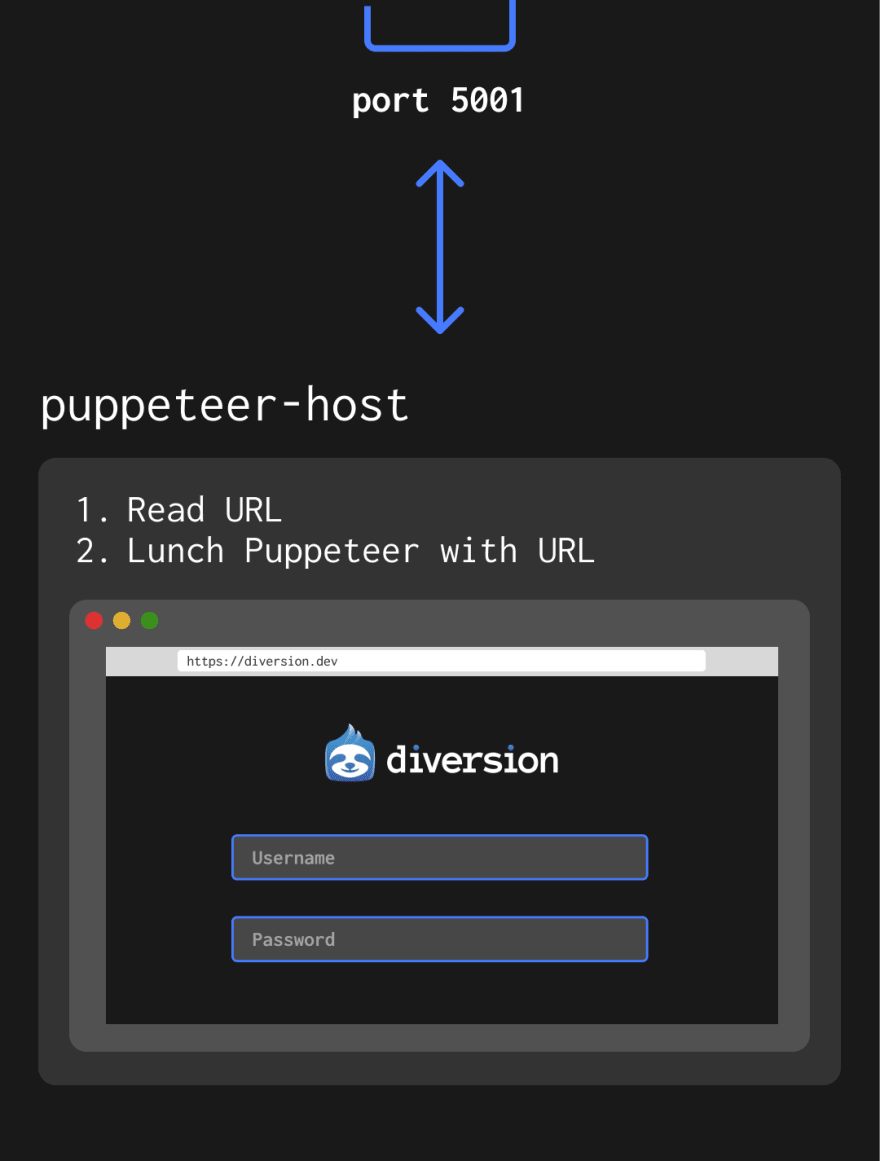
The puppeteer login script is pretty straightforward, feeding the sign-in form with the credentials. This is the gist of it:
// loginscript.js
const signInUrl = myArgs[0];
await page.goto(signInUrl);
try {
 await page.waitForSelector('input[name=username]', {timeout: 1000});
 await page.type('input[name=username]', 'testuser');
 await page.waitForSelector('input[name=password]');
 const pw = myArgs[1];
 await page.type('input[name=password]', pw);
 await page.click('input[name=signInSubmitButton]');
} catch (error) { // User is already signed in and all we're getting is a "Sign in as <user>" button
 await page.waitForSelector('input[type=Submit]');
 await page.click('input[type=Submit]');
}
After both clients have signed in, it’s time to run the actual scenarios. Below is a snippet of the system tests. It starts by connecting to the other machine in setUpClass, then runs a test involving two clients for a single user. Note how dv_runner_remote uses the RPyC socket to execute dv CLI commands on the other machine:
# test_system.py

class SystemTest(unittest.TestCase):
   TEST_REPO_NAME = 'test-repo'
   TEST_REPO_DIR = f'./{TEST_REPO_NAME}'

   @classmethod
   def setUpClass(cls) -> None:
       cls.player2 = rpyc.classic.connect(os.environ['PLAYER2_RPYC'])

   def test_create_move(self):
       dv_runner_local = DvRunner(subprocess.run)
       dv_runner_remote = DvRunner(self.player2.modules.subprocess.run)

       # clone the repo
       resp = dv_runner_local.run('clone', SystemTest.TEST_REPO_NAME)
       self.assertTrue(os.path.exists(f'{SystemTest.TEST_REPO_DIR}'),
                       f'stdout: {resp.stdout}, stderr: {resp.stderr}')

       # create a file, then move it to a new dir
       os.mkdir(f'{SystemTest.TEST_REPO_DIR}/test-dir/')
       with open(f'{SystemTest.TEST_REPO_DIR}/test-dir/test-file', 'w') as f:
           f.write('test-content')
       os.mkdir(f'{SystemTest.TEST_REPO_DIR}/test-dir2')
       shutil.move(f'{SystemTest.TEST_REPO_DIR}/test-dir/test-file',
                   f'{SystemTest.TEST_REPO_DIR}/test-dir2/test-file')

       # clone the repo on the other machine
       resp = dv_runner_remote.run('clone', SystemTest.TEST_REPO_NAME)
       self.assertTrue(self.player2.modules.os.path.exists(f'{SystemTest.TEST_REPO_DIR}'), resp.stdout)
       self.player2.modules.os.chdir(SystemTest.TEST_REPO_DIR)

       # ensure the file is in the right location
       self.assertTrue(self.player2.modules.os.path.exists(f'{SystemTest.TEST_REPO_DIR}/test-dir2/test-file'))

       # delete the repo
       player2_status = dv_runner_remote.run('status')
       repo_id = re.findall(r'(dv.repo.\S)', player2_status.stdout)[0]
       resp = dv_runner_remote.run('repo', '-d', repo_id)
With this stack we were able to simulate E2E testing of our CLI with a web-based login, and this is applicable for any similar application. This general framework can be leveraged to solve many other use cases as well, for example if you need to perform an action from a CLI and verify it propagated in a webpage, synchronize actions across multiple machines from one central script, etc.
This framework manages to reduce the daunting task of E2E tests to a nearly self-contained unit, very similar to unit testing. With all of the relevant services and components connected and communicating with each other, you can write these tests quickly and simply just like unit tests. This is a sweet spot for developers, and the testing realm they feel most comfortable with, as it is much more native to their workflows, and with the automation it is much more scalable than manual QA. The E2E testing also provides as close a replication of the product journey as possible. This ensures that our developer experience and product quality are always at the core of our engineering.
Special thanks to Alon Regev and Avi Mastov for their feedback on this article.


Oldest comments (2)
Great post @egalazarev! I've been looking for something like this for a while....will check it out!
Awesome read! This is how you build great products👏