
Hey gorgeous reader,
In this blog, I will demonstrate how to implement Spotify Authentication and retrieving Users' Data with ReactJs and ExpressJs. To implement this, we will be using a third-party library called spotify-web-api-node.
Let's go 🚀,
Table Of Contents:
- Setting up initial project Structure
- Setting up Spotify Web API
- Designing the Login Page
- Working on Spotify Configuration File
- Setting up the Server
- Creating custom Hook for handling Authorization
- Getting the User's Data (Optional)
1. Setting up the Initial Project Structure:
To get started let’s make a new folder named spotify-auth. Now open this folder with VS-Code or by using your favorite IDE.
Create two folders inside the spotify-auth named client and server.
Now that you are in Visual Studio Code, Press Ctrl + J (on Windows) and Command + J (on Mac).
Now that you’re in the terminal, we can now set up our React client and ExpressJS server.
Client Setup,
To setup the client, first, change the current directory to the client by entering the following code in the terminal.
cd client
- Then, to create a React app in your client directory, type the following and press Enter.
npx create-react-app .
- You know that it is finished when you see “Happy Hacking” on your terminal. If you see that, we are ready to move on.
- Install dependencies by running the following:
npm i @material-ui/core spotify-web-api-node axios
- Now that we have our React App and all the dependencies installed, now we can start it. In the terminal type the following command. This command will start the React App.
npm start
- After you hit Enter, you should see your default browser open. Although I suggest Google Chrome because of its development tools making life easier, it’s still your personal preference, but we cannot guarantee development quality with other browsers.
- If you did everything correctly, you must see the following screen on your browser window.
- If you do not see the browser tab open
http://localhost:3000
- Then go to the above URL.

- This is the Welcome screen of React. If you reached here then congrats.🥳
Server Setup,
- To set up the server, first, change the current directory from client to server by entering the following code in the terminal:
cd ../server
- Then create a server.js file into the server folder and run the following in terminal to initialize the package file:
npm init -y
- Install dependencies:
npm i express spotify-web-api-node cors
- Now enter the following into server.js,
const express = require('express')
const app = express()
const port = 8000

app.get('/', (req, res) => {
  console.log('Hello World!')
})

app.listen(port, () => {
  console.log(`Example app listening at http://localhost:${port}`)
})
- Now that we have our server setup, now we can start it. In the terminal type the following command:
node server.js
- If you see 'Hello World!' in your terminal, then congrats your server is running.🥳
2. Setting up Spotify Web API:
To get access to the Spotify Web API so that we can get a lot of details from the API, we must create an API credential at Spotify Developers Website. To do that, use this link to go to Spotify Developer Dashboard. Here’s the full URL
https://developer.spotify.com/dashboard/
Then you have to press login and login using your Spotify account, although, you can use Google, Facebook, or Apple for third-party agents as logging in to Spotify.
You must be redirected to the Dashboard and now you should see something like this:

If you are here, great! Just press the “Create an App” button so that we can generate our Spotify API credentials.
You will now see a popup box like this:
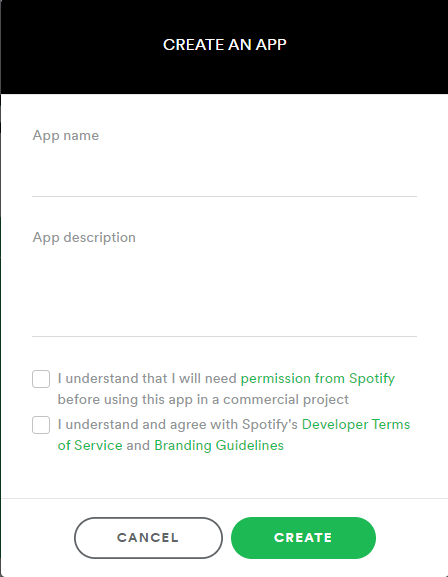
Give your app a name, in this case, I will use “spotify-clone-medium” and give it a description. Make sure you agree to Spotify’s Terms of Service before pressing “Create”.
You should now see a screen similar to this:

Here, copy the Client ID and save it somewhere, we will need it in the app. We would require the Client Secret but you need to keep it a secret and should not be shared in any circumstances.
Now, click on the Edit Settings button. You should see something like this:

Here, in the Redirect URIs field, enter our development server address which is http://localhost:3000/ (do not forget the slash in the end). After you enter click on the Add button beside it and finally, hit Save.
3. Designing the Login Page:
Now we have everything set up properly, we can go ahead and actually start coding and make our Login Page!
To do that, let’s make a file named Login.js in the client/src folder. Once you are in the file, use rfce snippet from ES7 Snippets to make a component. Also, we will be using a Material-UI hook named 'makeStyles' for the styling. If you don't want to use Material-UI then you can create a separate Login.css and write all the styling in that file and when you are done, import it into the Login.js.
To use { makeStyles } from Material-UI we need to import it first.
Also, I have chosen a Spotify logo that fits the background. Also, I've given some styling to our Login component so that it looks nice with the help of makeStyles. You can copy the following to the Login.js :
import React from 'react'
import { makeStyles } from '@material-ui/core/styles';

const useStyles = makeStyles({
    login: {
        display: 'grid',
        placeItems: 'center',
        height: '100vh',
        backgroundColor: 'black',

        '& img':{
            width: '50%'
        },

        '& a':{
            padding: '20px',
            borderRadius: '99px',
            backgroundColor: '#1db954',
            fontWeight: 600,
            color: 'white',
            textDecoration: 'none',
        },

        '& a:hover':{
            backgroundColor:' white',
            borderColor: '#1db954',
            color: '#1db954',
        }
    },
});
function Login() {
    const classes = useStyles()
    return (
        <div className={classes.login}>
            <img src="https://getheavy.com/wp-content/uploads/2019/12/spotify2019-830x350.jpg" alt="Spotify-Logo"/>
            <a href="#">LOGIN WITH SPOTIFY</a>
        </div>
    )
}

export default Login
Let’s go back to App.js and render this component. To do that, go to App.js, import the component, and use it inside the parent div. Your App.js should now look like this:
import React from "react";
import "./App.css";
import Login from "./Login";

function App() {
  return (
    <div className="app">
      <Login />
    </div>
  );
}

export default App;
So now, if you go to your browser, you should see something like this:

If you see the above screen, congrats you have made the Login page design🥳. Now let’s make a Spotify Configuration File that will help us Login using Spotify Web API.
4. Working on Spotify Configuration File:
We will use a Spotify Configuration file so that all our Spotify API logic stays at a place and in an organized manner. So let’s make a new file called spotify.js and have the following contents and then we will run through the code and see how it works.
const authEndpoint = "https://accounts.spotify.com/authorize";
const redirectUri = "https://localhost:3000/";
const clientId = "YourClientId";

const scopes = [
  "streaming",
  "user-read-email",
  "user-read-private",
];

export const loginUrl = `${authEndpoint}?client_id=${clientId}&response_type=code&redirect_uri=${redirectUri}&scope=${scopes.join(
  "%20"
)}`;

// loginUrl = "https://accounts.spotify.com/authorize?client_id=YourClientId&response_type=code&redirect_uri=https://localhost:3000/&scope=streaming%20user-read-email%20user-read-private"
Here’s the logic behind the Spotify configuration file:
- The authEndpoint is the URL where we need to authenticate using Spotify. All Spotify Authentication requests must be passed through this URL.
- The redirectUri is the one which we gave in the Spotify Web API settings, this states where to take back the user if the Spotify login was successful.
- The clientId is the Client ID provided to you by the Spotify Web API and you need to mention it here.
- scopes are basically permissions that you need to ask Spotify for. More such permissions are available on Spotify API Documentation about scopes.
- The loginUrl is the final URL that needs to be called to authorize a user for our Spotify Clone app. This URL contains the Client ID and all the permissions so that Spotify knows about our app and allows user authentication.
Now let’s bring this loginUrl into our Login component(login.js) so that we can enable our users to Login through the app. So, your code should now look at this and should link to the loginUrl.
import React from 'react'
import { makeStyles } from '@material-ui/core/styles';
import { loginUrl } from "./spotify";

const useStyles = makeStyles({
    login: {
        display: 'grid',
        placeItems: 'center',
        height: '100vh',
        backgroundColor: 'black',

        '& img':{
            width: '50%'
        },

        '& a':{
            padding: '20px',
            borderRadius: '99px',
            backgroundColor: '#1db954',
            fontWeight: 600,
            color: 'white',
            textDecoration: 'none',
        },

        '& a:hover':{
            backgroundColor:' white',
            borderColor: '#1db954',
            color: '#1db954',
        }
    },
});
function Login() {
    const classes = useStyles()
    return (
        <div className={classes.login}>
            <img src="https://getheavy.com/wp-content/uploads/2019/12/spotify2019-830x350.jpg" alt="Spotify-Logo"/>
            <a href={loginUrl}>LOGIN WITH SPOTIFY</a>
        </div>
    )
}

export default Login
Now, if you try to click on LOGIN WITH SPOTIFY on your app in the browser, you will see you are redirected to Spotify asking to login and then requesting authorization. Once you authorize, you find yourself back on the Login Page, but this time, you see a code in the URL bar:

We need that code to generate the Access Token that we will use to authenticate the User. To do that, we need to take code out of the URL bar. Also, create a Dashboard.js in src, so whenever we log in we will be redirected to Dashboard with the value of code passing via props.
Dashboard.js:
import React from "react";

const Dashboard = ({ code }) => {
  return (
    <div>
            {code}
    </div>
  );
};

export default Dashboard;
Now, let’s write some logic to get the value of code from the URL.
So, go back to App.js and add the following code:
import React from "react";
import "./App.css";
import Login from "./Login";

// 'URLSearchParams(window.location.search)' will get url string after the '?' & .get() will get the code value from the url
const code = new URLSearchParams(window.location.search).get('code')

function App() {
  return (
    <div className="app">
      {code ? <Dashboard code={code} /> : <Login />}
    </div>
  );
}

export default App;
- In the above, we are getting the value of code from the URL and passing it to the Dashboard.
Logic Behind the code:
- To access the value of the query(the string after '?' in URL) inside the browser, using JavaScript, we have a special API called URLSearchParams(), supported by all modern browsers.
- Note: don’t pass the full URL as a parameter to
URLSearchParams(), but only the query string part of the URL, which you access usingwindow.location.search.
In the case of:
https://test.com/hello?name=roger
window.location.search is equal to the string ?name=roger.
-
get('code')function will get the value of the code.
Now if you click the Login button, you will be redirected to Dashboard with the code printed on the screen.
If you can see the code value then congrats, we can now use this to generate the AccessToken.🥳
5. Setting up the Server:
Now, we will set up the Server that will generate the accessToken with the help of the code that we will receive from the client.
We will be using a library named spotify-web-api-node, by which we can call the Spotify API in a much easier way.
Copy the following code into the sever.js and then we will run through the code and see how it works.
const express = require('express')
const cors = require('cors')
const spotifyWebApi = require('spotify-web-api-node')

const app = express()
const port = 8000

app.use(cors()) // To handle cross-origin requests
app.use(express.json()); // To parse JSON bodies

const credentials = {
  clientId: Your CLIENT_ID,
  clientSecret: Your CLIENT_SECRET,
  redirectUri: http://localhost:3000/,
};

app.get('/', (req, res) => {
  console.log('Hello World!')
})

app.post('/login', (req,res) => {
//  setup
    let spotifyApi = new spotifyWebApi(credentials)

//  Get the "code" value posted from the client-side and get the user's accessToken from the spotify api
    const code = req.body.code

    // Retrieve an access token
    spotifyApi.authorizationCodeGrant(code).then((data) => {

        // Returning the User's AccessToken in the json formate
        res.json({
            accessToken : data.body.access_token,
        })
    })
    .catch((err) => {
        console.log(err);
        res.sendStatus(400)
    })

})

app.listen(port, () => {
  console.log(`Example app listening at http://localhost:${port}`)
})
Here's the logic behind the above code,
- First, we have setup our credentials, so that we can use the spotifyWebApi(it has many functions that make calling Spotify API easy).
- Then, we have created a post route '/login' that will request the code value from the client and send the accessToken in response.
-
.authorizationCodeGrant()is a function that will return the data, which contains - accessToken, refreshToken, and expiresIn, generated with the help of the code. For now, we only need accessToken.
6. Creating custom Hook for handling Authorization:
Now, we will create a custom hook named useAuth for handling our Authorization logic.
The useAuth hook will receive the accessToken from the server that we created.
- First create a useAuth.js file in client/src folder.
- Copy the following code:
import { useEffect, useState } from "react";
import axios from "./axios";

export default function useAuth(code) {
  const [accessToken, setAccessToken] = useState();

  useEffect(() => {
    axios
      .post("http://localhost:8000/login", { code })
      .then((response) => {

        // If success then cut the code string from the URL and execute the other thing
        window.history.pushState({}, null, "/");

        console.log(response.data);
        setAccessToken(response.data.accessToken);

      })
      .catch(() => {
        //   If fail redirect to home page - Login page
        window.location = "/";
      });
  }, [code]);

  return accessToken
}
Here's the logic:
- We are using the axios library for requesting the server.
- We have written our login in a useEffect with the dependency of code, so whenever our code value changes, this useEffect will run.
- We are making a post request at the '/login' route to our server with the code value.
- The server in response will send the accessToken, which we store in the state with the help of useState.
So in a Nutshell, useAuth will request the server with the code value, and in response, the server will return the accessToken of the User.
You can try printing the accessToken to check whether you have received it or not.
Now, you can use this accessToken to retrieve data of the User from Spotify.😁
7. Getting the User's Data (Optional):
Want to see the User's Information as they log in? Don't worry we will cover that here. We will use spotify-web-api-node, for getting the user's data.
First copy the following code into the Dashboard.js :
import React, { useEffect } from "react";
import useAuth from "./useAuth";
import SpotifyWebApi from "spotify-web-api-node";

// Setting the spotifyApi, so that we can use it's functions
const spotifyApi = new SpotifyWebApi({
  clientId: "7b215911d14245089d73d78055353cb2",
});

const Dashboard = ({ code }) => {
  const accessToken = useAuth(code);

  useEffect(() => {
    if (!accessToken) return;

    // Setting Up the spotifyApi with AccessToken so that we can use its functions anywhere in the component without setting AccessToken value again & again.
    spotifyApi.setAccessToken(accessToken);

    // Get user details with help of getMe() function
    spotifyApi.getMe().then(data => {
      console.log(data);
    })
  }, [accessToken]);

  return (
    <div>
    {code}
    </div>
  );
};

export default Dashboard;
Here's the logic:
- We are setting up the spotifyWebApi with the Client ID.
- We are using the useAuth hook to get the accessToken of the user.
- We have written our login in a useEffect with the dependency of accessToken, so whenever our accessToken value changes, this useEffect will run.
-
.getMe()function will return the data, which contains the User's Details.
So, If you inspect your browser window and look at the console, you will see the user's details. 😄
If you made it till here then congrats 🥳, You have set up the Spotify Authentication.
Also, I've created a Spotify Clone website, So do check it out😄:
Website
GitHub
Demo Of The Project
Peace out. ✌


Top comments (11)
amazing job!
I tried to insert the accessToken into a spotify web player, this however triggers an infinite reload
`import logo from "./logo.png";
import "./App.css";
import SpotifyPlayer from "react-spotify-web-playback";
import React from "react";
import "./App.css";
import Login from "./Login";
import Dashboard from "./Dashboard"
import {useAuth} from "./useAuth"
const code = new URLSearchParams(window.location.search).get('code')
function App() {
const accessToken = useAuth(code).accessToken;
return (
{code ? : }
className="App-spotify-player"
token={accessToken}
uris={["spotify🧑🎨5K4W6rqBFWDnAN6FQUkS6x"]}
styles={{
activeColor: '#fff',
bgColor: '#faebd7',
color: '#000000',
loaderColor: '#FDB9F8',
sliderColor: '#FDB9F8',
trackArtistColor: '#FDB9F8',
trackNameColor: '#000000',
}}
/>
);
}
export default App;
`
Would be nice if you could help me out

The upgraded version of spotify is only available at Spotify APKClasico, where you can download the application for free, the latest version is continuously updated.
Nice work.
Thanks, @harsh2000hp 😁
Hi there, I was trying to do what you did here and everything has been okay until the last step. I am not getting the user's details it says invalid access token, can you help?
I had the same issue, which was being caused by the presence of React.StrictMode tags in my index.js file.
Useful
Thank you Sir
Thank you!
I have Spotify Premium free for my android.
If you want to download our post Spotify MOD APK
Great article, it's very useful information! Here I share Spotify Premium APK MOD for Android.
Some comments may only be visible to logged-in visitors. Sign in to view all comments.