
Optimizing images is a long duty, maybe you’re already using imagemin or ImageOptim, they’re great tools, but it can seem difficult to automate their usage.
When you want to optimize your images for the web, you have plenty of tasks to do like:
Resizing
Creating different resolution files (for Retina screens)
Optimizing (removing metadata)
Compressing
Create better format alternatives (like WebP)
We’re already compiling our JavaScript and CSS through module bundlers and pre/post-processors, here comes a new build step: image processing.
Getting started with Lepto
Lepto is a Node.js module and Command Line Interface responsible for editing, optimizing and analyzing images resources. So let’s get started!
First of all, you will need to have an “npm initialized project”. If not, run the command npm init.
You will also need to install the CLI tool as a dev dependency:
$ npm install -D lepto-cli
If you’re too lazy to collect some ordinary images, I give you some that you can download on this gist, simply click on the “Download ZIP” button and put those resources into an “assets” directory.
Then you have to create your configuration file named lepto.config.json:
{
  "input": "assets",
  "output": "assets/output",
  "watch": true,
  "filters": [
    {
      "glob": "**/*.*",
      "use": [
        {
          "name": "lepto.jpeg",
          "quality": 75
        },
        {
          "name": "lepto.png",
          "quality": 75
        }
      ]
    }
  ]
}
Create a new npm script named like build into your package.json:
{
  ...
  "scripts": {
    "build": "lepto",
    ...
  }
  ...
}
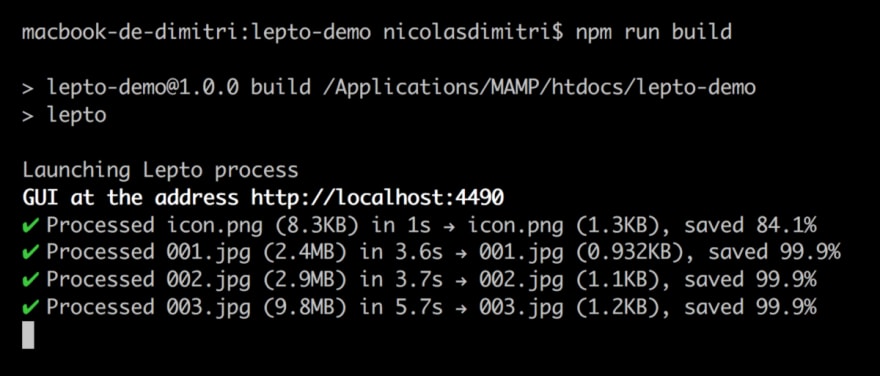
Now, by running the command npm run build, Lepto will compress all jpg and png from your “assets” directory and export them into the output directory. By setting the watch option to true, Lepto will watch for every single change inside the “assets” directory to relaunch the process.
By default, Lepto comes with zero configuration, so you need to write a list of filters each of them associated with a glob and a list of plugins to use. In this configuration file example, we ask Lepto to compress all jpg and png files with a quality of 75.
Let’s add some plugins
Now, you would like to resize your images. There is a plugin for that: lepto-resize, you will have to install it like that:
$ npm install -D lepto-resize
Then we’ll add a new filter in our Lepto config:
{
  "glob": "**/*.{jpg,jpeg}",
  "use": [
    {
      "name": "lepto-resize",
      "maxWidth": 1200
    }
  ]
}
All your jpgs have now a width less or equal to 1200px. You can discover way more options to use with lepto-resize on the repository: github.com/leptojs/lepto-resize.
Let’s add another filter to create Retina’s versions of our png:
{
  "glob": "**/*.png",
  "use": [
    {
      "name": "lepto-resize",
      "retina": [2, 3]
    }
  ]
}
Now we can easily insert them into our html using srcset:
<img srcset="assets/output/icon.png,
             assets/output/icon@2x.png 2x,
             assets/output/icon@3x.png 3x"
     src="assets/output/icon.png" alt="Icon alt">
I’m pretty sure that you are now capable of adding the plugin lepto-webp to create WebP alternatives of your jpgs! Check out the documentation here: github.com/leptojs/lepto-webp.
Using the GUI
For having the best-optimized images, we also need to carefully choose the best suitable quality percentage for each of them.
By default, the GUI is accessible on the port 4490, so let’s run npm run build and go on localhost:4490. We’ll get this beautiful interface composed of three parts: your input files list, your filters list and finally the optimizer waiting for a file selection.

So let’s select a file in the list: it is now displayed it the optimizer, letting us play with the quality slider and see the output in real-time. When you’re satisfied with a quality percentage, click on the button “Add optimization plugin” and save this new configuration by clicking on “Save config” (or press ⌘S / Ctrl+S).

By adding an “optimization plugin” the GUI is simply creating a new filter with a glob equal to the file name, and the plugin corresponding to the file extension:
{
  "glob": "001.jpg",
  "use": [
    {
      "name": "lepto.jpeg",
      "quality": 48
    }
  ]
}
Be sure to keep those specific filters at the end of the list.
To go even further
The use cases for this tool are endless. You can even automatically collect the vibrant colors of your images and get them into a single JSON file with the lepto-vibrant-color plugin.

To learn more about Lepto, check out the lepto and lepto-cli documentations:
To learn even more about the best image optimization practices I recommend you the “Essential Image Optimization” guide by Addy Osmani: images.guide.
About me
I’m a French student, enthusiast of front-end development for several years now. By creating Lepto, I tried my best to make a non-frustrating and efficient tool to easily manage image optimization. Building a Command Line Interface was obvious for performance and ease of use reason (see this great article about Terminal and design by Brandur). However, the GUI was necessary for choosing the best compression quality. So I came to this great harmony.
I am listening to all suggestions, discussions and violent criticism via Twitter or via e-mail: dimitri@ooeo.fr.
Thanks for reading! 😄
 dimitrinicolas
/
lepto
dimitrinicolas
/
lepto
Automated image Editing, Optimization and Analysis via CLI and a web interface. You give to lepto your input and output directories, the plugins you want to use and their options. Then lepto does his job, you keep your original files and the structure of the input directory. Some plugins can even collect data (like primary colors) from your images and save them in a JSON file.


The main purpose of this tool is to automate image optimization and analysis This project is recent, so use it with care, I'm listening to all feedback (we can talk via twitter, don't follow me I never tweet).
What is the difference with ImageMin? I think that if you deal with large applications, then go on ImageMin, but if you are building small static websites and you want to optimize your resources easily, then you could try lepto.
You give to lepto your input and output directories, the plugins you want to use and their options. Then lepto does his job, you keep your original files and the structure of the input directory. Some plugins can even collect data (like primary colors) from your images and save them in a JSON file.
If you want to learn more about image optimizations, I recommend to you the amazing images.guide…


Top comments (4)
Hi Dimitri, just wanted yo let you know that this article inspired my latest blog post.
Thanks for sharing.
Thanks, great article 👏🏼
lovell's sharp :)
Yes, sharp is a big pillar of this tool. An amazing work from Novell!