Completion handlers are everywhere in Swift. They are commonly used in Apple's frameworks and many third-party libraries. They are often put forward as an alternative to delegation and the target action pattern, especially in the context of long-running work like fetching data over the network or processing images. You might see them referred to as "handlers" or "completion blocks", simply "completions", or maybe something else depending on the conventions of the code base you are working in.
Today we are going to look at what the completion handler pattern is and the main problem it solves. We'll look at how completion handlers are actually implemented in Swift. And we'll look at some downsides to the pattern and some examples of how to work around them.
What Is A Completion Handler?
At the most basic level, a completion handler is a block of work that is passed as an argument to a function so that it can run at a later time. There are many reasons why we might want to use them, but they are especially powerful when we have a task that will take a long time to finish and we don't want that task to block other work. That's a pretty abstract sentence, so let's think through an example.
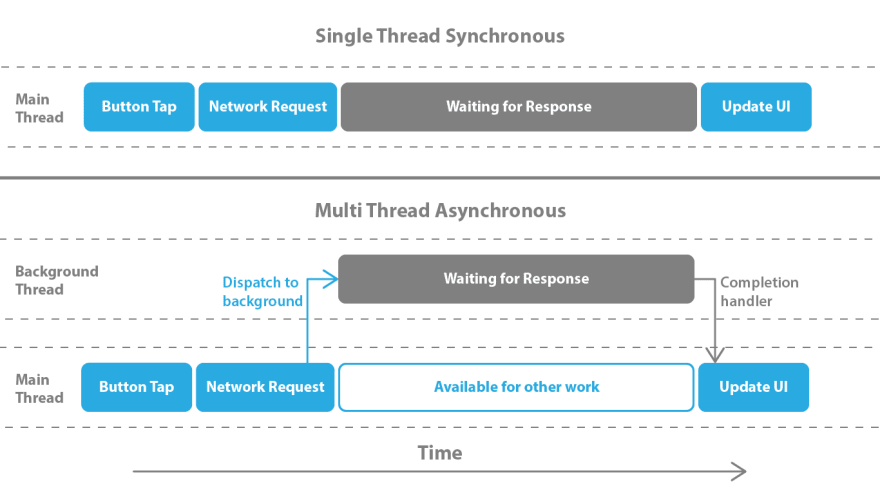
Imagine a user taps a button in your app that is supposed to load some data. Let's say it is a list of pets who need to be adopted in the zip code the user entered. (It doesn't matter what the data is, but why not imagine cute animals?) The button tap will be handled on the main thread (which is used for all UI updates on iOS) and that will kick off a network request to load the data, and when that returns it will update the UI to show the list of adorable pets. The simplest way to code this would be to just kick off the network request and then sit and wait for it to return and then update the UI when it does.
But what if that request took 2 seconds? or 5 seconds? The user wouldn't be able to do anything while they waited. They couldn't navigate around the rest of the app, they couldn't scroll or tap any other buttons or anything else, because that is all code that has to run and we're already waiting for the network request to return. We're blocking other work. That is a terrible user experience.
We have very little control over how long that network request will take, but we can improve the UX here. Instead of waiting, we'll put the work that takes a long time (in this case the network request) on another thread that won't block our UI thread. (Pretty much all of the abstractions that are used for network requests on iOS do exactly that for us under the hood.) That solves the problem of blocking the user from being able to use the app. But what about when the data comes back? How do we get that data to show up in our UI?
That is where completion handlers come in. When we kick off the network request in the first place, we'll give it a completion handler – block of work to run once the request returns. We'll trigger our UI update in that block of work.
Now that we have a high-level idea of what a completion handler is and what problem they solve, let's dig into what they actually look like in Swift. To do that, we need to look at the concept of closures as a whole and a little bit about their semantics.
A Brief Diversion On Closures
As the Swift Language Guide says:
Closures are self-contained blocks of functionality that can be passed around and used in your code.
In other languages you might see them referred to as "blocks" or "lambdas", but in Swift the name comes from their ability to capture or "close over" constants and variables in the context where they are defined. We'll touch on that more in a minute.
So a closure is a block of code that can take arguments and returns some value. Sounds a lot like a function, right? That's because in Swift functions are actually a specialized type of closure. They have a name and some special syntax, but you can pass a function anywhere you can pass a closure. Just as long as the signature matches.
That means a function which takes a completion handler is actually a closure that takes another closure to run at some later point. It's closures all the way down! This is usually where I see people's eyes start to glaze over, but it is worth understanding if you can stick with it.
In Swift these are all closures, and they would all do the same thing:
func firstAdd(_ a: Int, _ b: Int) -> Int { return a + b }

let secondAdd: (Int, Int) -> Int = { a, b in return a + b }

let thirdAdd = { (a: Int, b: Int) -> Int in return a + b }

let fourthAdd: (Int, Int) -> Int = { $0 + $1 }
The first one is a normal function that you are probably used to seeing. The second defines the signature of the closure and then the closure itself, giving names ("a" and "b") to the arguments. The third defines the signature and names together within the closure. The fourth uses the anonymous argument labels ("$0" meaning the first argument, "$1" meaning the second, and so on) and omits the return keyword, which is allowed because this is a one line closure and the return value can be inferred as the result of that line.
If you wanted to add two values you could call any of these in the same way:
firstAdd(2, 2)
secondAdd(2, 2)
thirdAdd(2, 2)
fourthAdd(2, 2)
Capturing Values
This is great if you have the values you want to pass to the closure and the logic is trivial like it is here. But what if we want to keep track of some state beyond an individual run of the closure? That is where capturing variables comes in. Let's say we have a game and we're keeping track of a score for a given user. We might model our logic like this:
// simple object to encapsulate different difficulties in our game
struct Difficulty {
    let pointValue: Int

    static let easy = Difficulty(pointValue: 10)
    static let hard = Difficulty(pointValue: 6)
}

// global function for generating a new counter of a given difficulty
func scoreCounter(diffculty: Difficulty = .easy) -> () -> Int {
    var score: Int = 0

    let adder: () -> Int = {
        score += diffculty.pointValue
        return score
    }
    return adder
}

let easyCounter = scoreCounter()
print(easyCounter()) // 10
print(easyCounter()) // 20

let hardCounter = scoreCounter(diffculty: .hard)
print(hardCounter()) // 6
print(hardCounter()) // 12
Look at the scoreCounter function. We are going to give it a Difficulty and it is going to give us a closure which takes no value and returns an Int. Internally, it declares a variable called score and sets it to 0. Then it makes a closure called adder which itself adds the difficulty's pointValue to the score and then returns the new score. Finally, it returns the adder.
The magic here is that the closure "captures" a reference to the score variable and also to the difficulty's pointValue. So it will actually increase each time we call the closure, even though we're not holding onto that score variable anywhere. And each instance of the counter will have its own score variable.
Escaping
This may not seem like much, and in all honesty, it is probably not the best way to model a score counter, but when we combine it with the next feature of closures we start to see where it all comes together. Closures can also "escape" the scope where they are passed.
That means they can outlive the scope of where they are passed. This is a fairly confusing concept, but it basically boils down to a function (A) saying that the closure it accepts (B) may run after the function has returned (C). In our score counter example it might look like this:
// A.
func scoreCounter(modify: @escaping (Int) -> Int) -> (Int) -> Int {
    var score: Int = 0

    let adder: (Int) -> Int = {
        score += modify($0) // C.
        return score
    }
    return adder
}

let modify: (Int) -> Int = { $0 * 8 / 10 } // B.
let customCounter = scoreCounter(modify: modify)
print(customCounter(10)) // 8
print(customCounter(10)) // 16
The scoreCounter function takes a modify closure and it is going to build an adder closure to return. Since the modify closure it takes as an argument is going to be called by the adder closure it returns, it may be called after scoreCounter has finished its work, so we have to mark it as @escaping.
Back To Completion Handlers
So for our example we might write something like this, with a completion handler:
func fetchPets(then completion: @escaping ([Pet]) -> Void) { ... }
The caller of the function will pass a block of work that it wants to do with the fetched array of pets. Then it can continue with whatever work comes next without being blocked by the the work that needs to be done to fetch the pets. The "fetching pets work" will happen on a background thread and when it is done the "completion handler" work that the caller defined will run.
The the call site would look something like this:
// in PetListViewController
fetchPets { pets in
    self.updateUI(with: pets)
}
The pet list view controller says "I want to you to fetch the list of pets, and when you're done I want you to call my update UI function with the pets that you fetched".
I don't know about you, but I find that it is a lot easier to follow the logic if I personify the different classes and objects in my code and imagine them having conversations with each other.
Now we've made it all the way through the diagram! We sent our long running work to a background thread where it doesn't block the UI and we've used a completion handler to update our UI when it is finished. You can see that the completion handler is marked as @escaping, because it will be called after the fetchPets function has returned. And it is easy to miss, but we are actually capturing a reference to self here. The closure will hold onto a reference to the pet list view controller (which is what self refers to in this case) as long as it (the closure) remains in memory.
It seems like we've solved our problem. That's great, but what can go wrong? Let's look at some things you should watch out for as you use completion handlers in your code.
Some Pitfalls
UI Work On A Background Thread
One of the most common mistakes I see beginners make with completion handlers is updating their UI on the background thread a network response it returned on. This usually stems from the the fact that you almost never have to dispatch your network request to a background thread in the first place (it is done for you) and so many people don't realize their completion handler will even be called on a background thread. Plus it is easy to forget and it usually won't lead to outright crashes, just odd behavior.
Fortunately it is relatively easy to fix. We just need to make sure the UI work runs on the UI queue. We can do that using this function called DispatchQueue.async(group:qos:flags:execute:), not to be confused with the async keyword introduced in Swift 5.5. This function takes a closure and runs it on the queue it is called on asynchronously (there is also a synchronous version called sync), with some optional configuration. In our example it would look like this:
// in PetListViewController
fetchPets { pets in
    DispatchQueue.main.async { self.updateUI(with: pets) }
}
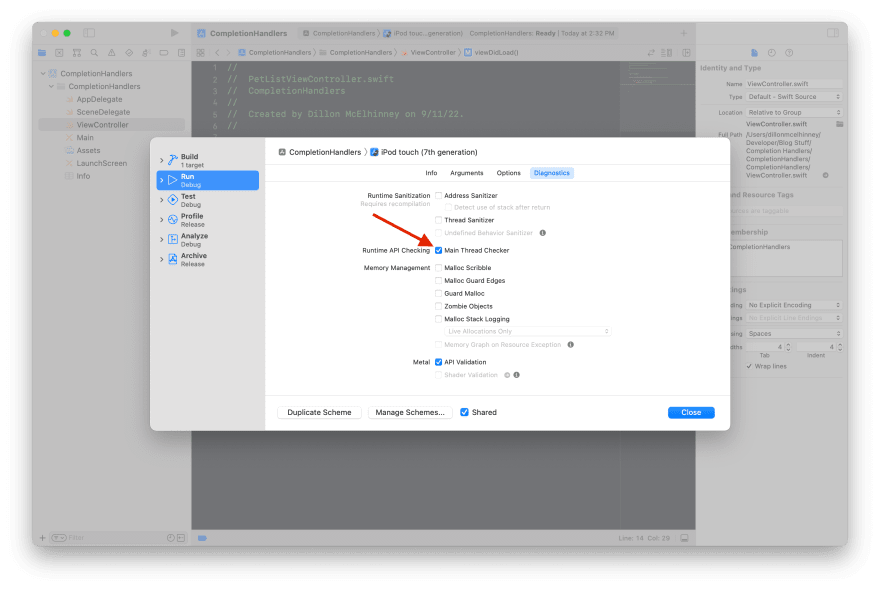
Another tool that helps here is the "Main Thread Checker", which you can enable in the Scheme Editor, on the "Run" tab, under "Diagnostics". This will cause your app to pause execution when your app is running and you try to update the UI from any thread other than the main one. It will even try to show you where you're doing it, although I find in real usage that it isn't always 100% accurate.
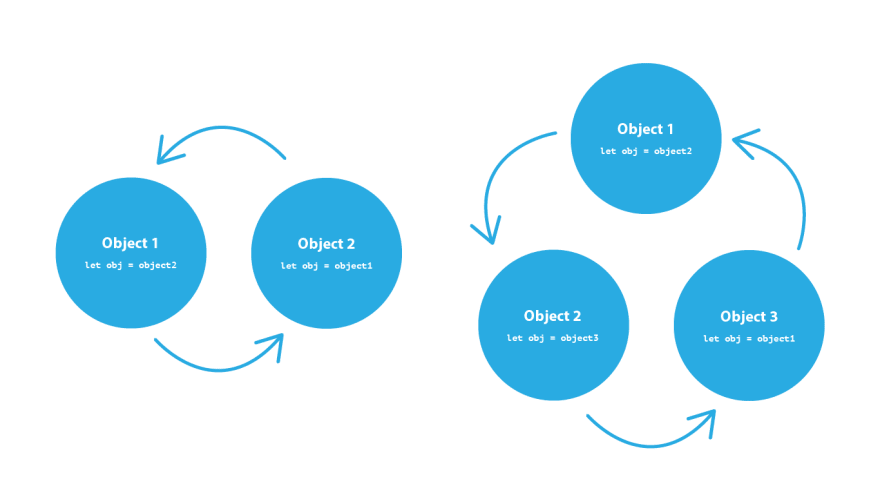
Retention Cycles
Another common mistake that people make with completion handlers is causing a retain cycle. To really get to the bottom of what that means and why it can be a problem we'd have to dive deep into how Swift handles memory management. I'm not going to do that in this article, but you can read more about it here if you're interested. For now, let's just say that a retain cycle is when two or more objects each have a strong reference (one which adds to the retain count) to one another so that there is a closed loop of references which will hold those objects in memory indefinitely. And let's say that is generally a bad thing that we want to avoid.
We can avoid that cycle if we break one of the references. In Swift we can do that with either the weak or unowned keywords. Both of these keywords will keep a reference to the object without adding to its retain count. weak references must be Optional, to acknowledge it may not be there in the future when you try to access it. unowned is similar to an implictly unwrapped optional, in that you are telling the compiler to treat the reference as always being there even though it is possible for it to not be. There are times when unowned is the right method to use, but generally speaking it is safer to use weak and that is probably what you should do unless you have a good reason to do otherwise.
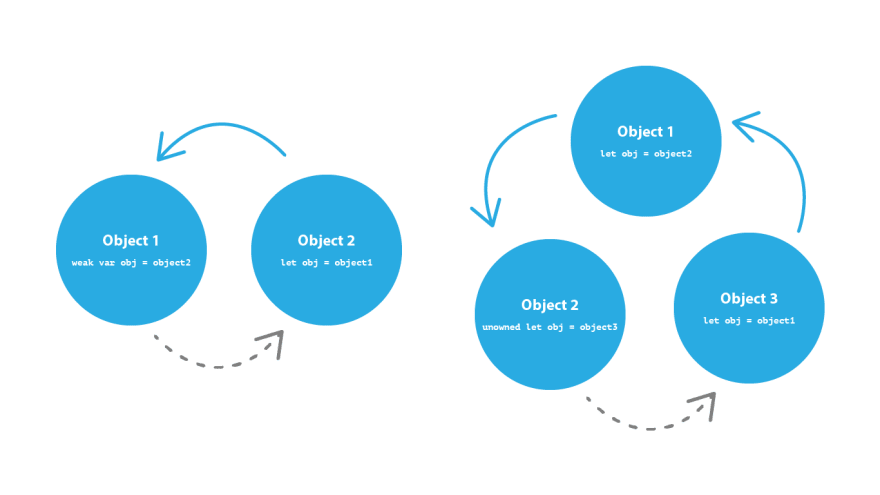
Some examples of when to use unowned would be if the captured reference will never become nil, or when the closure and the instance it captures will always refer to each other and will always be deallocated at the same time. In either of these cases though, you could use weak and it will still resolve the retain cycle it just may be slightly less performant.
In a closure you can make a reference weak or unowned with the "capture list". So far when we've captured references in a closure it has been implicit – the compiler just handles it for us if we use a reference in the closure. But we can also explicitly capture references using the capture list. You do that by putting them in square brackets before the argument definition in the closure. That looks like this:
fetchPets { [weak self] pets in
    DispatchQueue.main.async { self?.updateUI(with: pets) }
}
So now we are telling the compiler to keep a weak reference to self. That means self now has a type of PetListViewController? and so we use optional chaining on it before calling updateUI. If self is no longer there this block will just return. That safely avoids the retain cycle.
You might notice that this is the same method we use to avoid a retain cycle in the delegate pattern, it just looks a little different here because we're using closure semantics. The main difference is that in the delegate pattern, the weak reference is handled as a part of the implementation and in the completion handler pattern it is handled at the call site. This is one reason why I generally prefer the delegate pattern. In that pattern you avoid retain cycles in one easy to check (and lint) place and users of your code don't have to worry about it at the call site. With the completion handler pattern you give that power to the users of your method, which may be more versatile, but also means that they have to do some extra work to avoid retain cycles.
Wrap Up
We've looked at how the completion handler pattern is just giving some other code a block of work to do later. We've looked at how this pattern solves the problem of not wanting to block important work in the short term with something that will take a long time. We've looked at the semantics and how to implement completion handlers in Swift. They may look a little funky at first, especially with some of the syntactic sugar, but they just make use of a combination of Swift features that we use elsewhere. And we've looked at the two main problems people run into with completion handlers – updating the UI from a background thread and inadvertently causing retain cycles – and how to avoid those problems.


Latest comments (1)
A very good article. Thank you so much for your work