In this post, I am going to walk you through steps to integrate Dialogflow (api.ai) bot into your website. We will be using Kommunicate powered chat plugin for adding to a website that integrates well with Dialogflow.
Step 1: Setup chat widget with Dialogflow
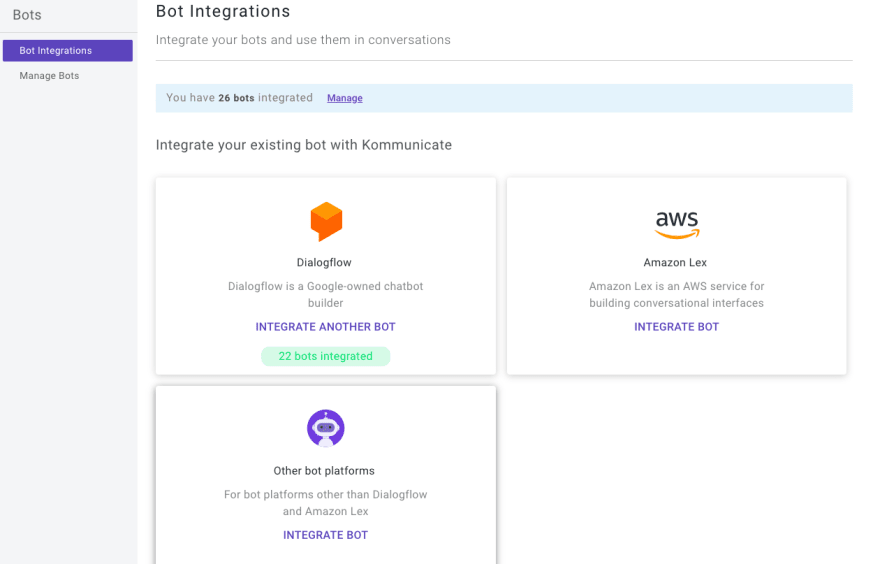
Login to your Kommunicate dashboard and navigate to the Bot section. If you do not have an account, you can create one here. Locate the Dialogflow section and click on Integrate Bot.
Here’s a video explaining how to integrate:
https://youtu.be/ZlrFYRwJxS8
Step 2: Get your Dialogflow API Credentials
After clicking on the setting one popup box will open. You will be asked for Dialogflow credentials.
You can get them by logging into your Dialogflow console.
Click on the Settings icon (gear icon on the left panel).
Click on Google Project -> Service Account and download the key.
Dialogflow Console
Save your settings and follow the instructions to complete the setup.
Step 3: Integrate Dialogflow (api.ai) Bot into Kommunicate
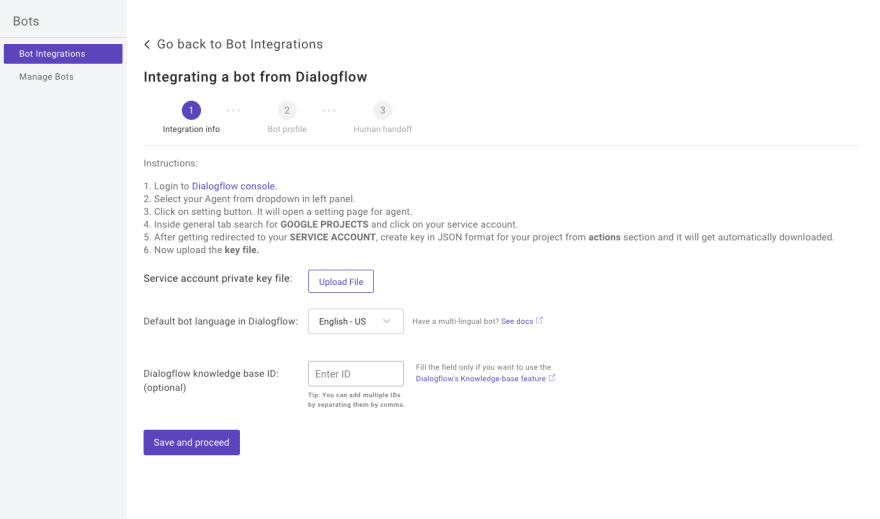
Go back to the Dialogflow settings screen of Kommunicate, upload your Service account key file. The instructions for the same are laid down on the webpage. Choose your default bot language and then click on next to save and proceed.
Note that, you can enter knowledge base IDs if you are using the knowledge connectors feature of Dialogflow.
In the bot profile section that follows, you will be able to give your bot a name. This name will be visible to your customers whenever the bot interacts with them.
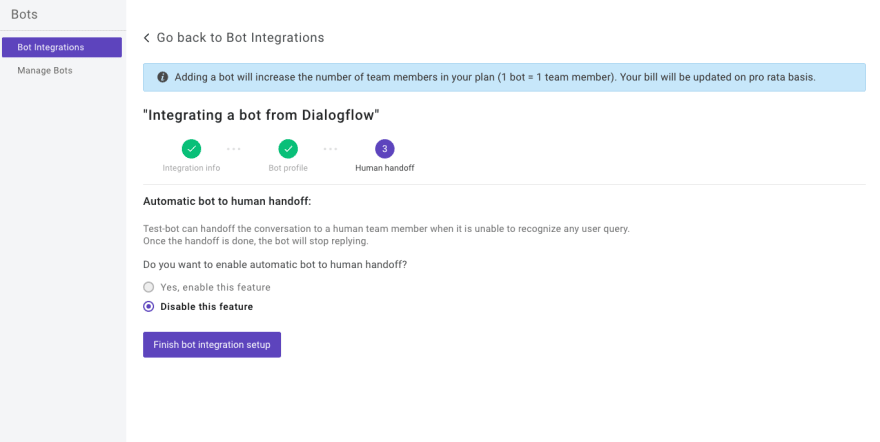
To complete the setup, save and proceed to the next steps. You can set up your bot profile and automatic chatbot to human handoff in the next steps.
You can check your newly created bot in two places:
Dashboard →Bot Integration → Manage Bots: You can check all your integrated bots here
Dashboard → Bot Integration: Your Dialogflow icon should be green with the number of bots are you have successfully integrated.
Step 4: Integrate Dialogflow (api.ai) bot in website
The final step is to connect Dialogflow bot into your website. Before that, to use the bot in customer conversation, you need to assign all the incoming conversations to the bot. You can do that from the Conversation rules section under Settings.
Enable Assign new conversations to bot and select your newly configured bot from the Select a bot dropdown.
Navigate to Dashboard →Settings. Click on Install under the Configuration section.
Copy the JavaScript code add it to your website code. The Kommunicate chat widget will appear and you can now see your bot live in action. More information on live chat and bot integration can be found (here)[https://docs.kommunicate.io/docs/web-installation.html].
Sample preview

Chat widget interface code is available in (Github)[https://github.com/Kommunicate-io/Kommunicate-Web-SDK]
In these few simple steps, you can integrate bot using Dialogflow and Kommunicate into your website and automate mundane tasks so that your agents can concentrate on what only humans can do.
Originally published at (Kommunicate Blog)[https://www.kommunicate.io/blog/integrate-bot-using-dialogflow-in-kommunicate/]


Oldest comments (0)