RTC Module With A Raspberry Pi 4 And Ubuntu Server 20.04.
- Introduction.
- Equipment Used.
- Image The MicroSD Card.
- Installing The RTC Module.
- Connecting To The Pi Over SSH.
- Detect The RTC Module In Ubuntu.
- Configure The RTC Module In Ubuntu.
- Set The RTC Modules Date And Time.
- Configure Ubuntu To Use The RTC Module.
- Load Kernel Module At Boot.
- References.
Introduction.
Recently, I was looking to setup a Raspberry Pi 4 Server that would run Ubuntu Server 20.04 (latest available at the time) and I wanted to add an RTC battery to it as I would be running a PostgreSQL database that would be storing date and time values in some of the tables.
As a result, I picked up an RTC battery module from eBay for a few pounds and proceeded to install it. I was able to find a few guides on how to do it but there was a problem; all of the guides were for Raspbian OS. No real issue, it can't be that different for Ubuntu, right?
Well, for 98% of it, the setup was the same, but there was one part of the setup that was different which made it so that when I would reboot the Pi, the module could not be detected.
I managed to figure out what was causing it, after many hours of troubleshooting and as a result I decided to write this article (my first one ever) to cover the setup and configuration.
Equipment Used.
Here is the equipment / software I used for this little project:
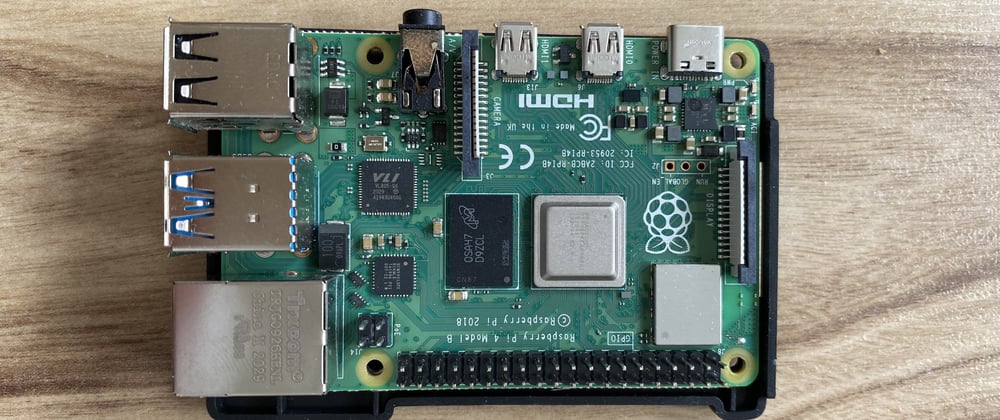
- A Raspberry Pi 4 B 8GB model.
- A SanDisk 128GB MicroSD card.
- A USB MicroSD to SD-Card adapter.
- A FLIRC Case.
- A Raspberry Pi 4 power adapter.
- A GPIO-based RTC Battery Module.
- A CAT 6a/7 Ethernet cable.
- The Raspberry Pi Imager application.
- Ubuntu Server 20.04 64-bit for Raspberry Pi (downloaded via the Raspberry Pi Imager).
Image The MicroSD Card.
First, download the Raspberry Pi Imager application for your operating system and install it.
For a step-by-step guide on how to image the MicroSD card with Ubuntu 20.04 LTS, follow the steps in the YouTube video below. When you get to step 2, instead of selecting Raspberry Pi OS, go to Other general purpose OS > Ubuntu > Ubuntu Server 20.04.4 LTS (RPI 3/4/400). This should have 64-bit listed under the title.

Video link:
Installing The RTC Module.
To begin with, you will need to check which chipset is on your RTC module. You should be able to find this by looking at the text on the module or you can find it from the vendors description from where you bought it, which might be easier.
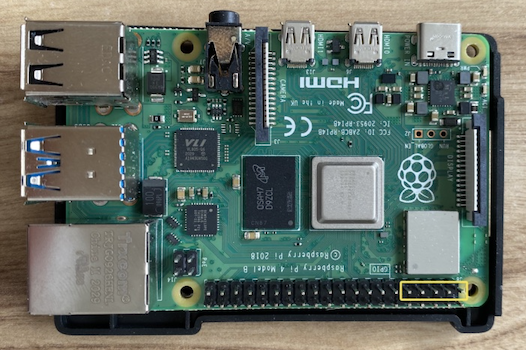
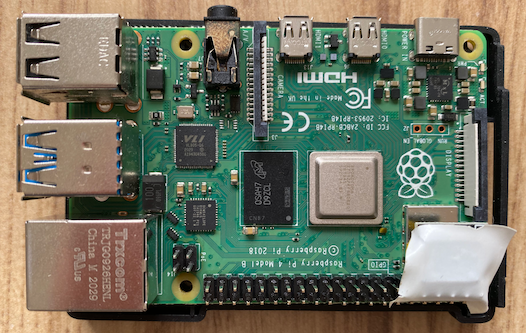
You can then proceed to install the module onto the GPIO pins on the Pi. For my RTC module, I needed to install it onto pins 1, 3, 5, 7 and 9 but yours might be different.
I placed a bit of electric tape over the RTC module as it was going into an aluminium case which it shouldn't come into to contact with but I figured it's better safe than sorry.
You can then install the MicroSD card and connect up the Ethernet cable and power adapter to the Pi.
Connecting To The Pi Over SSH.
SSH is used to remotely connect to Ubuntu (or Linux in general) to allow you to run terminal commands. You will need to use a terminal application to use SSH. Which application you use depends on your computers Operating System. Some examples that are available include:
- Linux: Terminal, X-Term or the console screen if you have no GUI installed.
- macOS: Terminal (built-in) or iTerm2 (download)
- Windows: PowerShell SSH (Needs to be enabled in Windows 10. Use this guide to set it up.
As part of the Raspberry Pi Imager setup, you specified a username and password to use. You will need to use those credentials with the following command:
ssh username@ip_address
- Replace username with the username you specified in the Raspberry Pi Imager.
- Replace ip_address with the IP address the Raspberry Pi obtained from your DHCP server (typically, this would be your Router). It should look something like 192.168.0.11.
Once connected, you should then be prompted for a password. This is the password you previously set in the Raspberry Pi Imager. Once you have successfully logged in, you should see a prompt similar to the below:
pi@pi4-server:~$ _
- pi: This is your username.
- pi4-server: This is the hostname of the Raspberry Pi you are connected to.
Detect The RTC Module In Ubuntu.
Now that you are connected to the Raspberry Pi via SSH, you can now start to setup the RTC module in Ubuntu.
The first step is to install the i2c-tools so that Ubuntu can detect the RTC module. Run the following command and when prompted for a password, use the same one you used to login via SSH:
sudo apt install -y i2c-tools
Once the i2c-tools are installed, the next step is to use the i2cdetect command to locate the module on the i2c bus. At the terminal, enter the following command:
sudo i2cdetect -y 1
The output should look similar to the below.
     0  1  2  3  4  5  6  7  8  9  a  b  c  d  e  f
00:          -- -- -- -- -- -- -- -- -- -- -- -- --
10: -- -- -- -- -- -- -- -- -- -- -- -- -- -- -- --
20: -- -- -- -- -- -- -- -- -- -- -- -- -- -- -- --
30: -- -- -- -- -- -- -- -- -- -- -- -- -- -- -- --
40: -- -- -- -- -- -- -- -- -- -- -- -- -- -- -- --
50: -- -- -- -- -- -- -- -- -- -- -- -- -- -- -- --
60: -- -- -- -- -- -- -- -- 68 -- -- -- -- -- -- --
70: -- -- -- -- -- -- -- --
In the above, all the fields are the same, except for the field at position 60x8. This is where the RTC module has been detected. This is typical for most RTC modules for the Raspberry Pi but yours may come back in a different field.
Make a note of the number that is in the field (68 in the above output). It will be needed later on.
If the output of the command is like the following, you may need to check that the RTC battery is installed correctly:
     0  1  2  3  4  5  6  7  8  9  a  b  c  d  e  f
00:          -- -- -- -- -- -- -- -- -- -- -- -- --
10: -- -- -- -- -- -- -- -- -- -- -- -- -- -- -- --
20: -- -- -- -- -- -- -- -- -- -- -- -- -- -- -- --
30: -- -- -- -- -- -- -- -- -- -- -- -- -- -- -- --
40: -- -- -- -- -- -- -- -- -- -- -- -- -- -- -- --
50: -- -- -- -- -- -- -- -- -- -- -- -- -- -- -- --
60: -- -- -- -- -- -- -- -- -- -- -- -- -- -- -- --
70: -- -- -- -- -- -- -- --
Configure The RTC Module In Ubuntu.
Now that the RTC module has been detected, the next step is to load the appropriate Linux kernel module to allow the RTC module to be usable by Ubuntu. The commands that will need to be run depend on which chipset the RTC module has. The below covers two common chipsets that are used but yours might be different. If so, check with the vendor for which kernel module to run.
Before running the second command, if your number from the previous section was not 68, please change the 68 in 0x68 to whatever number was shown:
For and RTC module with the ds1307 chipset:
sudo modprobe rtc-ds1307
sudo echo ds1307 0x68 > /sys/class/i2c-adapter/i2c-1/new_device
For and RTC module with the ds3231 chipset:
sudo modprobe rtc-ds3231
sudo echo ds3231 0x68 > /sys/class/i2c-adapter/i2c-1/new_device
If you get no text come back when you run either command, the commands will have run successfully.
To check that the kernel module has been loaded correctly and the RTC module is now accessible, run the following command:
sudo i2cdetect -y 1
The output should be similar to the below:
     0  1  2  3  4  5  6  7  8  9  a  b  c  d  e  f
00:          -- -- -- -- -- -- -- -- -- -- -- -- --
10: -- -- -- -- -- -- -- -- -- -- -- -- -- -- -- --
20: -- -- -- -- -- -- -- -- -- -- -- -- -- -- -- --
30: -- -- -- -- -- -- -- -- -- -- -- -- -- -- -- --
40: -- -- -- -- -- -- -- -- -- -- -- -- -- -- -- --
50: -- -- -- -- -- -- -- -- -- -- -- -- -- -- -- --
60: -- -- -- -- -- -- -- -- UU -- -- -- -- -- -- --
70: -- -- -- -- -- -- -- --
If the text at 60x8 (or the number your module is reported at) has changed to UU, the kernel module has loaded correctly and the RTC module is now accessible.
Set The RTC Modules Date And Time.
Up to this point, the RTC modules date and time will (likely) be different to the current date and time. To see (read) what time is stored on the RTC module, run the following command.
sudo hwclock -r
The output will be similar to the below with the date and time being different:
2000-01-01 16:17:57.927712+01:00
To update the date and time, the current date and time needs to be written to the RTC module. To do this, run the following command:
sudo hwclock -w
sudo hwclock -r
The output will now be the current date and time. For example:
2022-06-11 16:20:43.937816+01:00
Configure Ubuntu To Use The RTC Module.
The next step is to configure Ubuntu to use the RTC module for its date and time, rather than rely on a software-based solution. There is one file that needs to be modified using a text editor such as nano, vim or emacs. For this example, nano will be used.
Run the following command:
sudo nano /lib/udev/hwclock-set
First, comment out the following lines by using "#" at the beginning of each line:
if [ -e /run/systemd/system ] ; then
 exit 0
fi
Lastly, comment out these two lines:
/sbin/hwclock --rtc=$dev --systz --badyear

and

/sbin/hwclock --rtc=$dev --systz
The end result will look like this:
#!/bin/sh
# Reset the System Clock to UTC if the hardware clock from which it
# was copied by the kernel was in localtime.

dev=$1

# if [ -e /run/systemd/system ] ; then
#    exit 0
# fi

if [ -e /run/udev/hwclock-set ]; then
    exit 0
fi

if [ -f /etc/default/rcS ] ; then
    . /etc/default/rcS
fi

# These defaults are user-overridable in /etc/default/hwclock
BADYEAR=no
HWCLOCKACCESS=yes
HWCLOCKPARS=
HCTOSYS_DEVICE=rtc0
if [ -f /etc/default/hwclock ] ; then
    . /etc/default/hwclock
fi

if [ yes = "$BADYEAR" ] ; then
    # /sbin/hwclock --rtc=$dev --systz --badyear
    /sbin/hwclock --rtc=$dev --hctosys --badyear
else
    # /sbin/hwclock --rtc=$dev --systz
    /sbin/hwclock --rtc=$dev --hctosys
fi

# Note 'touch' may not be available in initramfs
> /run/udev/hwclock-set
Press CTRL + x and then y to save. Press enter and you will then be taken back to the command prompt.
Load Kernel Module At Boot.
Although the module is now working, if the system is rebooted, the kernel module for the RTC module will not be loaded so you will need to go through the setting up of it again. Not ideal at all!
Instead, what needs to be done is to tell Ubuntu to load the kernel module as part of the boot sequence. This is what stung me for a while as all the guides available showed how it was done on RaspberryPi OS and when followed, the kernel module would not load.
It turns out that Ubuntu decided that they would do things a little differently. Instead of using the config.txt file that is stored in /boot, they made it so that you needed to place it in /boot/firmware. Grrr...
So, with that in mind, some text needs to be placed in the /boot/firmware/config.txt file to tell Ubuntu to load the kernel module for the RTC module. To do this, run one of the following commands below. If you previously got a number different to 68, change 0x68 match that number (0x11 if your number is 11 for example):
For ds3231 chipsets:
sudo echo dtoverlay=i2c-rtc,ds3231,addr=0x68 >> /boot/firmware/config.txt
For ds1307 chipsets:
sudo echo dtoverlay=i2c-rtc,ds1307,addr=0x68 >> /boot/firmware/config.txt
The system can now be rebooted to check that everything is setup correctly. To perform a reboot, run the following command:
sudo reboot
Wait for a minute or two, or ten it's up to you. Maybe get a drink. Log back into the system using SSH and run the following command:
sudo i2cdetect -y 1
You should see UU in field 60x8 (or the field you recorded earlier). The module is now loaded after a reboot and the RTC module is now setup to provide the system time and date.
References.
Most of the setup steps were followed from the below adafruit setup guide. It was only when it came to the different directory for the config.txt file that I had to look into it further.


Latest comments (5)
Hello, thanks for the article.
I see you have a FLIRC case. Did you install the RTC module inside or outside the case ? I currently run a Raspberry Pi 4 microserver in a remote location and I think it could use a hardware RTC.
I found several RTC hats but none look like they're going to fit inside the FLIRC case without some kind of mod.
If you have found an RTC hat which can fit inside the FLIRC case, can you drop a link or at least some clue on what to look for when searching ?
Thank you in advance.
The module I got was installed inside the FLIRC case without any modifications, other than a little bit of electrical tape on top in case it contacted the case.
The module was bought off of eBay a year+ ago so I can't get a link for it (seller not there anymore) but I just checked the module and it does resemble the one on the link below (not the red PCB image, the one below it and in the customer reviews):
thepihut.com/products/mini-rtc-mod...
The dimensions listed (in mm) are roughly the same as the one I have. You can find them on ebay as well.
This one below is identical (in terms of the pictures) to the one I have:
https://www.ebay.co.uk/itm/165852540923?hash=item269d94effb:g:-N4AAOSwfY9jqRz-&amdata=enc%3AAQAHAAABIF4Kjwbqg%2Fn60FjG6t2j0ypxAA%2FKMQ7%2BQjVkwC6pRwh7y5x0uGjQLKNtJUbm3ASvQ9IDj%2BQwHv4QJBY256TO1zjD9vOgNgRfLPA9DSke33Q8u%2BwA2dK8fs0XTqrqzvc2vYErMO%2BUNDFVWHUDqWgZYk8cXDPn9otdPkmwqXFaRmt%2BFmoLOTdudDjCbAG6lRBZ75XMXyizr0CQUu2LUgvzInaEj7RrVHcV7Rk4Vdg1HnBjzzXGJ6Rw9ydXYK%2FLcwPrqhFhqK%2FAI0aKtiHYUx6k05v9ScttB7M49M%2BNCAW6oKHxpLFKxBqyP%2FZBShQe1dGu57rQFf8Pj5KFKyw4p8Qqvg1egzShOUWihc4c0O2TSRkMHrJx2YpCMhVYPHMF4vCypA%3D%3D%7Ctkp%3ABk9SR8jk1OKrYQ
Thanks a lot !
I found an electronics retailer local to me which has these mini RTC modules in stock. Will order several modules to upgrade my other Pi 4s and 3s too.
The battery is permanently soldered on these modules but it shouldn't be too hard to replace it with a couple wires and a 2032 holder when the original cell dies.
Wish you a happy 2023 !
Happy new year to you too.
It is good to hear you found a local supplier. They can be a pain to find in a retail store.
The only concern I would have with the CR2032 battery is the size might interfear with the Pi's display header and the FLIRC cases heat sink for the SOC. Might be ok if it's away from the RTC board I suppose.
Yes, my idea was to use a wired CR2032 holder. I do not think a soldered-on one would fit on that tiny module inside the FLIRC case.
I upgraded 2 out of 3 Pis I have with RTC.
As for your instructions, it was a bit simpler for me.
Now my Pis will no longer depend on external services for their timekeeping.
One thing I'm not sure about is how those modules and their batteries will tolerate high temperatures as both of my RTC upgraded Pis run under constant CPU load. One RTC module reads 44C and the other is over 60C.
I still have one more Pi to upgrade with an RTC, but it's more than 20 kilometers away from me and will have to wait until I have the chance to get there.