
We are going to get into the basics of Docker through an example in Node.js to understand its benefits. You can download the working code example from this article here.
When we talk about software, it includes a whole stack of components, including frontend and backend components, databases, libraries, etc.
During the deployment of our software, we have to ensure that all these components work on a wide range of platforms where our application may run.
What is Docker used for?

I’m guessing you have faced the situation in which you test your application locally, and when deploying it, something doesn’t work as expected.
Docker comes to solve this problem by simplifying the process of deploying an application by packaging it, with all of its dependencies, and running it in an isolated environment, making the process very easy and efficient.
Although Docker can be present in the whole workflow of software development, its main use is during the deployment.
This way, Docker separates your application in this standardised unit that we call a container.
What is a container?
Remember we said Docker packages and runs your application in an isolated environment. This is what we call a container.
Containers offer a packaging mechanism in which applications can be abstracted from the environment in which they actually run, giving developers the possibility to create predictable environments. The container becomes the unit for testing your application.
Why choose Docker?
Docker vs. VMs
Virtual machines (VMs) are an abstraction of physical hardware turning one server into many servers. A hypervisor is computer software, firmware, or hardware that creates and runs VMs, allowing several of them to run on a single machine. Each VM includes a full copy of the operating system kernel, the application, and the necessary libraries. VMs can also be slow to boot.
The kernel is the part of an operating system that handles memory management, resource allocation and other low-level services essential to the system.
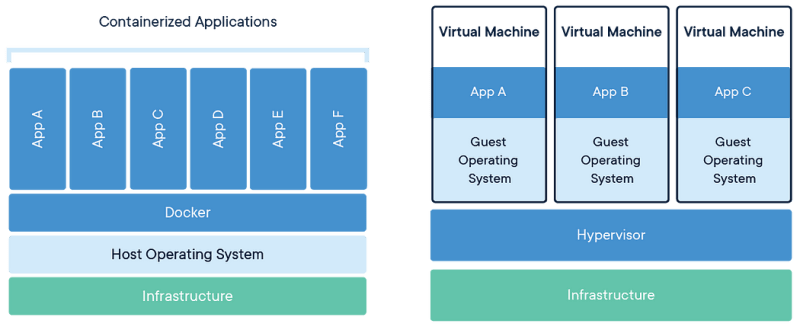
Containers and virtual machines have similar resource isolation and allocation benefits, but function differently because containers virtualise the operating system instead of hardware.
Containers are an abstraction at the app layer that packages code and dependencies together. Multiple containers can run on the same machine and share the OS kernel with other containers, each running as isolated processes in user space.
Benefits of Docker
From an operations standpoint, it gives your infrastructure improved efficiency, which can lead to a better utilisation of the compute resources. This allows us to run more containers on a given hardware combination than if you were using virtual machines.
Going back to containers, A container is a runtime instance of a Docker image. So basically, a Docker container consists of a Docker image, an execution environment, and a standard set of instructions. But, what is an image?
What is an image?
As we saw, containers are runnable instances of an image. So, unlike a container, an image does not have state and it never changes. An image is a template with instructions for creating a Docker container.
From here, we are going to be following the example from the repository to build our node application and dockerise it.
To start, we have the index.js file that exposes a get and returns the port in which we are running the application. We need to install express and dotenv as dependencies for this example.
If we run the app and browse http://localhost:3000 the server will return
Your application is running on port 3000
So the next question is, how do we build a Docker image?
What is a Dockerfile for?
For building images, we use Dockerfile. This is a file with a simple syntax for defining the steps needed to create our image and run it.
Often, it is an image based on another image, with some additional customisation. This is what the Dockerfile, contains. So, in order to assemble our image, we are going to create a document containing all the commands we would need to build an image of our own application.
We can create our own images, or use the ones created by others and published in a registry. For example, we can use any image published on Docker Hub.
We are going to build an image of our node application. For this, we could start FROM an Ubuntu image, install Node on top of it, and our application afterwards, or directly start from a Node image.
Each instruction in a Dockerfile creates a layer in the image, and when you change the Dockerfile and rebuild the image, only those layers that have changed are rebuilt. This is what makes images so lightweight, small, and fast.
We are going to start FROM a Node image, and install and run our application from there as follows:
After this, we have RUN a pair of commands. The first installs Python as a build dependency. It is unnecessary for the dependencies this project has, but it is a good example to see how to insert build dependencies, that is, ones we need to build our application, but once the program is compiled we won’t be needing it anymore. The second one installs the dependencies for the project.
In these examples, we COPY the package.json before the source code (COPY . .). This is because Docker images are made up of layers, and since the file package.json does not change as often as our source code, we don’t want to keep rebuilding our node_modules each time we run docker build.
We are going to set the ENV variables PORT to 3000 and the TYPE so we can see the differences when we run our dockerised app.
After that, EXPOSE tells Docker which port the container is listening on at runtime, in this case we are exposing port 3000.
Finally, the CMD command tells Docker how to run the application we packaged in the image. The CMD follows the format CMD [“command”, “argument”].
If we now run the command docker build . we build the image we just created. We can also run docker build --tag myapp . if we want to tag the image we just created.
We can now see the image we just built with the command docker images.
To increase the build’s performance, we should avoid the files and directories from being included in the image by adding a .dockerignore file to that directory as well. In our case, we have ignored all the files we won't be needing.
We can now run docker run -p 3001:3000 myapp. This way, we are mapping our host port 3001 to the container port 3000. The pattern is HOST:CONTAINER.
So now, when we go to http://localhost:3001, the server will now return:
Your built with Dockerfile application is running on port 3000
What is docker-compose for?
Imagine we want to run two containers, one for our node application and the other for a database in which we will store some information, for example MongoDB. This is when docker-compose becomes useful.
docker-compose defines a docker run command. This is a set of steps to create and run our container. We define a multi-container application in a single file, then spin our application up in a single command which does everything that needs to be done to get it running.
First of all, make sure you install docker-compose on your machine and add this docker.compose.yml file:
We are here giving instructions to build two images, one for myapp and one for the mymongo.
In the service myapp we are telling docker-compose to use the Dockerfile in the same directory (the . from the build . indicates to run the build command, the Dockerfile, is in the current working directory).
We are also telling that myapp depends_on mymongo, so myapp won’t run until mymongo does.
With the ports instruction we are again mapping the port exposed to 3001 as we did on the docker run command manually before.
We set the environment variables PORT and TYPE so that when we run the command docker-compose up and check on http://localhost:3001 we should see:
Your built and run with docker-compose application is running on port 3000
The command docker-compose up gives Docker the instructions to build the images and run the container according to the docker-compose.yml.
The command docker-compose down shuts down all the services run by the previous script.
As docker ps lists all running containers in Docker engine, docker-compose ps lists containers related to images declared in docker-compose file, so the result of docker-compose ps is a subset of the result of docker ps.
Docker Command Line Cheat Sheet
Here are some useful Docker commands explained:
▶ docker build --tag tagname .→ Build an image from the Dockerfile in the current directory and tag the image. Example: docker build --tag myapp .
▶ docker run -d -p 80:80 tagname service nginx start → Example: docker build --tag myapp .
▶ docker ps → Check the running containers.
▶ docker ps -a → Show all containers (default shows just running ones).
▶ docker exec -it containername bin/sh → Enter the console from a given docker container.
▶ docker images → See local built images
▶ docker images -a → See all images locally stored, even the intermediate images. Remember each Docker image is composed of layers, with these layers having a parent-child hierarchical relationship with each other. Docker calls this an intermediate image.
▶ docker image rm imagename → Remove an image.
▶ docker stop containername → Stop a container.
▶ docker rm containername → Remove a container.
▶ docker-compose -f path/to/docker-compose.yml up → Create and start a container specified on a docker compose file. Example: docker-compose -f docker/docker-compose.yml up
▶ docker-compose -f path/to/docker-compose.yml down → Stop and remove containers, networks, images and volumes. Example: docker-compose -f docker/docker-compose.yml down


Top comments (1)
Nice article!