
(Photo by Harley-Davidson on Unsplash)
In this seventh part we are going to see how to update to the new version of yew; then again we will how to write and use custom components using yewtil.
Then... No spoiler!
Code to follow this tutorial
The code has been tagged with the relative tutorial and part.
git clone https://github.com/davidedelpapa/yew-tutorial.git
cd yew-tutorial
git checkout tags/v7p1
Part 1: New Yew, and Again on Pure Components
As I was explaining in the last tutorial, the latest versions of Yew, have modify a little the way we should writ our code, namely it became mandatory to explicitly use the fn change(), that we saw too in the last article, and explain, even when it should just return false.
Moreover, yewtil was purged of dead code and moved into Yew's workspace.
We will proceed with order to update the code we already have from the end of last tutorial.
Cargo.toml
The versions in crates.io are not fully updated, so here I'll opt for the latest available code in the Github repo:
yew = { git = "https://github.com/yewstack/yew", features = ["web_sys"] }
yewtil = { git = "https://github.com/yewstack/yew" }
You can see that yewtil points to the same repo as yew: this is because now they are in the same workspace. Beginners notice: this is a somewhat obscure and undocumented way of referring to the crate; I first encountered it using Diesel from git, and it was strange also for me that it should work this way, especially because it is undocumented: there are lots of docs about how to setup a workspace, but not many on how to use two crates from the same workspace, while using the git repo. So beware.
src/components/button.rs
No changes have to be done. Yup, our code works fine through versions (it is also fairly simple).
src/app.rs
This is THE change to be done: we have to add a fn change() if we want to correctly impl Component for our App struct, even though there are no Properties (our App, as the entry-point does not need any), so there is nothing to change. Well, we'll stub it out and simply return false:
    fn create(_: Self::Properties, link: ComponentLink<Self>) -> Self {
        App {
            link: link,
            counter: 0,
        }
    }
Before all this was simply implied.

That's it, our app runs as expected!
Part 2: Improve some more with yewtil
Code to follow this part
git checkout tags/v7p2
We will see presently how to simplify some more the custom components through what are called function components. To understand what they are, we can recall that pure components are components that do not need to manipulate directly the state, but update themselves merely if the state changed, on the basis on a comparison between the current and the new state. Function components likewise, can be used for components that do not need to manipulate or act directly in response to state change (presentation components). In addition to pure components, function components do not define the state as a struct, and a struct implementation. the state they receive is based on the function parameters, that is, the parameters the function defines are effectively those used as state.
An example should suffice, we shall change our trusty Button
src/components/button.rs
We start with the imports:
use yew::{html, Callback, Html, MouseEvent};
use yewtil::function_component;
Previously we were using Yew's prelude only to import Html, so now we dispensed with it, and are importing straight Html.
From Yewtil we are importing function_component.
#[function_component(Button)]
pub fn button(onsignal: &Callback<MouseEvent>, #[prop_or_default] title: String) -> Html {
    html! {
        <button onclick=onsignal>{ title }</button>
    }
}
This is all that is needed! Let's proceed with order:
- we use the directive
#[function_component(<ComponentName>)]: we define the component name, capitalized as any struct (under the hood in any case a component with its proper struct is created, of course) - we define a function, and we declare the state we want to use in the parameters of that function (as a good practice it is sufficient the name of the component, not capitalized)
- the function must behave as a
viewfunction, but beware that there is not aselfwith the state, instead, we have to use the function parameters - in the parameters we can use our trusty
#[prop_or_default]directive, as we do in the state struct definition.
And it really is the end of it.
What is done under the hood is that a component is created, with a struct that matches our parameters, initialized exactly as a pure component; the fn view() of that struct will call the function we defined matching the correct parameters.
It is a really a useful ergonomics for simple presentational components.
As we can see, nothing really has changed. In this case, it is good news.
Part 3: improved API ergonomics
Yewtil allows also for an improved way of fetching web API data.
Code to follow this part
git checkout tags/v7p3
Cargo.toml
Let's bring back serde, and add the needed feature to yewtil
[dependencies]
wasm-bindgen = "^0.2"
serde="1"
yew = { git = "https://github.com/yewstack/yew", features = ["web_sys"] }
yewtil = { git = "https://github.com/yewstack/yew", features = ["fetch"] }
In fact, we need the fetch feature to fetch API data in an improved way.
EDIT: July 29, 2020
While trying again to compile today this code, I discovered a bug introduced few hours ago in wasm-bindgen that clashes with gloo-events bringing down the whole dependency tree! It was introduced in the version 0.2.66 released yesterday!
Meanwhile Yew has updated to version 0.17.2, and while on the surface everything compiles fine, I haven't had yet the time to explore in depth all the changes.
Thus I recommend using the following dependencies:
wasm-bindgen = "=0.2.65"
serde="1"
yew = { git = "https://github.com/yewstack/yew", features = ["web_sys"], tag = "0.17.2" }
yewtil = { git = "https://github.com/yewstack/yew", features = ["all", "yewtil-macro"], tag = "0.17.2" }
If you want to use the version I used at the time this article was written, then substitute for both yew and yewtil the tag="0.17.2" with tag="0.16.2".
After applying these change I suggest a cargo clean, followed by the usual ./run.sh, that will clean all, download all dependencies, and compile them again.
src/api.rs
We add this new file src/api.rs. Let's go quickly over the use section:
use serde::{Deserialize, Serialize};
use yewtil::fetch::{FetchRequest, Json, MethodBody};
We use serde, as well as some parts of the yewtil::fetch mod.
Next we need to replicate the data structures returned by our API. We'll use for this purpose the dummy API /employees endpoint, by restapiexample.com; so, we define it in a constant:
const API_URL: &'static str = "http://dummy.restapiexample.com/api/v1/employees";
This is the result of that endpoint call:
{
  "status": "success",
  "data": [
    {
      "id": "1",
      "employee_name": "Tiger Nixon",
      "employee_salary": "320800",
      "employee_age": "61",
      "profile_image": ""
    }
    // .... there are 23 such records in the array
  ]
}
Thus we need a struct to hold the JSON object wrapper, with the two fields, status and data, plus a struct to represent each employee record in the data array.
#[derive(Debug, Default, Clone, Serialize, Deserialize, PartialEq)]
pub struct Employee {
    pub id: String,
    pub employee_name: String,
    pub employee_salary: String,
    pub employee_age: String,
    pub profile_image: String,
}
This covers the Employee records; notice that besides the usual derives, and the Serialize / Deserialize for serde, we have as well a not too common Default. Since we need to init the data structures easily with Default::default(), we need to make Rust to derive it for us. If the structures are more complex we explicitly need to impl a Default for our structs in order to init them more easily.
The wrapping structure is easy as well:
#[derive(Debug, Default, Clone, Serialize, Deserialize, PartialEq)]
pub struct ApiResponse {
    pub status: String,
    pub data: Vec<Employee>,
}
Notice how we derived again the Default.
We made both struct completely pub, because we need to import them for use in other parts of our project.
Next we need to define a Request struct, and we need to impl the FetchRequest trait for our Request struct:
#[derive(Default, Debug, Clone)]
pub struct Request;

impl FetchRequest for Request {
    type RequestBody = ();
    type ResponseBody = ApiResponse;
    type Format = Json;

    fn url(&self) -> String {
        API_URL.to_string()
    }

    fn method(&self) -> MethodBody<Self::RequestBody> {
        MethodBody::Get
    }

    fn headers(&self) -> Vec<(String, String)> {
        vec![]
    }

    fn use_cors(&self) -> bool {
        true
    }
}
Lots of lines, but the code is very simple to understand.
We have 3 types:
-
RequestBodyif we need to send a body for the request: think of a POST request that wants to add a new employee to the database, and does it with data encoded in the BODY. -
ResponseBodythe data type onto which to map the response. Beware that some API respond with empty objects sometimes, so be prepared to map for empty objects or nothing, maybe with anOption. -
Formatthis type corresponds to the format used for querying and response; in this case we usedJsonfrom the sameyewtil::fetch, which re-exportsserde_json; ideally a type that can default toserde_json. Most API in the wild do use JSON, so it is very useful.
Next we define the needed 4 functions:
fn url(&self)has to return a string containing the URL endpoint to poll.-
fn method(&self)has to return aMethodBodythat represents the API request method:-
MethodBody::Getfor a "GET" request -
MethodBody::Deletefor a "DELETE" request -
MethodBody::Post()for a "POST" request -
MethodBody::Put()for a "PUT" request -
MethodBody::Patch()for a "PATCH" request -
MethodBody::Headfor a "HEAD" request
-
fn headers(&self)has to return a vec of tuples containing 2 String, to be parsed as(KEY: VALUE)for the headers; for example:
vec![
    ("User-Agent".to_string(), "Mozilla/5.0 (Windows NT 10.0; Win64; x64)".to_string())
]
-
fn use_cors(&self)has to return a bool on whether or not to use CORS: it defaults to returnfalse, so beware when not implementing it.
We covered all needed in the API fetch part; we will see now how to handle the fetch states and we will create a component in order to take advantage of the API.
src/components/mod.rs
Since we will implement a custom component, called Employees to display the results of the API call, we need to declare its containing .rs file in the components/mod.rs, in order to use it as a mod:
pub mod api;
pub mod button;
pub mod employees;
We published also api so that we can use both the fetch interface and its data structures (notably the Employee records)
src/app.rs
Since there will be just a small addition, we will do it right away: we will add our custom component:
use crate::components::employees::Employees;
This is to use it.
    fn view(&self) -> Html {
        html! {
            <div>
                <h1>{ "Welcome to Components" }</h1>
                <p>{ self.counter } </p>
                <Button onsignal=self.link.callback(|_| Msg::RemoveOne) title="-1" />
                <Button onsignal=self.link.callback(|_| Msg::AddOne) title="+1" />
                <Employees />
            </div>
        }
    }
And this is to use it in the interface. Yes, we just simply added the component <Employees />
src/components/employees.rs
Now, for the meatiest part:
use crate::components::api::{ApiResponse, Employee, Request};
use yew::{html, Component, ComponentLink, Html, ShouldRender};
use yewtil::fetch::{Fetch, FetchAction, FetchState};
use yewtil::future::LinkFuture;
It is quite some stuff. Let's proceed with order:
- the
components::apiuse, of course. - next, the
yewparts needed for implementing a custom component (a regular one in this case) - then, of course,
yewtil'sfetchparts; notice how we need to handle the state of the request, usingFetchState. - lastly
yewtil::future::LinkFutureis a trait needed forComponentLinkto implement asend_futureaction implicitly; so we will not see it in action, yet we need it in scope.
Next we define the struct for our component
pub struct Employees {
    api: Fetch<Request, ApiResponse>,
    link: ComponentLink<Self>,
}
We have the usual ComponentLink (to which it is magically added the send_future method, just by importing the future::LinkFuture of yewtil). We also have a Fetch that we aptly called api, to which we passed the data to be mapped, ApiResponse, and Request, our implementation of FetchRequest.
We will use a two messages system, as we did previously in the regular API polling:
pub enum Msg {
    SetApiFetchState(FetchAction<ApiResponse>),
    GetApi,
}
The Msg::SetApiFetchState will be set with the appropriate FetchAction state, according to the state of the transaction (do you remember the web API calling model?); the GetApi of course is the one that will initiate all, maybe to be attached to a button that the user can press to explicitly send the request.
Now we need to impl the Component trait for our Employees, as usual, to make it into a custom component:
impl Component for Employees {
    type Message = Msg;
    type Properties = ();

    fn create(_: Self::Properties, link: ComponentLink<Self>) -> Self {
        Employees {
            api: Default::default(),
            link,
        }
    }
As you can see, in the init of the api we use the std::Default::default(), that is why we needed Derive it in the data structures of api.rs .
Nothing new nor difficult in the type declarations and vreate function. Notice, though, that we do not need props, just as we do with App, because the state will be internally managed by the component, as if it were a totally independent unit.
The update function will handle the Msg's:
    fn update(&mut self, msg: Self::Message) -> ShouldRender {
        match msg {
            Msg::SetApiFetchState(fetch_state) => {
                self.api.apply(fetch_state);
                true
            }
            Msg::GetApi => {
                self.link.send_future(self.api.fetch(Msg::SetApiFetchState));
                self.link
                    .send_message(Msg::SetApiFetchState(FetchAction::Fetching));
                false
            }
        }
    }
- The
Msg::SetApiFetchStateis used to communicate the state to theapiwhich is theFetchaction. - The
Msg::GetApiis used to init the API call, so it first uses thesend_futuremethod we attached to theComponentLink, passing to it theapistate, and a way to callback once finished fetching; we recall that the first state theapiis in, is the Default of everything. The default for the state isFetchAction::NotFetching, which indicates that it is not fetching right now, nor any other state. After this it uses the methodsend_message(added as well) telling the action to start fetching, withFetchAction::Fetching. As soon as it is called to fetch, the component does not need to be re-drawn, that is why we returnfalse
Just for reference, these are the 4 possible state of the Fetch:
-
FetchAction::NotFetching, when it is in a resting state -
FetchAction::Fetching, when it has been initialized and prompted to fetch -
FetchAction::Success(result), when the fetching succeeded; it wraps the response -
FetchAction::Failed(error), when the fetching has had some error; it wraps such error.
To them, there corresponds a FetchState, thus
FetchState::NotFetchingFetchState::FetchingFetchState::Fetched(result)FetchState::Failed(error)
As already explained, we need to implement the change function, even though we do not have props passed by the parent, so it is a simple ShouldRender=false
    fn change(&mut self, _props: Self::Properties) -> ShouldRender {
        false
    }
Next we will analyze the view function:
    fn view(&self) -> Html {
        match self.api.as_ref().state() {
            FetchState::NotFetching(_) => {
                html! {<button onclick=self.link.callback(|_| Msg::GetApi)>{"Get employees"}</button>}
            }
            FetchState::Fetching(_) => html! {"Fetching"},
            FetchState::Fetched(data) => {
                if data.status != "success".to_string() {
                    return html! {"Api Error!"};
                }
                data.data
                    .iter()
                    .map(|e: &Employee| {
                        html! {
                            <div>
                                <div>
                                    <p>
                                        {"Name: "}
                                        {&e.employee_name}
                                    </p>
                                    <p>
                                        {"Salary: "}
                                        {&e.employee_salary}
                                    </p>
                                    <p>
                                        {"Age: "}
                                        {&e.employee_age}
                                    </p>
                                </div>
                                <hr />
                            </div>
                        }
                    })
                    .collect()
            }
            FetchState::Failed(_, err) => html! {&err},
        }
    }
}
The biggest part of the code is taken by a closure that displays the record data present in the response. We will proceed with order:
The function contains a single match over self.api.as_ref().state() that gets the state of the api. We will analyze the 4 state matched:
-
FetchState::NotFetching: in this case we return thehtml!containing the button to push, with a callback toMsg::GetApi, in order to start fetching the records form the API endpoint. As we can recall from the code above, this messages sends right away the messageSetApiFetchStatewrapping the actionFetchAction::Fetching.Msg::SetApiFetchStatewhen matched in theupdatelogic will pass this same action to theFetchinterface, that in our struct is calledapi, and then re-draws the component, bringing us to the following branch of ourmatch -
FetchState::Fetching: now that we are on this branch we will write a message that we are fetching, instead of the button. With a little of trickery, and the help of a CSS library, we could show a spin animation instead... -
FetchState::Fetched(data). The first line in theMsg::GetApihad set to wrap the response inMsg::SetApiFetchStateby using the ComponentLink'ssend_futurenewly acquired method. So once the fetching is ended it either callsSetApiFetchStatewith aSuccess, wrapping a response, or aFailed, wrapping the error. In this branch, we match theFetchState::Fetched, that ensues, so we take the response, calleddata, and we first check the "status". It might seem confusing, but the call to the API may succeed or fail, and this depends mostly on the connection, if it's disconnected for example. But even if the fetching succeeds, so we have a response from the server, the server can announce to us that it failed to retrieve the data, or because we do not have the necessary authorization (this is not the case with this dummy API). However, in this case the fetching succeeded, because we got a response. But the content of the response might be that the server failed to produce the requested data. So the first thing, as soon as we have a successful answer from the server, is to check if this answer has got the data we need or not. In this case we need only to check that thestatusfield is equal to"success". In case it is, we can show the content of the records, that we iterate over with a.iter()method on the vec of Employee, and we map to a closure that just creates html to show the fields of each record (separated by a horizontal rule,<hr />). Weclollectthe vector to show it in the component. In case the response is a failure, we just return a message of"Api Error!". -
FetchState::Failed(error): in case the connection failed, we promt the error, with a&err, nothing more.
Time to run our app:
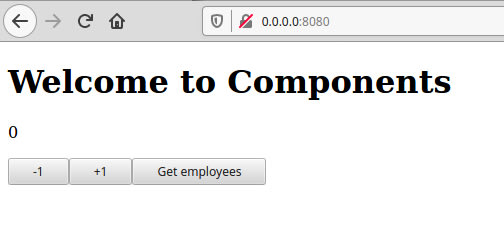
Now we have a button to start fetching.

This is the message that appears while fetching.

This the result of our fetching.
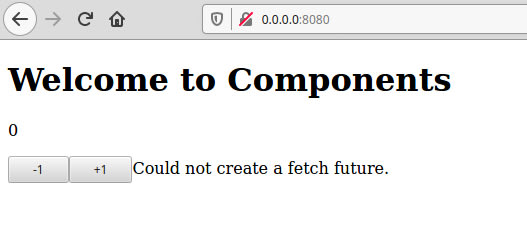
I created an error by disconnecting the Internet, so I got an error Could not create a fetch future.
Conclusions
We covered more stuff than I had originally had planned to do, so this seventh installment really had to be added to cover the new yewtil interface. I had planned to cover some practical example, but I have to postpone it to the following tutorial. So stay excited: we'll finally cover practical applications starting from next article!


Top comments (5)
Davide, this is Great tutorial and I have been enjoying the learning thus far. However, on Part 7 I cannot get any version to compile (as of 7//202020). Error Messages:
v7p1 button.rs:
use yewtil::{Pure, PureComponent); no 'PureComponent' or 'Pure' in root
v7p2 button.rs and v7p3 button.rs: :
error[E0432]: unresolved import
yewtil::function_component--> src/components/button.rs:2:5
|
2 | use yewtil::function_component;
| ^^^^^^^^^^^^^^^^^^^^^^^^^^ no
function_componentin the rooterror[E0432]: unresolved import
crate::components::button::Button--> src/app.rs:1:5
|
1 | use crate::components::button::Button;
| ^^^^^^^^^^^^^^^^^^^^^^^^^^^------
| | |
| | help: a similar name exists in the module:
button| no
Buttonincomponents::buttonerror: cannot determine resolution for the attribute macro
function_component--> src/components/button.rs:4:3
|
4 | #[function_component(Button)]
| ^^^^^^^^^^^^^^^^^^
|
= note: import resolution is stuck, try simplifying macro imports
error: cannot find attribute
prop_or_defaultin this scope--> src/components/button.rs:5:50
|
5 | pub fn button(onsignal: &Callback, #[prop_or_default] title: String) -> Html { | ^^^^^^^^^^^^^^^
Not sure how to resolve these errors. Tried replacing the button.rs code with the button.rs example on the YEW GitHub site but no luck there. Any thoughts?
Fixed it! In the Cargo.toml file change the yewtil = line to:
yewtil = { git = "github.com/yewstack/yew", features = ["fetch", "pure"] }
Yes, it's something I actually explain further on with the tutorials. I shouldn't have committed to the main github branch, because the Yew interface changed so much... But alas, I did. In any case, thank you for your bugfix! I do really appreciate people are taking this project seriously! ❤️❤️❤️
Great tutorial. Was really helpful for me. Only problem I had was that the API doesn't provide the id, age, or salary as a string. Since it puts it out as an integer, I had to change the Employee struct to i32 for those fields. I really liked the tutorial but I just wanted to put this out there for anyone who got stuck with the fetch error that it couldn't deserialize. It took me way longer than it should have for me to realize it was only an issue with the fields being differently typed.
Thank you for taking the time to report this.
I have looked into the matter, but the actual API have not changed, it still gives string-wrapped numbers, so I cannot re-create your problem. Can you please show me the piece of code you are having troubles with?
While working on this I discovered instead that
YewandYewtilhave buped up version, and also that there is a bug introduced few hours ago inwasm-bindgenthat clashes withgloo-eventsbringing down the whole dependency tree! It was introduced in the version 0.2.66 released yesterday.I'm working on fixing the article, but for now, here is the whole Cargo.toml
dependenciessection:With this, a
cargo cleanfollowed again by a./run.shwill clear all, download and build again the whole dependencies. It will take time, and it is bandwidth consuming (if you are on mobile bridge) but it should work fine with the last branch of the repo.