So recently we had a problem. We’ve started building a micro-service based e-commerce platform that communicates using azure service bus. Unfortunately we found that setting up azure functions with a service bus trigger either ended up with a lot of code to maintain or a lot of deployment pipelines. It was getting to be a pain, so we looked for an alternative which we found with logic apps and a bootstrapper function which I’ll take you through how to implement.
So what’s the problem with Azure functions? I’m not knocking them, I like them and they’ve got a great place in our platform. However, every time we added a topic or subscriber we either had to copy and paste some code, or configure a new deployment pipeline or somewhere in between, but either way it was more dev work than it needed to be. We were finding either a growth in code or a growth in pipelines and it was getting in the way of real work. We needed a way to setup subscribers without additional code and deployments to maintain.
This alternative turned out to be another Azure function but a function to manage all the resources for our service bus, essentially a service bus bootstrapper. I’d really like to give credit to our principal engineer Paul Milligan for the initial vision for this here, he had a great idea and we worked on this together to come to this final solution. Check out the example we’re going to build on my github repo.
How does this work I hear you ask? Well first up you need some data that represents the structure of your message queues so you can start creating your service bus entries. We decided to go for a Cosmos Db; it’s quick and easy to setup a data structure and it’s easy to query the data you need. Alternatively you could use a relational db or even a flat json file if you really wanted to.
Let’s unpack this json then. The type is simple, that’s my cosmos db partition key. For the rest, basically we have a topic with a name we’ll use in service bus and an array of our subscriptions which I can loop through. Obviously we’re going to add to this later, but this is enough for now to bootstrap our service bus.
So how am I going to handle this in code? I already said I was going to create an azure function, I’m going to assume you can handle this by yourself. I also need to create a service bus instance in azure. At minimum this needs to be on the standard tier but if you have enough topics and subscribers that you need to bootstrap them then that’s probably a given anyway, I reckon you can probably manage to set that up by yourself as well.
So let’s get to some code, C# is my weapon of choice
Okay, so this should be pretty straightforward. Before we get into the method let’s just check my dependencies. I’ve got a data provider which is querying my cosmos db and then I’ve got a management client for connecting to service bus. The management client comes from a nuget package called Microsoft.Azure.ServiceBus and you’ll need a connection string with management access. You can set up the client and connection string using standard dependency injection patterns in the function startup.
So what’s happening in the code? Well first of all I’ve got to get my topics and then loop through them all. If a topic doesn’t exist I create it, if it does then I don’t. Then I basically go through the subscriptions with the same logic. The difference there is I have a couple of settings which I reckon are pretty self-explanatory, in reality you’d set this up with some sort of configuration.
Why have I used async LINQ? When I ran this I found that it could get quite slow at the point of deploying the logic app, so this is prep for later. This Linq means that I’ll kick off all the deployments more or less at once. Remember the aim here is to manage a lot of topics and subscribers and their apps. Each logic app can take over 30 seconds to deploy so doing this synchronously would take a really long time.
But overall the logic is pretty simple and after running this I end up with the topics and subscriptions created in my service bus and I didn’t have to use a single portal mouse click.


So now we can bootstrap all the subscriptions in service bus, but being honest that’s not the biggest deal, it doesn’t take long to set those up by hand. The problem as we all know is all the subscriber apps. As I said before I didn’t want to have to manage and maintain the code and deployments for many subscriber functions so we’re going to have a look at using logic apps instead and how we can bootstrap them with this function.
First up let’s look at creating the logic apps. We’re going to do a simple version but you can get more complicated if you want to; In our full setup we’ve built in things like slack notifications for our team on dead letters.
Step one, (and this is really important but you’ll see in greater detail why later) create a specific resource group that’s going to store all your bootstrapped subscriber logic apps and nothing else. I’m going to assume you either know or can work out how to create a resource group.
On to the logic app. For designing your logic app I have to admit it’s much easier to do in design view, so create an example logic app you can delete later when using the bootstrapper function.
First up we’ve got to pick a service bus trigger.

For now we’re using topic subscriptions but you could configure this differently if you wanted to. When working through this I looked into peek-lock vs autocomplete and I decided to go with peek-lock. Here’s why; when you peek-lock you get exclusive access to the message from the logic app and nothing else can access it until the lock expires. You have to manually complete the message which we’ll do at the end of the function, however you’ll definitely know if you’ve completed or not. When using autocomplete the logic app completes the message for you but only on the next visit to the service bus, if you make the logic app trigger infrequently then potentially the lock has expired before your logic app completes the message so something else picks it up. I’m a bit of a control freak anyway, so I want to know for sure that my message has been completed so it’s easier to just put in the steps for my peace of mind.
When creating your trigger it’ll ask you to create a connection, you might as well set up a connection string at this point, you’re going to need listen permissions. We’ll actually setup the connection differently later but you’re going to end up using the same connection string so you might as well get it done.

So I’ve got a trigger set up. This is all pretty self-explanatory but one thing that’s interesting is the frequency which you’ll check for items. Now with a function it’s a push mechanism from the service bus to the function. With the logic app it’s a long polling mechanism, but it’s not as straightforward as it sounds.
I’ve set this to run every ten seconds. That means it will open a connection to service bus and leave it open for 30 seconds, if there are existing messages or new messages in that time it will take them off the queue and process all of them. Once that 30 second window is over it will wait 10 seconds (my execution frequency) and then repeat. You could narrow this down to 1 second at most if you were so inclined, I guess it depends on the priority of your messages; for some you might want to increase it for others decrease it.
Now we need to setup what we’re going to do with that message, this completely depends on your setup but we’re running api micro-services on azure app services so I’m going to do an example with an http call for simplicity. You can obviously set it up as you see fit.

This is pretty straightforward, we’re going to post the content of the message to an endpoint on a micro-service. Don’t forget you need to figure out your own json structure in here or whatever format you choose to post with. You can do what you need to do in terms of authorization (we will discuss this later) but there’s one last thing you do need to know about the content that goes in the body. The content is a base64 string. So you’ve got options, you can either handle that here or you can do it on the service end, for the sake of brevity I’m going to leave that decision with you and just send the base64 in this example.
Next up, we need to handle the response, so add a control and select condition. It’s going to be pretty simple in this example, if the http call returns a 200 then it was successful, if it doesn’t, it wasn’t.

There is one issue we ran into with this and that was the possibility the endpoint on the other side failed or timed out so you need to add some settings to the condition with the configure run after option in the menu.

Just select all the options, because no matter what happens you want to manage this message to some kind of conclusion. This matters because a non-success code being returned from the http call would result in the logic app deeming itself to have failed at that stage, so if you don’t select ‘has failed’ here then you can’t handle that condition which leaves your messages constantly being reprocessed until expiry.
Okay, so first of all let’s deal with the success condition. It’s pretty straightforward, you want to complete the message.

This is all self-explanatory. You can select the lock token from the initial service bus trigger properties. You also don’t need a session id unless you’ve set up your service bus to use sessions, if you have you can probably handle it.
So what about on failure? Well it’s pretty much the same, but this time we’re going to dead letter the message. If you want to you can put some kind of retry logic in but that’s for you to figure out. In reality, we created a dead letter monitor function that picks up messages off the dead letter queue and schedules a retry on a sliding timescale and then eventually drops them on a poison queue.
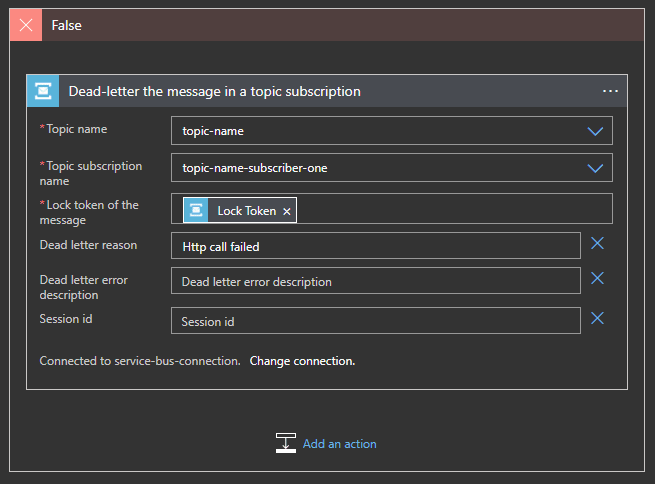
I’ve included a really simple failure reason here. In reality we actually return a failure reason in the response with a proper code but this is something I’m sure you can handle.
Great, so we’ve got our designed logic app!

Now it’s time to get that into our bootstrapper.
One of the best things about azure is azure resource manager (ARM) templates. Essentially this is a json document that describes a deployment. So, because a logic app isn’t actually code, this means you can define a parameterised template to deploy. Now with a bit of technical magic know-how you can make that customisable to the configuration in your database.
Let’s have a look at exporting and editing that template. First off find the button for exporting your template and download it.

You’ll end up with a zip file with two json files, a template file and a parameters file; we’re only interested in the template file.
First up let’s think about making this a bit more generic, we’re going to need to parameterise everything in here, so what do we need?
The bootstrapper is going to create logic apps for you so you’re going to need a logic app name. You’ll need to know where you’re deploying it to so you’ll need a resource group. Service bus stuff is a given so you’ll need a topic and subscriber name, but don’t forget you’ll also need the details of your connection to the service bus. Then finally an url which we’ll contact with the message payload. Great, let’s look at how we inject those into the template json file.
At the top of the template json file you’ll find there’s a parameters section, basically add a list of parameters like I have above, don’t worry about the values for now because that’s what we’re going to be setting in code. However do be aware of the types, particularly the use of securestring for secrets, make sure your connection strings and other secret data uses the securestring type so they won’t be visible in the actual app.
Great once we’ve got a list of parameters we now need to set about adding those into the template in place of some of the values.
Let’s start off with the trigger. Work your way down the template til you find the triggers. In that section you’ll find there is a section called inputs and you’re going to want to change the path so it looks like the below, you’ll also want to customise the recurrence interval. As you can see this will replace those values with our parameters. Great, now we can trigger our logic app for any given topic and subscriber at any frequency interval.
Okay, we now need to look at our actions. One thing that’s confusing about this is that they seem to be in reverse order. Don’t worry too much about it just remember you need to start from the bottom up if you’re a stickler for chronology. I reckon you can probably guess what we’re going to do but let’s go through it anyway.
First of all here’s the http call.
Yep, you guessed it, we replaced the uri with our parameter. Next up comes the conditional actions.
Yep, not rocket science, I just changed the path on each of the actions to use our parameterised topic name and subscriber name. So what’s left? We need to set up the name, region and service bus connection. So here you may find that your logic app template doesn’t have everything you need. So check out the gist below for how to add in the connection.
Awesome, we’ve got a fully parameterised template file. Now we can get to work with a function to automate this deployment!
We’re almost there, but there’s a couple of things you’re going to need. First of all we’re going to use two nuget packages for creating resources. You’ll need Microsoft.Azure.Management.Fluent and Microsoft.Azure.Management.ResourceManager.Fluent.
These two nuget packages provide functionality akin to the azure CLI in C# form. With these we can connect to azure to create our resources. However, you can’t just let any old function have the rights to create and delete resources so you’re going to need to set up an app registration in your azure active directory.
If you remember I said you should create a resource group especially for these logic apps, well that’s because we’re allowing code to create and manage resources, you should absolutely definitely scope this app registration access so it only has permissions to manage resources in this one resource group, don’t let it manage your entire subscription! It just takes a small mistake for it to accidentally delete everything! (yes, someone did that with an azure dev ops template and no it wasn’t me or Paul)
To create your app registration search for app registrations in the portal and create one as usual. Then head to IAMs on the resource group you set for the logic apps and give it contributor access. You’ll need this when you set up the azure client in your dependency injection so check the github repo if you’re not sure what I’m talking about.
Alright, on to the code! So below we can actually see this is really simple.
You setup an azure client and some config and read in the template file as a json string in the constructor.
We need a standard naming convention for the logic apps, you can see I’ve gone for a prefix with topic name and subscriber name, find something that works for you. Be aware though that logic app names can be a maximum of 64 characters long.
Next we just check if the logic app exists yet, if it doesn’t we create it using the template. Before we finish on this though a really key point is the Deployment Mode (and this is where it can go horribly wrong)
In the deployment mode you MUST select incremental. Incremental means that it will either create or update a resource with the selected name. The other option is Complete, this is where you can get in a mess! Complete means that it changes the ENTIRE RESOURCE GROUP! So if you’ve only got one resource defined in your template it will delete everything else and replace it with this single resource! Yes it did happen, no it wasn’t me (or Paul).
Okay, we’re done with this class, all you’ve got left to do is integrate that into the service bus bootstrap code but you can check the github repo for that.
If you’re observant you’ll have noticed I’ve added some more data into the cosmos db so now it looks like this.
Okay, so what happens when we run this? Well first up you should find you’ve got two new logic apps appropriately named
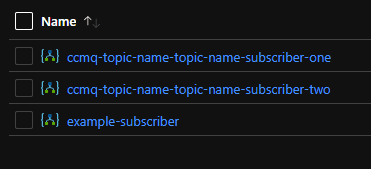
Now you can delete the example one you made. It’s all in the template file so you don’t need it. Next check one which doesn’t match the example you did, so in this case we’ll look at subscriber two and checkout the designer view. I won’t go through every stage but you can see below we’ve deployed with the values from cosmos.

Great stuff, is there anything else? Yep, you’ll also find it’s setup the connection to the service bus with your connections string.

Now all you’ve got to do is to chuck some messages through it and you should find it all works! Congratulations, you’ve just made managing your service bus subscribers a lot easier! All you’ve got to do now is add records to your database and run your bootstrapper.
Okay, so are there any other considerations. First of all some of you might be wondering about scale. We put 10,000 messages through a single logic app and found with a frequency interval of a second it could handle around 500 messages a minute. If you need more then one approach is to deploy more logic apps, you can have more than one subscribed to the same topic/subscriber due to the peek-lock functionality.
What about security? Well it depends on your setup but you may be working with a vnet and logic apps can’t be setup within a vnet which you might think was problematic. One approach is to use a managed identity with your logic app subscribers and include this in the template, then you can secure the resources they contact using azure active directory. You may be thinking that you don’t want to do this with all your internal services which is fair enough but you could use api management if you’ve got it setup or a single function or proxy as an entry point which signposts based on path, there are solutions out there. Alternatively if you’ve got a magic money tree then pay for an isolated environment.
One last question is whether it’s possible to do this with Azure functions. The answer is yes, and this may solve some security problems as you can then deploy them inside vnets or whatever setup you may have. However it’s considerably more complicated for an already overly long blog post. Essentially it’s the same idea but you also need to deploy some actual code.
Get stuck in and see what you can do.
Service Bus Bootstrapper
This example application is for the management of many subscribers to Azure Service Bus subscriptions.
For full details read the blogpost here -
To make the solution work you will need some setup in your azure portal as described in the blog post. You will also need to add a local.settings.json file with the following parameters set:
- CosmosConnectionString
- CosmosDatabaseName
- CosmosContainerName
- ServiceBusManagementConnectionString
- ServiceBusListenConnectionString
- ServiceBusConnectionName
- ServiceBusConnectionDisplayName
- BootstrapperIdentityClientId
- BootstrapperIdentityClientSecret
- AzureTenantId
- AzureSubscriptionId
- SubscribersResourceGroupName
- DeploymentRegion


Top comments (0)