A beginner-level tutorial to demonstrate how to set up a custom domain in CloudFront, with a managed SSL Certificate and DNS via Route 53.
This post is part of a wider series documenting my journey in migrating a traditional LAMP website over to a Single Page Application running on the Amazon Web Services platform. Here, I will focus on configuring a custom domain for my CloudFront distribution.
CloudFront is Amazon’s low-latency Content Delivery Network (CDN). Using a CDN speeds up the distribution of content to visitors by serving content from edge locations that are closest to the user.

At the time of writing, Amazon has 216 Points of Presence (205 Edge Locations and 11 Regional Edge Caches) in 84 cities across 42 countries.
When you set up your CloudFront distribution, straight out of the box with the default settings you will have your own cloudfront.net domain.

(that is assuming you have already configured CloudFront in front of an S3 bucket that holds your static web content, but if not check out this guide on serving static content from S3 using CloudFront and come back)

But what if you want to serve your content from my-custom-domain.com.
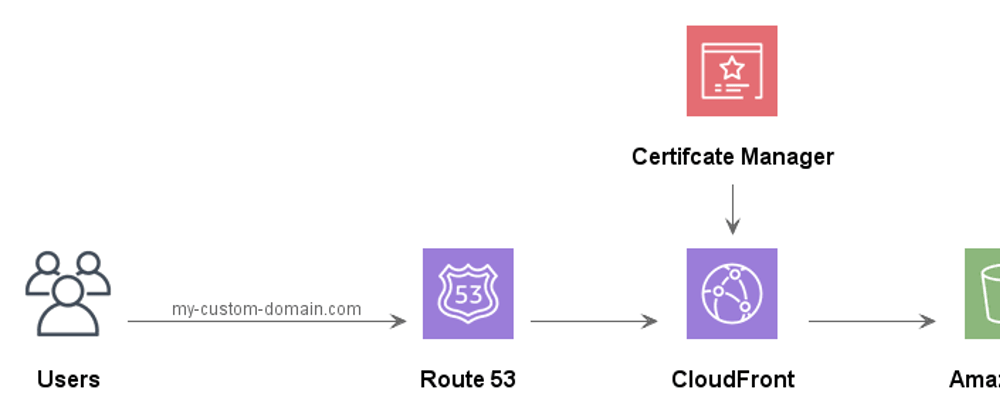
To use a custom domain requires a combination of Route 53 — Amazon’s highly available and scalable cloud DNS web service — and some additional configuration CloudFront. It doesn’t take too long to set up.
Before we start, I assume that you have your domain managed in Route 53; it doesn’t matter if you don’t, but this guide assumes you do.
There is an initial step to obtain an SSL Certificate within Certificate Manager. This allows you to serve your content over https and is a service provided by Amazon for free, and they’ll also take care of its renewal.
Within the Certificate Manager service, make sure you change your region to North Virginia; I cannot emphasize this one enough as it’s caught me out many a time. Then Request a Certificate.
The form is pretty self explanatory and you’ll need to provide a means to prove you own the domain — if you’re using Route 53, and we assume you are, then selecting the option that Amazon automatically manages the validation is the simplest approach. The process usually takes a few minutes.
Now head over to CloudFront and set up your custom domain. This can be done at the time of creating the distribution, but don’t worry if you forgot — you can go back and edit all these settings later.
The first setting is to list all your Alternative Domain Names in the CloudFront distribution settings.

The second setting is to reference the SSL Certificate you created. Check the Custom SSL Certificate (example.com) option and pick your SSL Certificate from the list. Warning; your Alternate Domain Names must match those you specified in the SSL Certificate provisioning request — so if you don’t see your certificate in the list, that is probably the reason.
With these settings done, the final step is to configure the DNS in Route 53.
In your domain hosted zone in Route 53, select to Create Record Set.
We will be creating as an A record for IPv4 and we’ll select the Alias option.
In the Alias Target, you will find your CloudFront distribution — select and save. Warning; your Alternate Domain Names you configured in CloudFront must match the record set name — so if you don’t see your CloudFront distribution in the target drop down list, that is probably the reason.

Repeat to create an AAA record for IPv6.
And that’s it. Success. You will find that you;
✔️ are now able to view your website using my-custom-domain.com, with all the added benefits of CloudFront providing edge locations around the world to reduce latency for your visitors.
✔️ have an SSL Certificate that is managed by Amazon and will be automatically renewed for you (at the time of writing, it’s free).

Variations. If you don’t use Route 53, the final step will be to add a CNAME entry in your DNS settings and set the value to your CloudFront domain.


Top comments (2)
Hey Dave,
I have a problem. I have a website setup in S3 which is delivered using cloudfront. The distribution's URL works absolutely fine. The DNS is setup on route53 for my custom domain.
Now i am trying to create subdomain which points to the above distribution. I created an Alias record in Route53, but the subdomain does not work. It's been around 8 hours setting up, and hasn't been updated. It redirects me to the page as shown here
Can you help me in this case ?
Thanks
What's your domain?
Never come across Thunder DNS before - is that something you have installed/use?