TOC
Introduction
We at Code & Context, a new bachelor's degree at the Technical University of Cologne, love project based work. During the still ongoing lockdown we want to build some kind of connection to our open space at our campus.
To finish off the second semester we have a project with the following vision: "Remote Explorer". Giving not only us, but also future students or complete outsiders an option to explore our campus would be pretty cool and might give us the feeling of being more connected.
We decided to build an IoT birdhouse with Elixir Nerves & Phoenix LiveView.
Elixir gave me a different perspective to programming and I will be going to use it as much as possible in future projects. Links to my recommended learning resources are attached at the end of this post.
Try it out yourself
You can find the code at the following git repository
The basic concept
Nerves is an easy to use and powerful framework for building embedded systems in Elixir.
I do recommend watching Todd Resudek's talk "Why your next (or first) hardware project should be built with nerves"
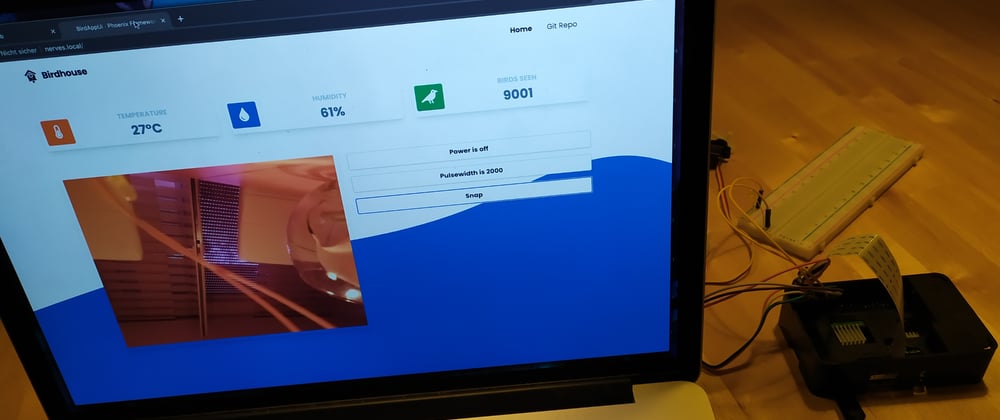
We can also take the advantage of using Phoenix LiveView to build a realtime dashboard with the following features:
- Turning a LED on and off (How could we not in an embedded systems project?)
- Controlling a servo motor for opening and closing a food container
- Realtime updates for the temperature and humidity
- Live-streaming video
- Taking snapshots and sending them to a telegram chat
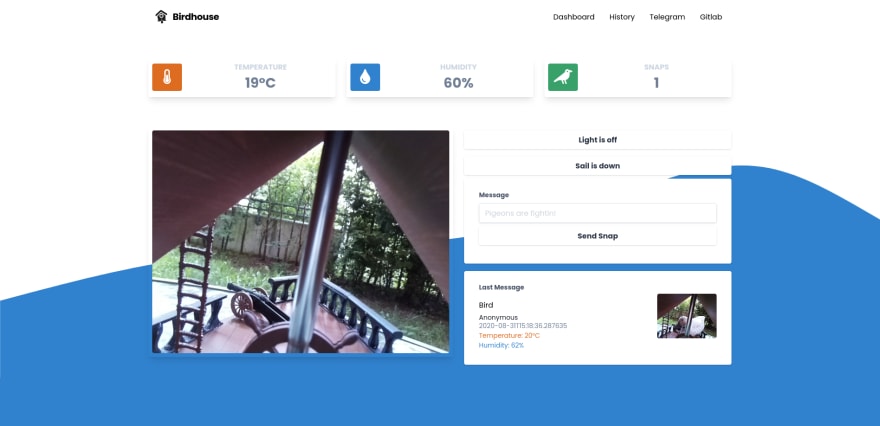
The birdhouse dashboard in action
Hardware
We are going to use the following hardware for our project:
- Raspberry 3
- Raspberry Pi Camera V2
- A simple LED connected to GPIO Pin 18 and GND
- A simple Servo motor connected to GPIO Pin 23, 5V and GND
- A DHT22 Temperature/Humidity sensor connected to GPIO Pin 4, 3.3V and GND
| GND | 3.3V | 5V | GPIO | |
|---|---|---|---|---|
| DHT22 | x | x | 4 | |
| Servo | x | x | 23 | |
| LED | x | 18 |
Setting up a new Elixir Nerves project
One thing I really love about the elixir ecosystem is that most of what you will need is documented very well.
To set up your development environment on either Mac, Linux or Windows, head over to the official nerves documentation: https://hexdocs.pm/nerves/installation.html
Creating our first Nerves project
We are going to use a "poncho project" structure for our app so we can split it into several smaller apps which will then live in a monorepo.
You can find the setup for a poncho project on the official nerves docs: https://hexdocs.pm/nerves/user-interfaces.html
When following the guide, make sure to don't forget our --live while leaving out the --no-webpack attribute:
mix phx.new bird_app_ui --no-ecto --live
Setting up WiFi and updating via SSH
Nerves provides us with an easy way to setup updates via SSH, so we do not have to constantly swap the SD card from our development device to our raspberry pi.
Updating the WiFi config
First lets update our WiFi configuration so we can use environment variables for our SSID and PSK:
# bird_app_firmware/config/target.exs

# ...
# Configure the network using vintage_net
# See <https://github.com/nerves-networking/vintage_net> for more information
config :vintage_net,
  regulatory_domain: "US",
  config: [
    {"usb0", %{type: VintageNetDirect}},
    {"eth0",
     %{
       type: VintageNetEthernet,
       ipv4: %{method: :dhcp}
     }},
     {"wlan0",
     %{
       type: VintageNetWiFi,
       vintage_net_wifi: %{
         key_mgmt: :wpa_psk,
         ssid: System.get_env("NERVES_NETWORK_SSID"),
         psk: System.get_env("NERVES_NETWORK_PSK")
       },
       ipv4: %{method: :dhcp}
     }}
  ]
# ...
To setup our environment variables execute the following commands in your terminal:
export MIX_TARGET=rpi3
export MIX_ENV=dev
export NERVES_NETWORK_SSID=your_wifi_name
export NERVES_NETWORK_PSK=your_wifi_password
Seeting up SSH deployment
Now we can add the nerves_firmware_ssh package to the list of our mix dependencies
# bird_app_firmware/mix.exs

# ...
  defp deps do
    [
      # Dependencies for all targets
      {:nerves_firmware_ssh, "~> 0.3", targets: @all_targets},
      {:bird_app_ui, path: "../bird_app_ui"},
      {:nerves, "~> 1.6.0", runtime: false},
      # ...
    ]
  end
# ...
now cd into your bird_app_firmware and run
mix deps.get
mix firmware
# (Connect the SD card)
mix firmware.burn
from this point on, after inserting the SD card into your raspberry,you can reach your raspberry pi (if you are in the same local network) via ssh nerves.local to debug and also deploy updates from bird_app_firmware via
# create new firmware
mix firmware
# upload firmware via ssh
mix upload
Picam - Setting up a video stream
We are going to use the Pi NoIR Camera V2 Module for our Project.
Buy a Pi NoIR Camera V2 - Raspberry Pi
Basic picam setup
 elixir-vision
/
picam
elixir-vision
/
picam
Elixir library used to capture MJPEG video on a Raspberry Pi using the camera module.
Picam

Picam is an Elixir library that provides a simple API for streaming MJPEG video and capturing JPEG stills using the camera module on Raspberry Pi devices running Linux.
Features currently supported by the API:
- Set sharpness, contrast, brightness, saturation, ISO, and shutter speed values
- Set the exposure, sensor, metering, and white balance modes
- Set image and color effects
- Rotate and flip the image vertically and horizontally
- Set the exposure compensation (EV) level
- Change the image size
- Adjust JPEG fidelity through quality level, restart intervals, and region of interest
- Enable or disable video stabilization
- Adjust the video framerate
- Render fullscreen or windowed video preview to HDMI and CSI displays
For specifics on the above features, please consult the Hex docs.
Requirements
| Requirement | Notes | |
|---|---|---|
| Host Device | Raspberry Pi 1, 2, 3, Zero/W | Zero and Zero W require a special ribbon cable |
| Operating System | Linux | Works out of the box with |
First we are going to make a new project inside our bird_app folder.
Run mix new bird_app_hardware --sup to create a new mix project with a supervisor and add picam to your list of dependencies.
# bird_app_hardware/mix.exs

# ...
  defp deps do
    [
      {:picam, "~> 0.4.0"}
    ]
  end
# ..
Update the bird_app_hardware config, so we can use the FakeCamera in development.
# bird_app_hardware/config/confix.exs

use Mix.Config

config :picam, camera: Picam.FakeCamera

config :logger,
  level: :debug,
  utc_log: true

config :logger, :console,
  level: :debug,
  format: "$dateT$time [$level] $message\\n"
Create two new files in bird_app_hardware/lib/bird_app_hardware with the name camera.ex and configuration.ex.
# bird_app_hardware/lib/bird_app_hardware/camera.ex

defmodule BirdAppHardware.Camera do
    use GenServer
    alias BirdAppHardware.Configuration
    require Logger

    def get_config(), do: GenServer.call(__MODULE__, :get_config)

    def set_size(width, height) do
      GenServer.call(__MODULE__, {:set_size, width, height})
    end

    def set_img_effect(effect) do
      GenServer.call(__MODULE__, {:set_img_effect, effect})
    end

    defdelegate next_frame(), to: Picam

    def start_link(opts \\\\ []) do
      GenServer.start_link(__MODULE__, opts, name: __MODULE__)
    end

    def init(_opts) do
      Logger.info("Configuring camera")
      conf = %Configuration{}
      Picam.set_size(conf.size.width, conf.size.height)
      Picam.set_img_effect(conf.img_effect)
      {:ok, conf}
    end

    def handle_call(:get_config, _from, conf), do: {:reply, conf, conf}

    def handle_call({:set_size, width, height}, _from, conf) do
      case Picam.set_size(width, height) do
        :ok ->
          if width > 1280 do
            Picam.set_quality(5)
          else
            Picam.set_quality(15)
          end

          conf = %{conf | size: %{width: width, height: height}}
          {:reply, :ok, conf}

        err ->
          {:reply, err, conf}
      end
    end

    def handle_call({:set_img_effect, effect}, _from, conf) do
      case Picam.set_img_effect(effect) do
        :ok ->
          conf = %{conf | img_effect: effect}
          {:reply, :ok, conf}

        err ->
          {:reply, err, conf}
      end
    end
end
# bird_app_hardware/lib/bird_app_hardware/configuration.ex

defmodule BirdAppHardware.Configuration do
  defstruct size: %{width: 640, height: 480},
            img_effect: :normal

  @typedoc @moduledoc
  @type t ::
          %__MODULE__{
            size: dimensions(),
            img_effect: img_effect()
          }

  @type dimensions ::
          %{width: non_neg_integer(), height: non_neg_integer()}

  @type img_effect ::
          :normal
          | :sketch
          | :oilpaint
end
Now we can add the picam children to our supervisor in application.ex.
# bird_app_hardware/lib/bird_app_hardware/application.ex

# ...
def start(_type, _args) do
    children = [
      # Starts a worker by calling: BirdAppHardware.Worker.start_link(arg)
      # {BirdAppHardware.Worker, arg}
      Picam.Camera,
      BirdAppHardware.Camera
    ]
# ...
Finally add bird_app_hardware project to your bird_app_firmware mix.exs files dependencies.
# bird_app_firmware/mix.exs

# ...
  defp deps do
    [
      # Dependencies for all targets
      {:bird_app_hardware, path: "../bird_app_hardware"},
      # ...
    ]
  end
# ...
Building a MJPG stream
Since we want to have a public stream of our picam, lets include it in our bird_app_ui and create a streamer module.
# bird_app_ui/lib/bird_app_ui_web/streamer.ex

defmodule BirdAppUi.Streamer do
  @moduledoc """
  Plug for streaming an image
  """
  import Plug.Conn

  @behaviour Plug
  @boundary "w58EW1cEpjzydSCq"

  def init(opts), do: opts

  def call(conn, _opts) do
    conn
    |> put_resp_header("Age", "0")
    |> put_resp_header("Cache-Control", "no-cache, private")
    |> put_resp_header("Pragma", "no-cache")
    |> put_resp_header("Content-Type", "multipart/x-mixed-replace; boundary=#{@boundary}")
    |> send_chunked(200)
    |> send_pictures
  end

  defp send_pictures(conn) do
    send_picture(conn)
    send_pictures(conn)
  end

  defp send_picture(conn) do
    jpg = BirdAppHardware.Camera.next_frame
    size = byte_size(jpg)
    header = "------#{@boundary}\\r\\nContent-Type: image/jpeg\\r\\nContent-length: #{size}\\r\\n\\r\\n"
    footer = "\\r\\n"
    with {:ok, conn} <- chunk(conn, header),
         {:ok, conn} <- chunk(conn, jpg),
         {:ok, conn} <- chunk(conn, footer),
      do: conn
  end
end
Add the following to our router.ex.
# bird_app_ui/lib/bird_app_ui_web/router.ex

# ...
forward "/video.mjpg", BirdAppUi.Streamer
To update the firmware cd into bird_app_firmware and run mix firmware && mix upload.
Now you should be able to access nerves.local/video.mjpeg. But there is still something wrong. After 60s we run into a timeout because of the standard configuration. To fix this, we need to change our idle_timeout to infinity.
# bird_app_firmware/config/target.exs

use Mix.Config

# When we deploy to a device, we use the "prod" configuration:
import_config "../../bird_app_ui/config/config.exs"
import_config "../../bird_app_ui/config/prod.exs"

config :bird_app_ui, BirdAppUiWeb.Endpoint,
  # Nerves root filesystem is read-only, so disable the code reloader
  code_reloader: false,
  http: [
    port: 80,
    protocol_options: [
      idle_timeout: :infinity
    ]
  ],
  # Use compile-time Mix config instead of runtime environment variables
  load_from_system_env: false,
  # Start the server since we're running in a release instead of through `mix`
  server: true,
  url: [host: "nerves.local", port: 80]
#...
Now we have a perfect continious live stream from our picam.
Adding a snapshot plug for single images
To easily add a route for single images of our video, we can add a plug which makes use of our next_frame() function
# bird_app_ui/lib/bird_app_ui_web/snap_plug.ex

defmodule BirdAppUiWeb.SnapPlug do
  import Plug.Conn

  def init(opts), do: opts
  def call(conn, _opts) do
    conn
    |> put_resp_header("Age", "0")
    |> put_resp_header("Cache-Control", "no-cache, private")
    |> put_resp_header("Pragma", "no-cache")
    |> put_resp_header("Content-Type", "image/jpeg")
    |> send_resp(200, BirdAppHardware.Camera.next_frame())
  end

end
and forward a route /snap.jpg to it.
# bird_app_ui/lib/bird_app_ui_web/router.ex

# ...
forward "/snap.jpg", BirdAppUiWeb.SnapPlug
# ...
LiveView Components for the temperature and humidity sensor
I am using a DHT22 as a temperature/humidity sensor connected to the GPIO 4 pin and the following hex package:
jjcarstens
/
dht
Elixir implementation to read DHT11 and DHT22 sensors
DHT
Driver for DHT 11, DHT 22, and AM2302 temperature/humidity sensors
Installation
This ports the Adafruit Python DHT library C source to handle the pin reads.
Currently this is only supporting valid Nerves targets, but in the future will be available to use in any Elixir environment with GPIO (like rasbian).
For none supported platforms (like host machine, MacOS, etc), readings will still work but be randomly generated.
def deps() do
  {:dht, "~> 0.1"}
end
See the datasheets for more info:
Usage
You need to specify the GPIO pin number and sensor type when taking a reading The sensor type can be a string, atom, or integer representation of the target sensor:
iex()> DHT.read(6, :dht22)
{:ok, %{temperature: 22.6, humidity: 50.5}}
iex()> DHT.…Add dht to your list of dependencies.
# bird_app_hardware/mix.exs

# ...
  defp deps do
    [
      {:dht, "~> 0.1"}
    ]
  end
# ..
We are going to make use of a GenServer once again and we will start polling data every 2 seconds with DHT.start_polling(4, :dht22, 2), as soon as the GenServer is initialized, which will also allow us to make use of telemetry events.
# bird_app_hardware/lib/bird_app_hardware/dht.ex

defmodule BirdAppHardware.Dht do
  use GenServer
  require Logger

  @dht_pin Application.get_env(:bird_app_hardware, :dht_pin, 4)

  def start_link(state \\ []) do
    GenServer.start_link(__MODULE__, state, name: __MODULE__)
  end

  def init(_state) do
    Logger.info("Starting DHT Sensor")
    DHT.start_polling(@dht_pin, :dht22, 2)
    {:ok, %{temperature: "Loading...", humidity: "Loading..."}}
  end

  def read() do
    GenServer.call(__MODULE__, :read)
  end

  def handle_call(:read, _from, state) do
    {:reply, state, state}
  end

  def handle_cast({:update, measurements}, _state) do
    {:noreply,
     %{
       humidity: floor(measurements.humidity),
       temperature: floor(measurements.temperature)
     }}
  end

  def handle_event(_event, measurements, _metadata, _config) do
    GenServer.cast(__MODULE__, {:update, measurements})
    |> broadcast(:dht_update, %{
      humidity: floor(measurements.humidity),
      temperature: floor(measurements.temperature)
    })
  end

  def subscribe do
    Phoenix.PubSub.subscribe(BirdAppUi.PubSub, "dht")
  end

  defp broadcast(:ok, event, data) do
    Phoenix.PubSub.broadcast(BirdAppUi.PubSub, "dht", {event, data})
    {:ok, data}
  end
end
# bird_app_ui/lib/bird_app_ui/application.ex

# ...
:telemetry.attach("dht", [:dht, :read], &BirdAppHardware.Dht.handle_event/4, nil)
# ...
Now lets create a LiveComponent which will live inside of our LiveView and subscribe to those events, as soon as a connection is established.
The LiveView will then handle the broadcast und send an update to each LiveComponent.
# bird_app_ui/lib/bird_app_ui_web/live/components/stats_component.ex

defmodule BirdAppUiWeb.StatsComponent do
  use BirdAppUiWeb, :live_component

  @impl true
  def mount(socket) do
    {:ok, socket}
  end

  @impl true
  def update(assigns, socket) do
    {:ok, assign(socket, assigns)}
  end

  @impl true
  def render(assigns) do
    ~L"""
    <div class="w-full md:w-1/3 p-3">
      <div class="rounded shadow-lg p-2">
          <div class="flex flex-row items-center">
              <div class="flex-shrink pr-4">
                  <!-- empty div so bg-colors don't get purged while we load the css class from the @color variable -->
                  <div class="bg-green-600 bg-blue-600 bg-orange-600 hidden"></div>

                  <div class="rounded p-3 bg-<%= @color %>-600"><i class="fa <%= @icon %> fa-2x fa-fw fa-inverse"></i></div>
              </div>
              <div class="flex-1 text-right md:text-center">
                  <h5 class="font-bold uppercase text-gray-400"><%= @stats_name %></h5>
                  <h3 class="font-bold text-3xl text-gray-600"><%= @stats %><%= @character %></h3>
              </div>
          </div>
      </div>
    </div>
    """
  end
end
# bird_app_ui/lib/bird_app_ui_web/live/page_live.ex

# ...
  @impl true
  def mount(_params, _session, socket) do
    if connected?(socket), do: BirdAppHardware.Dht.subscribe()

    measurements = BirdAppHardware.Dht.read()

    {:ok,
     assign(socket,
       temperature: measurements.temperature,
       humidity: measurements.humidity
     )}
  end

  @impl true
  def handle_info({:dht_update, measurements}, socket) do
    send_update(BirdAppUiWeb.StatsComponent, id: "humidity", stats: measurements.humidity)
    send_update(BirdAppUiWeb.StatsComponent, id: "temperature", stats: measurements.temperature)
    {:noreply, socket}
  end
# ...
# bird_app_ui/lib/bird_app_ui_web/live/page_live.html.leex

# ...
<%= live_component @socket, BirdAppUiWeb.StatsComponent, id: "temperature", stats: @temperature, stats_name: "Temperature", color: "orange", icon: "fa-thermometer-half", character: "°C" %>
<%= live_component @socket, BirdAppUiWeb.StatsComponent, id: "humidity", stats: @humidity, stats_name: "Humidity", color: "blue", icon: "fa-tint", character: "%" %>
# ...
You might have noticed that I use Tailwind CSS in this project. If you are interested in how to setup Tailwind CSS in an elixir project, check out https://andrich.me/learn-elixir-and-phoenix-add-tailwind-css
Sending snaps to a telegram chat
If you happen to see a bird live on stream it might be a good idea to save the moment. I am going to show you how to implement a simple telegram bot to your app.
I am going to use the nadia telegram bot hex package.
Nadia 


Telegram Bot API Wrapper written in Elixir (document)
Installation
Add Nadia to your mix.exs dependencies:
def deps do
  [{:nadia, "~> 0.7.0"}]
end
and run $ mix deps.get.
Configuration
In config/config.exs, add your Telegram Bot token like this
config :nadia
  token: "bot token"
You can also add an optional recv_timeout in seconds (defaults to 5s).
config :nadia,
  recv_timeout: 10
You can also add a proxy support.
config :nadia,
  proxy: "http://proxy_host:proxy_port", # or {:socks5, 'proxy_host', proxy_port}
  proxy_auth: {"user", "password"},
  ssl: [versions: [:'tlsv1.2']]
You can also configure the the base url for the api if you need to for some reason.
config :nadia,
  # Telegram API. Default: https://api.telegram.org/bot
  base_url: "http://my-own-endpoint.com/whatever/",

  # Telegram Graph API. Default: https://api.telegra.ph
  graph_base_url: "http://my-own-endpoint.com/whatever/"
Environment…
First install the necessary dependencies
# bird_app_ui/mix.exs

# ...
{:nadia, "~> 0.7.0"}
# ...
In config/config.exs, add your Telegram Bot token like this
# bird_app_ui/config/config.exs

# ...
config :nadia,
  token: System.get_env("TELEGRAM_BOT_TOKEN"),
  chat_id: System.get_env("TELEGRAM_CHAT_ID")
# ...
Now we are going to create a new LiveComponent:
# bird_app_ui/lib/bird_app_ui_web/live/telegram_snap_component.ex

defmodule BirdAppUiWeb.TelegramSnapComponent do
  use BirdAppUiWeb, :live_component

  alias BirdAppHardware.Camera

  @chat_id Application.get_env(:nadia, :chat_id)

  @impl true
  def mount(socket) do
    {:ok, socket}
  end

  @impl true
  def render(assigns) do
    ~L"""
    <button class="w-full font-bold bg-white hover:bg-gray-100 text-gray-800 py-2 px-4 border border-gray-400 rounded shadow my-2" phx-click="snap" phx-target="<%= @myself %>">
      Snap
    </button>
    """
  end

  @impl true
  def handle_event("snap", _, socket) do
    File.write!("/tmp/snap.jpg", Camera.next_frame())
    Nadia.send_photo(@chat_id, "/tmp/snap.jpg")
    {:noreply, socket}
  end
end
# bird_app_ui/lib/bird_app_ui_web/live/page_live.html.leex

# ...
<%= live_component @socket, BirdAppUiWeb.TeleGramSnapComponent, id: "telegram-snap" %>
# ...
When we click the button, the component sends the snap event to itself where we first write a temporary snap.jpg file with the contents of BirdAppHardware.Camera.next_frame() which we can finally send to telegram.
Final word
I am honestly having a lot of fun developing and building things with Elixir and will do a lot more in the future.
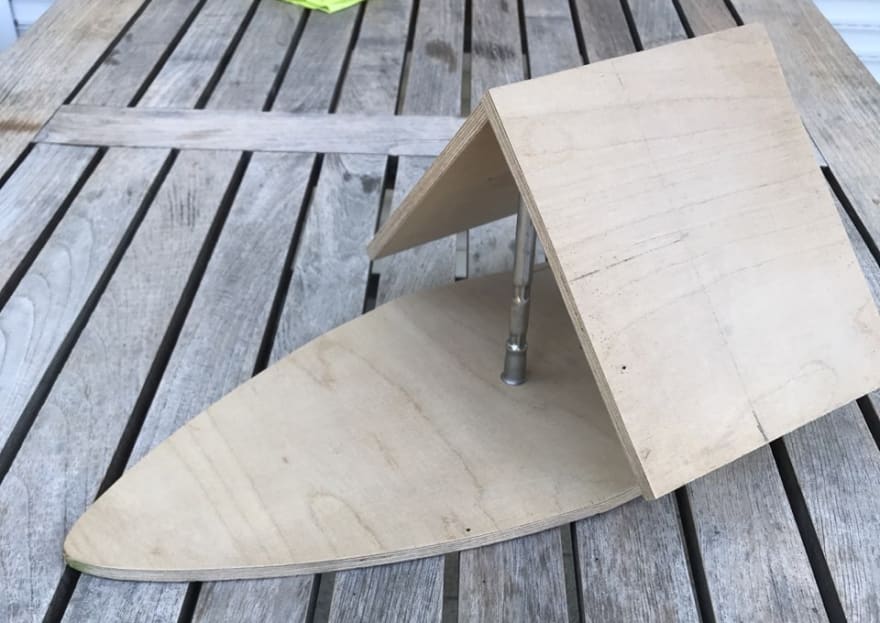
There are still a few todos like a real time bird detection on my list. We also have to implement everything into the following physical birdhouse and 3d-print some additional assets, like a picam holder and a food container.
I did not go through each and every component in detail. If you are interested in the development of the app, check out the git repository and try it out!
Thanks to the Elixir, Nerves and Phoenix Team 💫
My learning resources
- A nice introduction to Elixir: https://joyofelixir.com/
- An even more detailed introduction and a great book https://www.manning.com/books/elixir-in-action-second-edition
- Understandable tutorials for Phoenix LiveView https://pragmaticstudio.com/courses/phoenix-liveview
- Greg Meffords omni_eye app for scanning barcodes and streaming video where I got my code for the MJPG streaming from https://github.com/GregMefford/omni_eye/tree/master
- Screencasts https://elixircasts.io/


Oldest comments (0)