
Full article here: https://dashbird.io/blog/build-deploy-debug-aws-app/
The serverless technology feels as exciting and challenging as it was deploying our first app to the internet, seeing it come to life, work and also crash a lot. The latter happening more than we wanted at the begging, but later, when we managed to overcome that challenge, we felt like we could do anything.
Depending on the interests, we could focus more on our code and leave that task of deploying, monitoring, and giving support for the apps to the DevOps guys.
Well, nowadays that esoteric world of dev operation processes has been changing in some of its stages because of technologies like Serverless computing. It's supporting real-world applications, giving us the power of only creating code and offering the possibility for the code to be deployed by the same developer who is writing it.

So I'm going to share how we are developing the delivery part of a Sushi Restaurant App (sorry, plot twist, we know you're here for that juicy burger photo) that has the following features:
- Creation of an order by the client.
- Push notification for the owner about the new order.
- Asynchronous order update from the delivery person.
- Asynchronous update from the client that they have received the order.
- The company owner will receive notification in real-time about those updates.
Since we will be using the AWS environment and a lot of developers that are reading this have NodeJs background and the point here is to code and produce a working app, I want to show you a way of making a Serverless API using AWS Lambda without a deep previous understanding of their service. (But hey! Don't forget to read about the AWS free tier limit and prices of their services -- AWS Pricing)
The trick here is to use Dashbird -- a platform for monitoring, debugging, notifying, alerting, improving your serverless environment based on AWS Well-Architected Framework insights, performing cost analysis, and more, as an extension of your serverless services.
So instead of dealing with AWS Cloudwatch logging for monitoring, SNS topics for alerting and ... We will just analyze our Dashbird analytics dashboard and act when we receive the alert emails (or Slack notifications) for errors, incomplete executions and more.
Let's build our Food Delivery App
We can observe our already working serverless app, but how do I first deploy it to AWS?
Hopefully, you will have already used the Serverless Framework for AWS Lambda functions and API Gateway. This framework is an industry-standard tool used when creating serverless apps and when considering the complexity of dealing with packaging and deployment, it's often a great time and resource saver.
The Best Sushi App (Our app)
In this example, our restaurant will be a sushi restaurant. The complete app source code is available in this repository and is branched in the same way that will be explained here:
- master (Complete app)
- adding-orders
- received-and-delivered
- notify-owner
For the best follow up of the app-building process, proceed to download the project from the repository with:
  $ git clone git@github.com:imjaroiswebdev/aws-lambda-best-sushi-app.git
  $ # Then cd in our app folder
  $ cd best-sushi-app/api
  $ # Install the dependencies
  $ npm i
1. Filling the prerequisites
First, we need to ensure that we have installed SERVER⚡LESS on our computer, if not then proceed with npm...
$ npm i -g serverless
To continue, we need to configure our AWS credentials if we haven't already. If that is the case, then proceed with this Serverless guide for AWS Credentials.
2. Start coding with the order's database
For modeling and interacting with the database of the app we will be using Dynamoose.
The job of provisioning resources in AWS will be done by our serverless.yml configuration, and we will need to declare the IAM roles to allow the Lambda functions to access the Dynamo database where we are going to store the orders.
# serverless.yml
  .
  .
  .
provider:
  name: aws
  runtime: nodejs6.10
  stage: ${opt:stage, 'dev'}
  region: us-east-1
  environment:
      ORDER_TABLE: order-theBestSushiApp-${opt:stage, self:provider.stage}

  # Is not a good practice but if you want to don't
  # care about setting punctual permissions then you
  # just set in actions and resources allowed...
  # Action:
  #   - dynamodb:*
  # Resource: "arn:aws:dynamodb:${opt:region, self:provider.region}:*:table/*"
  iamRoleStatements:
    - Effect: Allow
      Action:
        - dynamodb:DescribeTable
        - dynamodb:Query
        - dynamodb:Scan
        - dynamodb:GetItem
        - dynamodb:PutItem
        - dynamodb:UpdateItem
        - dynamodb:DeleteItem
        - dynamodb:GetRecords
        - dynamodb:GetShardIterator
        - dynamodb:DescribeStream
        - dynamodb:ListStreams
      Resource: "arn:aws:dynamodb:${opt:region, self:provider.region}:*:table/${self:provider.environment.ORDER_TABLE}"

functions:
  .
  .
  .
resources:
  Resources:
    orderTable:
      Type: 'AWS::DynamoDB::Table'
      DeletionPolicy: Retain
      Properties:
        TableName: ${self:provider.environment.ORDER_TABLE}
        AttributeDefinitions:
          -
            AttributeName: id
            AttributeType: S
        KeySchema:
          -
            AttributeName: id
            KeyType: HASH
        ProvisionedThroughput:
          ReadCapacityUnits: 1
          WriteCapacityUnits: 1
        # Stream enabling order status notification
        StreamSpecification:
          StreamViewType: NEW_AND_OLD_IMAGES
So, we just configured the order database to start using with the app -- enable streams only if you need them. In the models folder, we define the order's model for creating new ones:
// api/models/order.js
const orderSchema = new Schema({
  id: {
    type: String,
    hashKey: true
  },
  rolls: [String],
  client: String,
  total: Number,
  delivered: {
    type: Boolean,
    default: false
  },
  received: {
    type: Boolean,
    default: false
  }
}, {
  timestamps: true
})

module.exports.Order = dynamoose.model(process.env.ORDER_TABLE, orderSchema)
In the folder handlers, we continue with the creation of the service for adding new orders to the database of the Sushi App. In the file add.js following the signature of an AWS Lambda function...
// api/handlers/add.js
module.exports.addOrder = (event, context, callback) => {
  // *** Error handling support in promises
  const handleErr = (errData) => {
    const errResponse = pe(errData)
    console.log(' => EVENT:', event)
    console.log(' => BODY:', body)
    callback(errResponse.stack, null)
  }

  const { body } = event

  createOrder(body)
    .then(newOrder => {
      const response = {
        statusCode: 200,
        headers: {
          'Content-Type': 'application/json',
          'Access-Control-Allow-Origin': '*'
        },
        body: JSON.stringify(newOrder)
      }

      console.log(` => Order [${newOrder.id}] created`)
      callback(null, response)
    })
    .catch(handleErr)
}

const createOrder = data => {
  let orderData = JSON.parse(data)
  orderData.id = uuid()

  return Order.create(orderData)
}
The function createOrder has been defined outside the handler addOrder itself to maintain only the IO task in it -- this improves the cold start timespan. If you consider that the maximum Node runtime that can be set for Lambda functions is v6.10, you want to use Object static methods, object rest/spread, async/await or any other ES6+ suggar you need to enable it through Babel transpiling.
This app project is now ready to be received through the webpack loader.
3. Deploying and Testing The "Add Order" Service Endpoint
Having the handler developed we need to define it in the serverless.yml file in the functions list...
# serverless.yml
  .
  .
  .

  functions:
    addOrder:
      description: Adds a new order
      handler: handlers/add.addOrder
      events:
        # http events declarations informs Serverless
        # to provision API Gateway Lambda proxy integration
        # for this function to be accesible through the
        # defined path and http verb
        - http:
            path: order/add
            method: post
            cors: true
  .
  .
  .
Here we have Serverless doing the work of configuring and provisioning the Lambda function, packaging and uploading a very important setting -- the AWS API Gateway proxy integration for allowing access through the endpoint path defined (here "order/add") and with the POST method for receiving the order data.
Let's deploy
In the terminal folder of the project where we got the serverless.yml file, we enter:
$ serverless deploy
As a result of the deploy we get this result:

This means that we are going in the right direction. Now, let's give the endpoint a try and add a new order to the database. For this, I will be using Postman:

Yeah!! ? Everything is working great.
Now, when we go to our AWS console and from there to our DynamoDB tables view, we will have our first entry to the table:

So up to this point the process is complete, the data is being stored and we can go further with the rest of the app functionality.
4. Endpoints for Updating As Delivered and As Received
The functionality relative to the delivery person and the client for updating the order as delivered and as received respectively, will be done by two services invoked by its endpoints. So now you can change the project to the branch received-and-delivered for the follow up of those simple services.
We'll proceed to declare them in the serverless.yml file:
# serverless.yml
  .
  .
  .

functions:
  addOrder:
    ...

  setAsDelivered:
    description: Updates an order as delivered
    handler: handlers/delivered.setAsDelivered
    events:
      - http:
          path: delivery/order/{id}/delivered
          method: get
          cors: true

  setAsReceived:
    description: Updates an order as received
    handler: handlers/received.setAsReceived
    events:
      - http:
          path: client/order/{id}/received
          method: get
          cors: true
  .
  .
  .
These services will only update the status of the order. We will be configuring it through GET with the ID of the order, but since we are receiving the ID as a parameter in the URL, the code of the handlers for these services is a bit different from the addOrder.js but at the same time very straightforward:
// delivered.js
module.exports.setAsDelivered = (event, context, callback) => {
  // *** Error handling support in promises
  const handleErr = (errData) => {
    const errResponse = pe(errData)
    console.log(' => EVENT:', event)
    console.log(' => BODY:', body)
    callback(errResponse.stack, null)
  }

  // Here we get the id from the url
  const { pathParameters: { id } } = event

  Order.update({ id, delivered: true })
    .then(deliveredOrder => {
      const response = {
        statusCode: 200,
        headers: {
          'Content-Type': 'application/json',
          'Access-Control-Allow-Origin': '*'
        },
        body: JSON.stringify(deliveredOrder)
      }

      console.log(` => Order [${deliveredOrder.id}] set as delivered`)
      callback(null, response)
    })
    .catch(handleErr)
}
Now that we have two more services we will deploy them like before with:
$ serverless deploy
As a result we will now have the endpoints for the two just deployed services:

Testing result with Postman

5. Time for Event-Driven Services: Notifications

We have one service (Lambda function) that is not integrated with an endpoint through the API Gateway and the arrow signaling the data flow is from the Order's database to the service. This setup is the event-driven service pattern, where the service notifyOwner (in this case) only reads the results of the updated orders from the database through an event stream provided by the database and reacts as a result of the change doing an additional action.
Change gears to the branch notify-owner
When we take a look again on the serverless.yml file, specifically at the order database resources provision in the end, we have:
  # serverless.yml
  .
  .
  .
resources:
  Resources:
    orderTable:
      Type: 'AWS::DynamoDB::Table'
      DeletionPolicy: Retain
      Properties:
        TableName: ${self:provider.environment.ORDER_TABLE}
        AttributeDefinitions:
          -
            AttributeName: id
            AttributeType: S
        KeySchema:
          -
            AttributeName: id
            KeyType: HASH
        ProvisionedThroughput:
          ReadCapacityUnits: 1
          WriteCapacityUnits: 1

        # In this section we before enabled the
        # event stream of data that will later be
        # listened by notifyOwner service
        StreamSpecification:
          StreamViewType: NEW_AND_OLD_IMAGES
The stream type definition that we enabled will serve a stream of data with a payload distinguished by its type, following this signature:
  // Record response payload for NEW_AND_OLD_IMAGES streams

  {
   "NextShardIterator": "string",
    "Records": [
        {
          "awsRegion": "string",
          "dynamodb": {
              "ApproximateCreationDateTime": number,
              "NewImage": {
                "id": {
                  "S": "string"
                },
                "rolls": {
                  "SS": ["string"]
                },
                "client": {
                  "S": "string"
                },
                "delivered": {
                  "BOOL": boolean
                },
                "received": {
                  "BOOL": boolean
                },
                "createdAt": {
                  "N": "string"
                },
                "updatedAt": {
                  "N": "string"
                }
              },
              "OldImage": {
                "id": {
                  "S": "string"
                },
                "rolls": {
                  "SS": ["string"]
                },
                "client": {
                  "S": "string"
                },
                "delivered": {
                  "BOOL": boolean
                },
                "received": {
                  "BOOL": boolean
                },
                "createdAt": {
                  "N": "string"
                },
                "updatedAt": {
                  "N": "string"
                }
              },
              "SequenceNumber": "string",
              "SizeBytes": number,
              "StreamViewType": "string"
          },
          "eventID": "string",
          "eventName": "string",
          "eventSource": "string",
          "eventVersion": "string",
          "userIdentity": {
              "PrincipalId": "string",
              "Type": "string"
          }
        }
    ]
  }
For notifying the owner about a new order, pick-up by the client, and about the delivery, we will make use of the properties eventName and OldImage and NewImage. Like before, we are going to declare the service in the serverless.yml file:
  # serverless.yml
  .
  .
  .
  notifyOwner:
    description: Notifies the Sushi owner through Firebase Cloud Messaging whenever he gets a new order, or when that order is received or delivered
    handler: handlers/notify.notifyOwner
    events:
      - stream:
          type: dynamodb
          arn:
            Fn::GetAtt:
              - orderTable
              - StreamArn
          batchSize: 1
  .
  .
  .
So now we'll proceed with the notifyOwner service that is located in the notify.js file in the handlers folder...
  // notify.js

  module.exports.notifyOwner = (event, context, callback) => {
    // *** Error handling support in promises
    const handleErr = (errData) => {
      const errResponse = pe(errData)
      console.log(' => EVENT:', event)
      console.log(' => BODY:', body)

      // Since dynamodb streams invokes lambda functions
      // in an "Event" type way, then the results are
      // manage by the context handler methods, not
      // the case of "RequestResponse" type where this
      // this is done through the callback method
      context.fail(errResponse.stack)
    }

    // Selects only the records that are related to
    // modifications and new entries on the orden DB entries
    event.Records
      .filter(({ eventName }) => (eventName === 'INSERT' || eventName === 'MODIFY'))
      .map(({ dynamodb }) => {
        const { message, type } = notification(dynamodb)

        message &&
          notifyToOwner({ message, type })
            .then(({ data }) => {
              data.success === 1
                ? console.log('Notification message sent:', message)
                : handleErr(data)

              context.done()
            })
      })
  }
The code in charge of creating the notification message, depending on the event received, results in an update in the order's database table that is notifyToOwner and as before, it is defined outside the service handler:
  // notify.js

  module.exports.notifyOwner = (event, context, callback) => {
    .
    .
    .
  }

  // Produces the notification message from the update
  // done in the order
  const notification = ({ OldImage, NewImage }) => {
    const { client } = NewImage
    let message = type = null
    let delivered = received = false

    // Since the results of the records received on
    // stream output comes directly from dynamodb
    // these are not parsed as standard plain js
    // objects like those managed with dynamoose,
    // then their values have to be referenced in
    // dynamodb notation

    if (!OldImage) {
      message = `New order from ${client.S}`
      type = 'newOrder'
    } else {
      delivered = NewImage.delivered.S !== OldImage.delivered.S
      received = NewImage.received.S !== OldImage.received.S
    }

    if (delivered) {
      message = `Order from ${client.S} was delivered`
      type = 'delivered'
    } else if (received) {
      message = `${client.S} confirmed the order as received`
      type = 'received'
    }

    return { message, type }
  }
Time to send some messages!
The messages created by notifyToOwner
will finally be sent to the Sushi app owner module when; a client makes a new order, the delivery person completes a delivery, and when the client confirms their order as received. Each of those messages will be sent through the push notification service of Firebase. Notice that even though this is an AWS service, it is not limited or forced to use only AWS products and because of that we are using FCM to push the messages to the owner.
ℹ Editor's note: The scope of this article does not include the details about setting up Firebase Cloud Messaging, but the configuration used, is the basic for use in a sufficient number of cases and especially notice that we are using the rest API version of the FCM service for not making use of external libraries that may add bulk to our service.
  // notify.js
  .
  .
  .
  // Sends a push notification to the Sushi owner through FCM
  const notifyToOwner = ({ type, message }) =>
    Token.get({ subscriber: 'sushi-owner' })
      .then(({ token }) =>
        fetch('https://fcm.googleapis.com/fcm/send', {
          method: 'post',
          headers: {
            'Content-Type': 'application/json',
            'Cache-Control': 'no-cache',
            'Authorization': 'key=' + process.env.FCM_SERVER_KEY
          },
          data: {
            notification: {
              title: type === 'delivered'
                ? 'Order Delivered'
                : 'Order Received!',
              body: { type, message }
            },
            to: token
          }
        })
      )
      .catch(err => err)
As it often happens with real world apps, we need to have a registry of every subscribed client (app) that is getting notifications. So we need to add a persistent way to maintain that registry and in this case in a form of another table called tokenTable
where the only subscriber that we'll have (sushi-owner) will submit its FCM client token to our database for us to know where to send the new messages.
That is the explanation of the other model seen in notifyOwner service.
To complete this task don't forget to run it once again..
$ serverless deploy
6. The Best Sushi App in action
Now we can go to the folder client and run:
$ yarn && yarn start
This will open a tab in our browser with The Best Sushi ready to work on our Serverless backed API for the restaurant.
Let's order some sushi

Notice that when the client orders sushi, a notification of a new order is received by the Sushi Owner module that is only listening for new notification updates that it receives as a prop from the app component.
  // App.js
  .
  .
  .
  class App extends Component {
    state = {
      notification: []
    }

    componentDidMount() {
      messaging.onMessage(payload =>
        this.setState(({ notification }) => {
          const { type, message } = JSON.parse(payload.notification.body)

          notification.push({
            type,
            message
          })

          return { notification }
        }))
    }

    render() {
      .
      .
      .
    }
  }
The same happens with the new notifications when the order is set as delivered and as received:


7. Debugging and Monitoring: Dashbird to the Rescue
This is the moment when you start realizing that AWS Cloudwatch is not enough anymore for monitoring. When you are developing your service, the Serverless Framework offers you some good tools for debugging your code without entering the AWS, like:
  # Watch the logs resulting of a particular service invocation
  $ serverless invoke -f addOrder -p event.json -l

  # In another terminal window
  # To maintain a open stream of the tail of logs generated by the service passed as parameter
  $ serverless logs -f notifyOwner -t
But in production you need a monitoring and observability dashboard for your running services backing your app.
The Solution
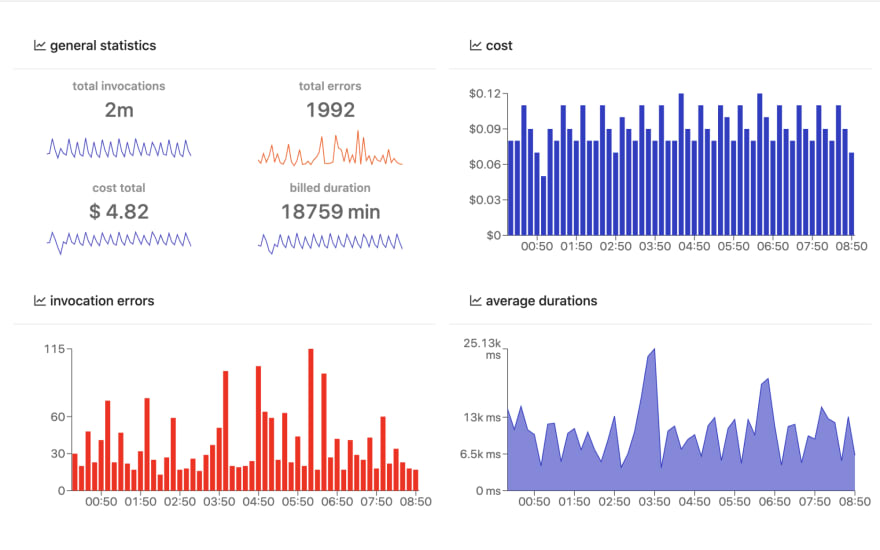
Here you got a complete and detailed dashboard for monitoring and observing everything happening with your services.


Dashbird gives you every log for every running service; you can easily filter logs by type, date, and more, live tail in one click if you are without a terminal or with your AWS credentials if you're away from your developing computer.
Dashbird also provides alerts and notifications in real-time via email and Slack integrations or webhooks and SNS endpoint configurations.
Serverless Performance Improvement

Because we are only using the default configuration provided by the Serverless Framework for provisioning Lambda functions that are set to 1GB of RAM, we are stacking these valuable assets without any concern and being very cost-efficient. We can test if running our services with a minor RAM can maintain the performance in invocation duration and cold start timespan, eventually finding out that the extra bump of RAM was just a waste.
That is just one of the many analysis results that we can achieve with the use of Dashbird without opening our AWS Console.
Wrapping up
We've shown the basics of building serverless apps and how to implement a basic event-driven functionality to your services. We've only just touched on the importance of using a monitoring platform for your In Production Serverless apps to build resilience, implement optimization, and use observability successfully. Dashbird is the perfect dev-tool for this, enabling more development and production for the DevOps team without compromising on security and functionality.
Further reading:
Why Serverless Apps Fail and How to Design Resilient Applications


Top comments (1)
Some comments may only be visible to logged-in visitors. Sign in to view all comments.