
Best Practices Setting up Your Local Development Environment
You are about to start a new project and then you wonder what's the best option to set up your local development environment. Your OS could be Linux, Mac, or Windows. However other people working on the same project may be running a different OS. There are many alternatives to install and use all the tools you need but, what pros and cons have each one of them?
This post presents different methods and best practices when setting up your local development environment along with the advantages and drawbacks of each option.
Services in your Machine
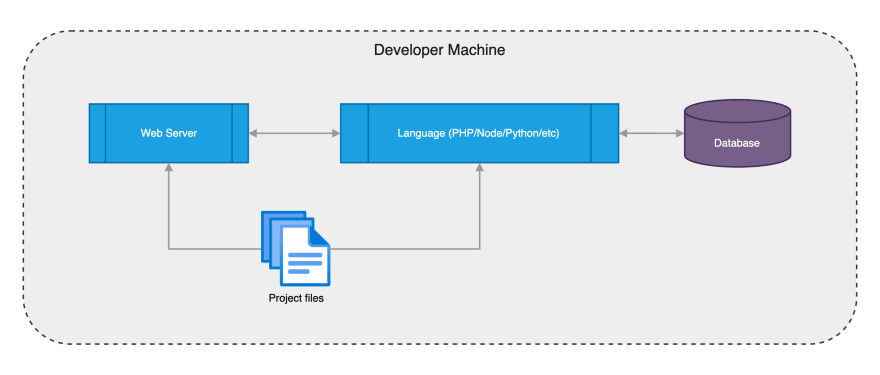
This is the first alternative when setting up a local environment and is based on manually installing on your computer all the required software. A simple web environment usually includes the Web Server (Apache and Nginx are the most common), the Language Interpreter (PHP/Node/Python/etc.), and a Database Engine (usually MySQL or PostgreSQL).
So you start downloading, installing, and setting up every component. This can be done by visiting the web page for every component needed and downloading the installer, but the best option is to use a package manager. Package managers will make this process easier and will allow you to keep your software updated to the latest version.
The specific package manager depends on your Operating System. In macOS the most popular tool is Homebrew. In Linux distributions like Ubuntu/Debian, you can use apt, and in RedHat/CentOS distributions you can use yum. In Windows the most popular tool is Chocolatey.
Once all the required software is installed you need to do extra steps to set up the environment:
- Create the Virtual Host in the Web Server and point it to your language interpreter service
- Create a new User in the Database Engine, a new Database and the give the proper permissions to that User
- Configure your code to use the Database credentials
- Repeat the process for every extra service required in the project (NoSQL databases, caches, etc.)
This process is not hard once you know how to do it, however, the following problems arise.
All the devs in the project don't share the same environment, they may have different operating systems and even different software versions. It may trigger situations where tests pass locally but not in CI/CD and vice-versa. Also, a bug that is happening in the computer of a developer may not happen on the computer of another developer.
Another issue is that if you reinstall your computer you have to repeat every step again. This is boring and tedious, also the installation and configuration method of these packages depends on your operating system. The instructions to set up your local dev environment won't be the same for every member of the project and then they must be written and duplicated for every OS.
There is a better alternative when setting up a local development environment: using Virtual Machines.
Virtual Machines
Not every developer in a project will use the same Operating System so the solution is for everyone to run a Virtual Machine (VM) on their computer with the same OS (e.g: Ubuntu Linux 22.04). With this method, all the developers will have the same environment and many problems from the previous section will be solved.
A free alternative to run Virtual Machines on your computer is VirtualBox. VirtualBox runs on Mac, Windows, and Linux. Using the interface you can create, start, stop, and destroy Virtual Machines. Once the Virtual Machine is created we can install all the software needed for our development environment. Also, we need to share (mount) the directory where the project files are located on our computer with the Virtual Machine.
However, creating and setting up a Virtual Machine manually is not the best in terms of productivity. The solution is to use a tool that will allow you to create and set up these environments automatically. This tool is Vagrant.
With Vagrant you just need to create a Vagrantfile in the root directory of your project and then run vagrant up in the terminal to create and start your Virtual Machine. This is an example of a simple Vagrantfile after running vagrant init ubuntu/jammy64:
Vagrant.configure("2") do |config|

  #
  # Use Ubuntu 22.04 LTS (Jammy Jellyfish)
  #
  config.vm.box = "ubuntu/jammy64"

end
Vagrant needs boxes, which is the package format of installed Operating Systems images. In this example, we are using ubuntu/jammy64 which is an image of Ubuntu's latest LTS version (22.04). Just with this file, we have solved the problem of creating and installing a new Virtual Machine and sharing our project files in the /vagrant path inside the VM. Boxes can be versioned too, so you can update to the latest version of a box at any moment.
Now we need to install and set up (provision) the services needed inside the VM. The first option would be to do this manually, but, as in the previous section, there are many issues that we want to avoid. The idea is to do it automatically with a command.
Vagrant supports provisioning automatically using provisioners. A provisioner could be something like a shell script with every step to install and set up all the software dependencies needed.
A shell script could work, but the best option is to use an orchestration/automation tool like Ansible, Chef, Puppet, or Salt. Using these tools you can define the steps needed to set up your project in a set of files, and just by invoking vagrant provision the VM will be set up. The advantage is that setting up a new development environment with this method is easy, fast, and can be shared with all the members of the project.
Example of a Vagrantfile using Ubuntu 22.04 and running Ansible with the playbook.yml file as the initial playbook:
Vagrant.configure("2") do |config|

  #
  # Use Ubuntu 22.04 LTS (Jammy Jellyfish)
  #
  config.vm.box = "ubuntu/jammy64"

  #
  # Run Ansible from the Vagrant Host
  #
  config.vm.provision "ansible" do |ansible|
    ansible.playbook = "playbook.yml"
  end

end

This scenario is much better than the previous one where everything is installed directly on your machine. Now there is only one environment and everything is shared within the team and automated. However, there are still some issues that can be improved:
- Machines are slow to create: The first time you create a new VM it will take some time to download, import, and create the VM in Virtualbox.
- Machines are slow to provision: The first time you provision a VM it will also take some time to download and set up all the packages required by the provisioner.
- High disk space usage: every project requires a new and independent VM, which can take many Gigabytes of storage. It means that if you are working on multiple projects the disk space needed could be very high.
- High memory usage: if you need to have more than one project running at the same time the different VMs needed will consume a lot of memory in your computer.
Because of all these reasons, there is a better alternative than using directly Virtual Machines: using Containers.
Containers
Instead of having to install and set up every service, you can use containers. With containers, you can take profit from existing images built officially. You only need to run a container with the software you need and it will start in a matter of seconds. It will take an extra time the first time because Docker needs to download the image from Docker Hub.
Docker Hub is a container image library where you can find interesting images to use in your projects like the Apache image, Nginx image, PHP image, Node.js image, MySQL image, etc. These images are ready to use, and they come with instructions about how to use them. Usually, you have to pass environment variables to the container and/or tweak a couple of config files.
Linux is the only Operating System supporting containers natively, so if you are using macOS or Windows you'll need software to run a VM with Docker in the background for you. Compared with the previous section the advantage is that we will need just one VM for all of our projects, not a VM for every project. The alternatives to running Docker in these systems are:
- Docker for Desktop: The most popular option.
-
Podman: An alternative container engine with the same CLI interface as the
dockercommand.
Imagine a project where you need two containers: a Node.js container and a Database container. One option would be to start both containers from the command line using the docker run command and passing every argument needed (files to mount, environment variables, ports to publish, etc). However, this is a manual process and is error-prone. There is a better solution to manage a set of containers: Docker Compose.
Docker Compose lets you define a set of containers using a docker-compose.yml file. This file is in YAML format and defines every container you need along with the configuration parameters.
Example of docker-compose.yml file with a PHP 8.1 installation, an Apache Web Server and a MySQL Database:
version: '3'
services:
    app:
        image: 'php:8.1-apache'
        ports:
            - '80:80'
        volumes:
            - '.:/var/www/html'
        depends_on:
            - mysql
    mysql:
        image: 'mysql:8.0'
        environment:
            MYSQL_ROOT_PASSWORD: 'rootpassword'
            MYSQL_ROOT_HOST: "%"
            MYSQL_DATABASE: 'appdb'
            MYSQL_USER: 'app'
            MYSQL_PASSWORD: 'appsecret'
            MYSQL_ALLOW_EMPTY_PASSWORD: 1
Having this file in the root directory of your project and running docker compose up would start both containers (app and mysql) in Docker. After working with the project you just need to type docker compose stop and both containers will be stopped. This process is very easy to learn and to apply to any developer in your team and it just requires having Docker installed, no extra dependencies needed.
It also has an extra advantage: a Dockerfile could be created at the root of the project and then you will have a way of building and publishing an image of your application in your CI/CD service ready to deploy.

Conclusion
Installing the services directly on your machine has the problem of having a different environment for every developer in the project.
This problem can be solved using Virtual Machines with the same environment for every member of the project, but it has the drawback of speed and resources needed when working with multiple projects.
Using containers solves this problem by having just one Virtual Machine on your computer (or even zero if you are using Linux). Working with containers also prepares your application to be deployed in container-based services in staging and production environments, like Kubernetes.


Top comments (0)