JavaScript Object Notation or more commonly known as it’s abbreviated name JSON is extensively used throughout all kinds of applications. Its purpose is to streamline communications, most commonly between a browser and a server. Although having said this, it’s perfectly normal for this to work the opposite way around too.
You will inevitably fall upon JSON one time or another during your developer journey and this article hopes to give you a content-know-how to work with it.
Contents
- Some Background
- A Basic Introduction
- JSON Data Types
- JSON Formatting
- Basic Example
- Nested JSON
- Advanced Example
- Managing JSON With JavaScript
- Working With The Console
- Summary
Some Background
JSON is a major part of the JavaScript programming language, it uses go far and beyond the imaginable eye. Discovered in March 2001 and Catering for over 40 languages, yes 40! JSON, with the right library, can be used in almost every programming language you’ve heard of.
This technology even has its own website, which lists all the libraries that can bootstrap your application with JSON. In addition, there are some technical diagrams to provide an insight into how this great communication helper works.
A Basic Introduction
JSON is quite easy to use when you get your head around it, it’s nothing more than simple text structured in a certain way. If you’ve never seen it in the flesh before, then this is a good time to show a small example. Here is what it can look like –
    {
        "SiteName": "CodeWall",
        "ArticleName": "JSON Tutorials",
        "Revision": 1
    }
As you can see from the example, it’s just as stated, simple text, formatted with quotations, separated by colons and comma’s and completely wrapped in some braces. It can get more advanced with bigger data, but we will go through that in detail within this article too.
JSON Data Types
JavaScript Object Notation can handle nearly every data type you could possibly need it too. This, of course, makes it an extremely powerful tool, being able to handle arrays and objects in itself is super-cool. Let’s go through the data types with some small examples showing how they would look in a working application.
String
    {
        "StringDataType": "String"
    }
Object
    {
        "ObjectDataType": {
            "myObj": "ObjectData"
        }
    }
Array
    {
        "ArrayDataType": [1, 2, 3, 4]
    }
Number
    {
        "NumberDataType": 1
    }
Boolean
    {
        "BooleanTrueDataType": true,
        "BooleanFalseDataType": false
    }
Date
    {
        "DateStringDataType": "2011-07-14 19:43:37 +0100",
        "JavaScriptDateDataType": new Date(1310669017000)
    }
JSON Formatting
There are some strict rules when it comes to formatting JavaScript Object Notation and if not adhered too, expect your code to fall over.
Rule #1. Key/Identifier & Value
JSON consists of 2 main elements, a key, and a value. No matter the data type, it needs to be in this format. The key you specify will ultimately be used to access the value later on within your application or on the alternative consumer end.

Rule #2. Key/Identifier Double Quoted
Yes, you may get away with it in JavaScript, but with JSON, you can’t. Every identifier or key you specify in a JSON object must be double-quoted, essentially making it a String type. It may be hard to rid habits of not having to do this, but it soon falls into place.

Rule #3. Wrap Objects In Curly Braces
Whether you have one object or fifty in your JSON code, each object needs to be wrapped inside curly braces, specifying the start and the end of each object inside. This is extremely important, especially to interpreters, if these are missed, you will soon be alerted about it!

Rule #4. Separate Key/Value by Colons
Data within JSON must be separated out, to do this, a simple colon is sufficient, it goes straight after the key or identifier statement and just before the value. This is another imperative concept which you will see the importance when logging data to the console, which is explained later in this tutorial.

Rule #5. Arrays Are To Be Treated Like Arrays
When using arrays within JSON, treat them exactly the same as you would do in normal JavaScript syntax. Whether that be a string or numeric array, the same rules apply.

Rule #6. Encapsulate Objects With Square Brackets (Array)
Multiple objects must sit in an array, giving you what is called an Array Of Objects, this will be used when you have advanced data that you need to communicate to the front-end or the back-end. Notice the bracket-syntax highlighted in blue within the image below.

Rule #7. Objects & Data Separated By Commas
No doubt you will end up working with multiple object JSON in your lifetime, they must be separated correctly, with a simple comma each time. Similarly, data must be separated out with commas too, let’s see this in action with a bit more of an advanced JSON snippet. The important syntax is highlighted in blue for visual understanding.

Basic Example
Now that we’ve gone through the main rules of JSON, it’s time for an example with a range of data types. Feel free to use the following code for your own learning, it will be a great reference or starting point. In this example, these four data-types are present –
- String
- Integer
- Decimal
- Boolean
    {
        "Article": "Tutorial",
        "Author": "Dan Englishby",
        "YearPublished": 2018,
        "IsPublished": true,
        "AverageWordsPerSentce": 20.3
    }
Nesting
Ok, so JSON can become pretty complicated in terms of data-load and that’s why nesting is a key factor to this technology. When you have tons of data to communicate, nesting is a beautiful art. Within the following example, nesting down to two levels is shown because, in theory, nesting is endless. Therefore, knowing how to do it will inevitably come in handy.
How do we nest objects?
Nesting objects are achieved by creating an Array-of-objects within a JSON property. See the following example
    {
        "OuterObject": [{
            "NestedObjects": [{
                    "SomeName": "SomeValue"
                },
                {
                    "SomeName": "SomeValue"
                },
                {
                    "SomeName": "SomeValue"
                }
            ]
        }]
    }
How do we nest arrays?
Similarly, we can nest arrays, and it’s pretty simple too. The only problem with doing it, is you lose the ability to specify the array’s data with identifier or keys. This is because the nested array will be identified with a numeric index rather than a key-value pair.
    {
        "OuterObject": [{
            "NestedArray": [
                [
                    "SomeValue"
                ],
                [
                    "SomeValue"
                ],
                [
                    "SomeValue"
                ]
            ]
        }]
    }
Advanced Examples
See the following examples that use nested concepts to section out data. The property Articles holds a nested set of article names, in addition, it holds the next nested set of data, Shared On, which again nests social network names.
Advanced Example #1
    {
        "Category": "Tutorials",
        "Articles": [{
                "Name": "ChartJS Lesson 1",
                "Shared On": [{
                        "SocialNetwork": "Facebook"
                    },
                    {
                        "SocialNetwork": "Twitter"
                    },
                    {
                        "SocialNetwork": "Google+"
                    }
                ]
            },
            {
                "Name": "ChartJS Lesson 2",
                "Shared On": [{
                        "SocialNetwork": "Facebook"
                    },
                    {
                        "SocialNetwork": "Twitter"
                    },
                    {
                        "SocialNetwork": "Google+"
                    }
                ]

            },
            {
                "Name": "ChartJS Lesson 3",
                "Shared On": [{
                        "SocialNetwork": "Facebook"
                    },
                    {
                        "SocialNetwork": "Twitter"
                    },
                    {
                        "SocialNetwork": "Google+"
                    }
                ]
            },
            {
                "Name": "ChartJS Lesson 4",
                "Shared On": [{
                        "SocialNetwork": "Facebook"
                    },
                    {
                        "SocialNetwork": "Twitter"
                    },
                    {
                        "SocialNetwork": "Google+"
                    }
                ]
            }
        ]
    }
The above example shows how to nest objects, but you can also nest arrays too, having an array-of-arrays is perfectly normal. It all depends on what your specific needs are. The following example shows the Shared On property holding an array of social network names.
Advanced Example 2
    {
        "Category": "Tutorials",
        "Articles": [{
                "Name": "ChartJS Lesson 1",
                "Shared On": [
                    ["Facebook"],
                    ["Twitter"],
                    ["Google+"]
                ]
            }
        ]
    }
Managing JSON With JavaScript
JavaScript works super-fluently with JSON, which of course it does, JS did create it! Managing data within JS can be done in numerous ways, from storing variables to finally accessing the data. In this section, we will learn how to do each one.
Storing JSON In A JavaScript Variable
If you’ve already worked with JavaScript before, I know this will be teaching you to suck eggs, but for the readers who haven’t see the example below –
Storing as a variable
    var json = {
        "Article": "Tutorial",
        "Author": "Dan Englishby",
        "YearPublished": 2018,
        "IsPublished": true,
        "AverageWordsPerSentce": 20.3
    };
Yep, it’s as simple as that, you’ve just stored your first JSON data-set in a JS variable!
Accessing the data
Accessing JSON values can be done in two ways
- Dot Notation Style
- Bracket Notation Style
Dot Notation Example
With the variable we created in the last example, we can now access the values with the following code.
var articleName = json.Article; // variable is now "Tutorial"
Bracket Notation Example
var articleName = json["Article"]; // variable is now "Tutorial"
Working With The Console
Visualizing the data, you create in JSON is quite important to understand it even further, once you see it properly logged into a console, it makes such a difference. All we need to successfully log data to the console is first, a browser with the console facility and secondly some JavaScript.
Browsers such as Google Chrome, Internet Explorer, Firefox all have this functionality, so If you haven’t got one of them already, go download one and then come back to this part of the tutorial.
How do I see the console?
The good news here is that to expose the console in most browsers is done by the exact same method. Use the following steps to find your console.
- Right click on the web page.
- Find the Inspect Element option.
- Click it.
- After the new window opens, find the sub-headed Console window and click it.
See chromes console in the image below –

Logging to the console
Now we’ve discovered the console, let’s use it, add the following code to your JavaScript and reload the page.
    var json = {
        "Article": "Tutorial",
        "Author": "Dan Englishby",
        "YearPublished": 2018,
        "IsPublished": true,
        "AverageWordsPerSentce": 20.3
    };
    console.log(json);
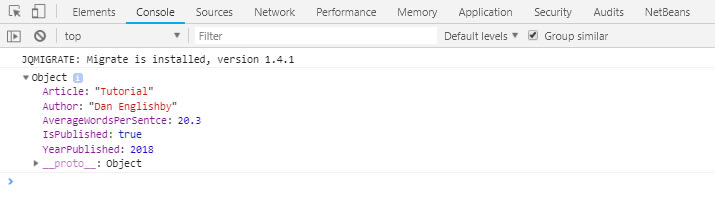
As you can see, the JSON created within the JavaScript has been nicely logged to the Google Chrome console. It’s sectioned and colored beautifully so you can quickly-visually understand it.
Summary
Within this tutorial, all aspects of working with JSON were covered, hopefully giving you the knowledge to go and play with it and learn even more. With a little practice, you will become fluent with it too and then start daring to work with some really complicated nested JSON. As I mentioned before, knowing these concepts will be invaluable to your tool-set because there are so many libraries and API’s that use it.
I’ve logged all the examples within this tutorial to the console, so you can see them all in their full glory. Right-click, inspect element and click the console window to see them.
Lastly, a great online tool that is extremely helpful in verifying that JSON is syntactically correct is the JSONLint interface, it’s free and very easy to use.
Hope it helps, thanks for reading!
This post is cross-posted from my blog - CodeWall JSON Tutorial


Top comments (2)
Thank you for your information. Usually I also perform JSON formatting and comparison operations in JSON Tool
Some comments may only be visible to logged-in visitors. Sign in to view all comments.