
What you’ll be building. Demo, Git Repo Here.
Introduction
App and web development have come a long way over the last few years. We use a lot of social media sites everyday, including Facebook, Twitter, WhatsApp, LinkedIn, and Instagram. One of the most widely used features is live chat. Using the CometChat communications SDK and Firebase backend services, you will learn how to build one of the best social networking sites on the internet with minimal effort.
Follow along the steps to build a Facebook clone that will allow users to add Facebook-like posts, stories, and more on the feed. This tutorial will use VueJs, Firebase, and CometChat to build a Facebook clone with a touch of tailwind's CSS.
Prerequisites
To follow this tutorial, you must have a degree of understanding of the general use of VueJs version three. This will help you to improve your understanding of this tutorial.
Installing The App Dependencies
First, you need to have NodeJs installed on your machine; you can go to their website to do that.
Second, you need to have the React-CLI installed on your computer using the command below.
npm install -g @vue/cli
Next, create a new project with the name facebook-clone and also add vue-router as a preinstall dependency.
vue create facebook-clone
Now, install these essential dependencies for our project using the instruction below.
Install and Configuring Tailwind CSS
To have tailwind CSS properly installed on the project, run the following codes.
npm install -D tailwindcss@npm:@tailwindcss/postcss7-compat @tailwindcss/postcss7-compat postcss@^7 autoprefixer@^9
Next, generate the Tailwind and post CSS configuration files.
npx tailwindcss init -p
This will create two files in your root directory: tailwind.config.js and postcss.config.js. The tailwind config file is where you add in customization and theming for your app. It is also where you tell tailwind what paths to search for your pages and components. Configure them in the manner below:
    // tailwind.congig.js
    module.exports = {
      node: 'jit',
      purge: ['./index.html', './src/**/*.{vue,js,ts,jsx,tsx}'],
      darkMode: false, // or 'media' or 'class'
      theme: {
        extend: {},
      },
      variants: {
        extend: {},
      },
      plugins: [],
    }


    // postcss.config.js
    module.exports = {
      plugins: {
        tailwindcss: {},
        autoprefixer: {},
      },
    }
Create a file named index.css in the src directory and paste the following codes:
    @tailwind base;
    @tailwind components;
    @tailwind utilities;
    @layer components {
      .icon {
        @apply hidden xl:inline-flex p-2 h-10 w-10 bg-gray-200 rounded-full text-gray-700 cursor-pointer hover:bg-gray-300;
      }
      .inputIcon {
        @apply flex items-center space-x-1 hover:bg-gray-200 rounded-full flex-grow justify-center p-2 rounded-xl cursor-pointer;
      }
    }
Finally, import your entry CSS file in your entry JavaScript file(main.js):
    // main.js
    import { createApp } from 'vue'
    import App from './App.vue'
    import router from './router'
    import './index.css' // There you go
Now that we're done with the installations, let's move on to building our facebook-clone app solution.
Installing CometChat SDK
- Head to CometChat Pro and create an account.
- From the dashboard, add a new app called "facebook-clone".
- Select this newly added app from the list.
- From the Quick Start copy the APP_ID, REGION and AUTH_KEY, which will be used later.
- Also copy the REST_API_KEY from the API & Auth Key tab.
- Navigate to the Users tab, and delete all the default users and groups leaving it clean (very important).
- Create a "app.config.js" in the src directory of the project.
- Enter your secret keys from CometChat and Firebase below on the next heading.
- Run the following command to install the CometChat SDK.
npm install @cometchat-pro/chat@2.3.0 --save
The App Config File
The setup below spells out the format for configuring the app.config.js files for this project.
    const firebaseConfig = {
        apiKey: 'xxx-xxx-xxx-xxx-xxx-xxx-xxx-xxx',
        authDomain: 'xxx-xxx-xxx-xxx-xxx-xxx-xxx',
        databaseURL: 'xxx-xxx-xxx-xxx-xxx-xxx-xxx-xxx-xxx',
        projectId: 'xxx-xxx-xxx',
        storageBucket: 'xxx-xxx-xxx-xxx-xxx',
        messagingSenderId: 'xxx-xxx-xxx',
        appId: 'xxx-xxx-xxx-xxx-xxx-xxx-xxx-xxx',
        measurementId: 'xxx-xxx-xxx',
    },

    const cometChatConfig = {
      APP_ID: 'xxx-xxx-xxx',
      AUTH_KEY: 'xxx-xxx-xxx-xxx-xxx-xxx-xxx-xxx',
      REST_KEY: 'xxx-xxx-xxx-xxx-xxx-xxx-xxx-xxx',
      APP_REGION: 'xx',
    }

    export { firebaseConfig, cometChatConfig }
WARNING: "The REST_KEY should not be exposed in front-end application. It should be part of the server-side environment only. But, here its used for demo purposes".
Setting Up Firebase Project
Head to Firebase to create a new project and activate the email and password authentication service. This is how you do it:
To begin using Firebase, you’ll need a Gmail account. Head over to Firebase and create a new project.

Firebase provides support for authentication using different providers. For example, Social Auth, phone numbers, as well as the standard email and password method. Since we’ll be using the email and password authentication method in this tutorial, we need to enable this method for the project we created in Firebase, as it is by default disabled.
Under the authentication tab for your project, click the sign-in method and you should see a list of providers currently supported by Firebase.

Next, click the edit icon on the email/password provider and enable it.

Now, you need to go and register your application under your Firebase project. On the project’s overview page, select the add app option and pick web as the platform.

Once you’re done registering the application, you’ll be presented with a screen containing your application credentials. Take note of the second script tag as we’ll be using it shortly in our application.
Congratulations, now that you're done with the installations, let's do some configurations.
Configuring CometChat SDK
Inside your project structure, open the main.js & index.css files and paste the codes below.
The below codes initialize CometChat in your app before it spins up. The index.js entry file uses your CometChat API Credentials. The app.config.js file also contains your Firebase Configurations variable file. Please do not share your secret keys on GitHub.
Also, the main.js file does more than bootstrap your application, it is also responsible for ensuring that an unauthenticated user is directed to the login page for authentication.
Configuring The Firebase File
This file is responsible for interfacing with Firebase authentication and database services. Also, it makes ready our google authentication service provider enabling us to sign in with google.
Project Structure
The image below reveals the project structure. Make sure you see the folder arrangement before proceeding.

Now, let's make the rest of the project components as seen in the image above.
The Router File
The router file contains all the relevant codes that navigate the user to different parts of our application. See the codes below.
The App Component
The App component is responsible for dynamically rendering our components employing the services of the Auth-Guard in the main.js file. The Auth-Guard ensures that only authenticated users are permitted to access our app, thereby providing security for our application.
The Login Component
This component is responsible for authenticating our users using the Firebase google authentication service. It accepts the user credentials and either signs him up or in, depending on if he is new to our application. See the glitch code below and observe how our app interacts with the CometChat SDK.

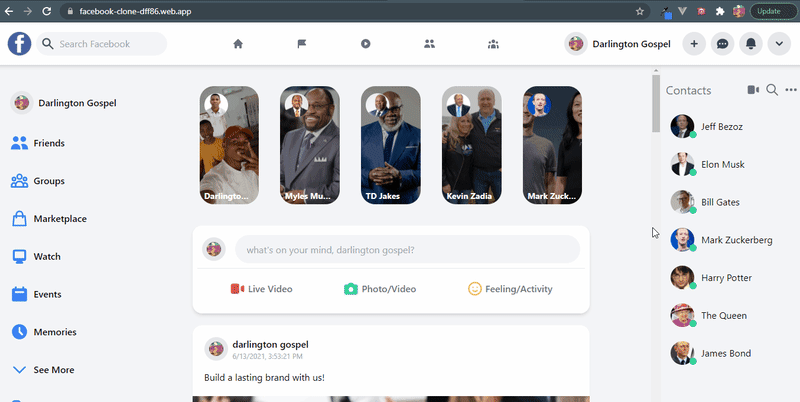
The Wall View
This is where all the magic happens. This component embodies other sub-components like the MainHeader, Sidebar, Feed, Widget, etc.
As intuitive as they sound, the above sub-components can be best observed in the image below.
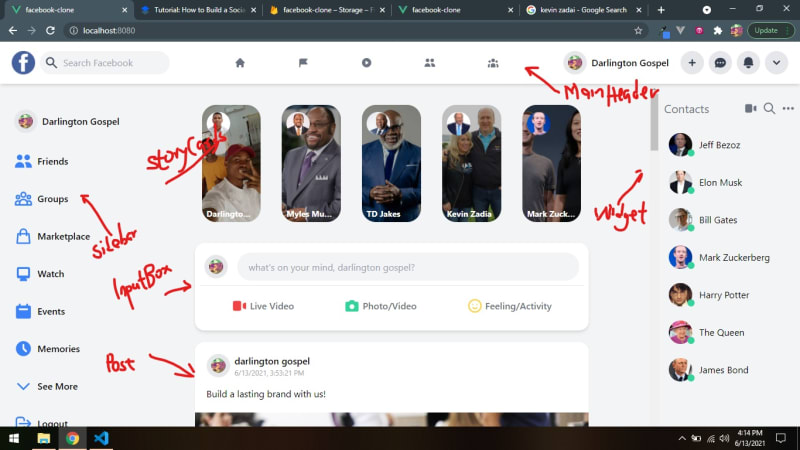
Observe the code below to understand how they are all glued with the tailwind CSS.
Next, let’s take a look at the various sub-components that supports our application.
The Sub-Components
The following is a list of smaller components, their code snippets, and the roles they play in our app.
- Contact
- Feed
- FriendRequest
- Group
- GroupRequest
- InputBox
- MainHeader
- Message
- Post
- Posts
- Sidebar
- SidebarRow
- Stories
- StoryCard
- User
- Widget
Let’s take a look at the individual functions of these components in detail.
Widget & Contact Component

These components are responsible for rendering a user’s contact list. The widget itself being very responsive embodies all the contacts of the signed-in user. For a better insight into what is happening under the hood, look at the code snippets below.
Please make sure you’re replicating this project in the order as seen in the code previews. Let’s proceed to the next sub-components.
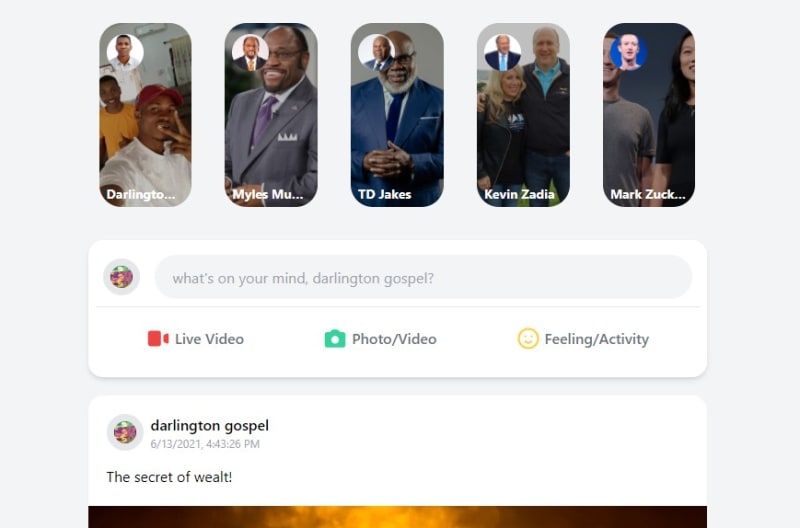
Post & Posts Component

These components are responsible for rendering the carded user posts with or without images. The post component is repeatedly reused within the posts component. The code block below is responsible for producing the above interface.
Stories & Story Card Components
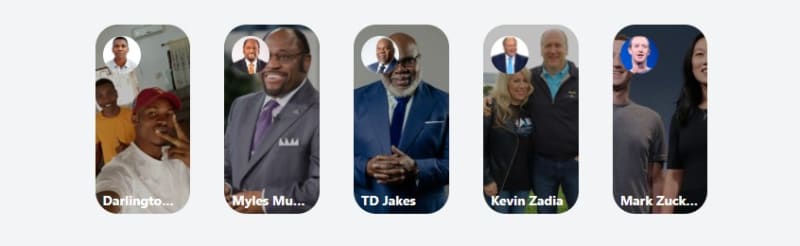
These components are designed with the responsibility of presenting our Facebook Stories. Using the story card component, the stories component renders the current user’s stories in a responsive approach. Below are the codes responsible for the image above.
The Input Box Component

The input box component is responsible for publishing new posts into our platform with or without an image. Behind the scene, the input box component leverages the storage and database services of our Firebase account for all the posts on our application. Below are the codes regulating the post-publishing processes.
The Feed Component
This component houses all the above-mentioned sub-components which includes the stories, input box, and posts components. These components are all designed together with the tailwind CSS. The codes below contain the component structure and design.
The MainHeader Component
![]()
This component is responsible for the navigational structure of our application which includes the essential icons and links such as home, friends, groups, avatar, chat, notification, and so on. Within the block below is the code structure responsible for this component.
The Sidebar & Sidebar Row Component

These components are responsible for the rendering of the navigational structures of our application. See the code snippet below for the structure and operations of the components.
The Group Requests Component
The group requests component is responsible for creating and listing the available groups on our platform. Once a group is created with a private or public parameter, our app nicely renders it to the view. Behind the scene, the CometChat SDK is being used here to both create and obtain the list of groups on our platform. Below is the code snippet responsible for this act.
The Friend Requests Component

Similar to the mode of operation of the group request component, the friend request component lists the available users on our platform. Also, the component gives a user the chance to send a friend request to other users on our platform. The code snippet below illustrates this better.
The Group, User, & Message Components
These components are responsible for the chatting functionality of our application. The group component caters for group chat whereas, the user component allows for a one-on-one chat. The message component is a reusable component responsible for rendering messages in the chat interface. Below are the code blocks responsible for their operations.
The Users View
The Users View is responsible for displaying the number of users within our platform along with a nice “Add as a Friend” blue button. It also navigates the user to the chat view.

Go through the code below to examine how all the components are put together and married by the tailwind CSS.
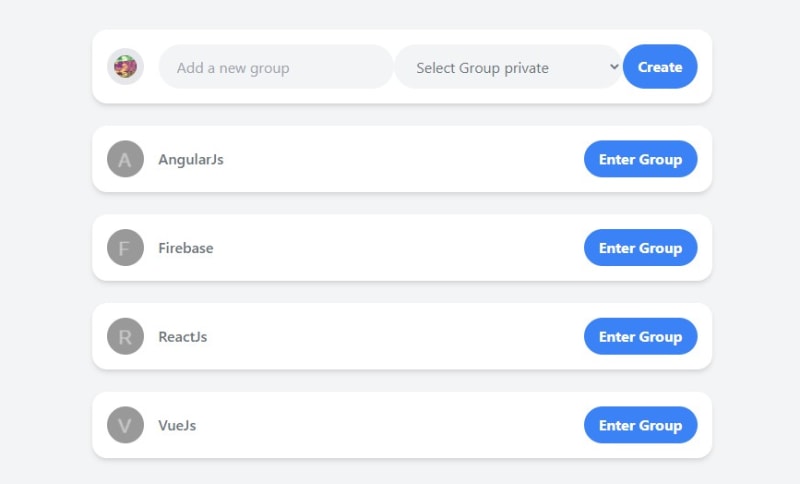
The Groups View
Almost like the Users view, the Groups component is responsible for creating and rendering out all the available groups in our platform. Also, it ensures that private groups are hidden from other user's accessibility. Observe the image and code below.

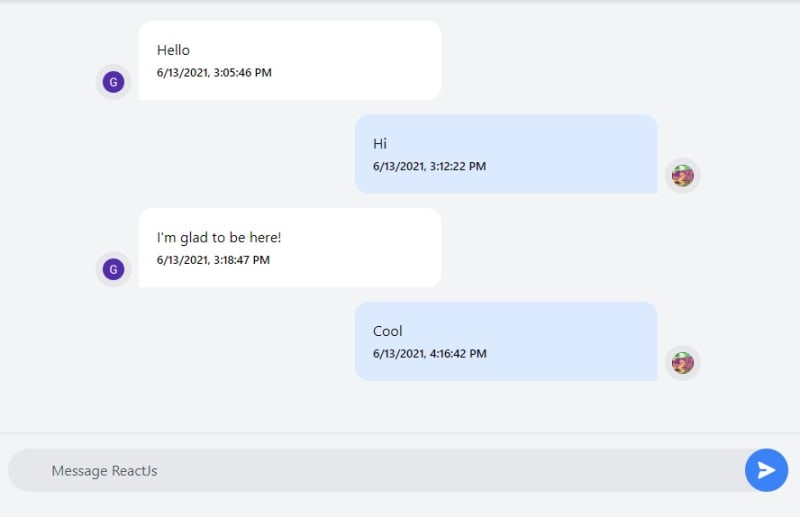
The Chats View
This view is responsible for adequately displaying either a group chat or a one-on-one chat depending on the kind of chat selected by the user. This messaging ability of this component is sponsored by the CometChat SDK.

The codes below explains it all. Please ensure that you go through all the folders in the project to see how they all merge, especially the components directory.
Way to go, you’ve just crushed it, a powerful and working clone of Facebook. Their is one more thing to do, start up your server if you haven’t done that already using the command below.
npm run serve
Conclusion
In conclusion, we have done an amazing job in developing a Facebook clone by leveraging VueJs, Firebase, CometChat, and Tailwind CSS. You’ve been introduced to the chemistry behind Facebook and how the CometChat SDK makes social networking applications buildable.
You have seen how to integrate most of the CometChat functionalities such as texting and real-time messaging. I hope you enjoyed this tutorial and that you were able to successfully clone Facebook.
It's time to get busy and build other related applications with the skills you have gotten from this tutorial.
About Author
Gospel Darlington is a remote full-stack web developer, prolific in Frontend and API development. He takes a huge interest in the development of high-grade and responsive web applications. He is currently exploring new techniques for improving progressive web applications (PWA). Gospel Darlington currently works as a freelancer and spends his free time coaching young people on how to become successful in life. His hobbies include inventing new recipes, book writing, songwriting, and singing. You can reach me on LinkedIn, Twitter, Facebook, or GitHub.


Latest comments (0)