People have started to realize that their tried and true traditional eCommerce platforms are falling behind when it comes to performance. I wanted to take a look at a particularly popular eCommerce tool with a lower cost barrier, Shopify. Shopify does a lot of things well. Shopify can be a simple tool to manage your products, from price, to images, to inventory. It also does a good job with the checkout process. It has always offered website templates to easily deploy your site on a Shopify front end. It reminds me of a simpler setup than even using a Wordpress template. But when you deploy your eCommerce Website using Shopify, you are often sacrificing on performance for ease of use. It turns out that Shopify has made it quite easy to access the functionality your Shopify account using an API. I am going to show an easy method to utilize Shopify's Storefront Access Token in an API with Nuxt.js as the front end. I will also boost performance scores using imgix for the images and Vercel to host the site.
Goals For What We Are Building
My goal for this demo is to quickly create a working headless eCommerce website using Shopify. In the end we will have a simple page is displaying three products, with their name and description, all coming from the Shopify API. We will be accessing the Shopify API via a nuxt-shopify SDK, which is essentially a GraphQL API. This way you can request information specific to a product or category, without having to request all info via the API on every page request. This will be set up in Nuxt as the front-end, but will be displayed via Vercel using SSR. This allows end users to modify/add/remove products all in the Shopify UI and have those changes be immediately reflected on the website without having to push or deploy any changes via a webhook. Here are links if you would like to jump ahead to the Github. If you would prefer to follow along in a video, here is the demo on Youtube:
Install Items
Run the following command to start a nuxt project:
npm init nuxt-app "projectname"
This will provide you a list of items to fill out in your terminal to create your project. I am using Javascript, choose your package manager, Tailwind CSS as my UI framework, I do not need any of these additional modules, choose the LINTER of your choice, no testing framework, a Universal rendering mode, and Static hosting. The final two there are important to do, the rest you can change or modify as you wish.
We will also need to install two other items. This is the nuxt/shopify SDK and the vue-imgix SDK. I will cover these items in more detail below as we utilize them
npm install nuxt-shopify
Then the vue-imgix SDK
npm install vue-imgix
Sign up for Shopify and get Storefront Access Token
Next you will need to create a Shopify account. They do offer a free test for __ days to build and test your Shopify account. Go to Shopify's Sign Up page to create your account now if you don't have one.
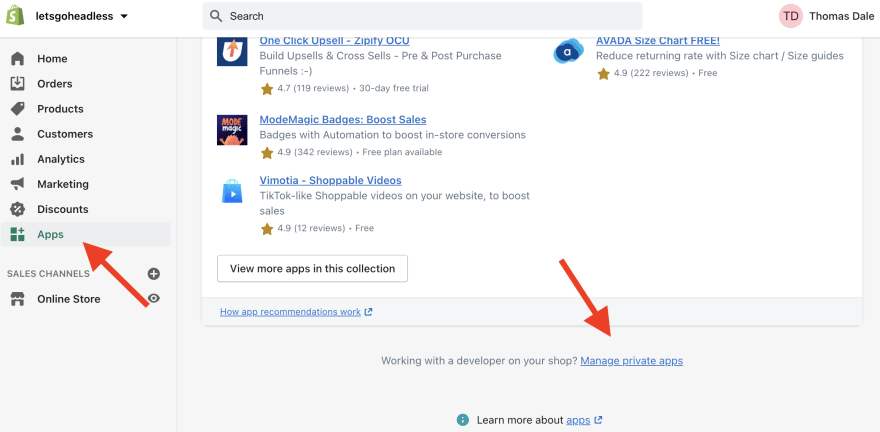
After you have completed signing up or logging in to your existing account, we will now need to get access to the Storefront Access Token. A lot of examples on the internet made this seem difficult, but it's actually quite easy. You just need to create a new developer app by clicking apps on the left menu, then clicking a hard to see link called manage private apps. Here is a screenshot of where it is:
Fill out the form, for the Storefront API Permissions you will want to check off all of these.

Once this is completed, you can scroll down and see a field called Storefront Access Token. It's import to use this token, not the Shopify API token. Now go ahead and go to your Nuxt project that you created. Create a .env file in the base of your project. I went ahead and added variables for my store's Shopify url and the storefront token. Your .env file will look like this:
SHOPIFY_DOMAIN="letsgoheadless.myshopify.com"
SHOPIFY_ACCESS_TOKEN="1234"
Now we will want to update the nuxt.config file to finalize the connection to your Shopify account. In the modules section of your nuxt.config, you will want to add nuxt-shopify:
modules: ['nuxt-shopify'],
Then you will want to add a section called shopify. You will add the process.env for your domain and storefront token here. Also add true to unoptimized.
shopify: {
    domain: process.env.SHOPIFY_DOMAIN,
    storefrontAccessToken: process.env.SHOPIFY_ACCESS_TOKEN,
    unoptimized: true
  },
You will now have access to items in your Shopify Account. If you created a new Shopify account during this demo, you will then need to add a couple products to your account so we have something to look at. If you want to see an example of me adding products, you can refer back to the video link above, at minute 13:58. If you already have an account, we can move forward from here.
Displaying Data from Shopify
Now that we have correctly connected to Shopify using our Storefront Access Token and we have added a few products to our Shopify accounts, let's at least prove that we can display json results from an API call. Let's go to our index.vue page, which is our home page. I'm going to add a fetch request using the nuxt-shopify sdk in the <script> portion at the bottom of our index.vue page. I am adding this:
export default {
  async asyncData({ $shopify, params }) {
      const products = await $shopify.product.fetchAll();
      return { products };
  }
}
I got this fetchAll request from the nuxt-shopify sdk page. You can see there are a lot of examples of the various requests you can make here. Now, I want to create a <ul> list and display the json data here. In this list, I need to be sure to do a v-for and a key to make the api call. Since I returned the fetchAll as products, I will do a v-for for that. Here is what I am adding:
<ul class="mt-4 text-center">Shopify JSON response
      <li v-for="product in products" :key="product.id">
        {{product}}
      </li>
    </ul>
In the v-for, I renamed the products to product and I am using the id value as a key to bind them. So theoretically if I simply put product inside of double curly brackets, it will display the entire json result of all of the products I am fetching from Shopify. If you run npm run dev in your console now, you should see the json response. This is an example of what a portion of mine looks like:
{ "id": "Z2lkOi8vc2hvcGlmeS9Qcm9kdWN0LzY3ODcxMjE1NzgxNTA=", "availableForSale": true, "createdAt": "2021-05-21T18:06:37Z", "updatedAt": "2021-05-21T19:45:51Z", "descriptionHtml": "Blue Hoodie everyone will need to have", "description": "Blue Hoodie everyone will need to have", "handle": "blue-hoodie", "productType": "", "title": "Blue Hoodie", "vendor": "letsgoheadless", "publishedAt": "2021-05-21T18:07:04Z", "onlineStoreUrl": null, "options": [ { "id": "Z2lkOi8vc2hvcGlmeS9Qcm9kdWN0T3B0aW9uLzg3NTc3OTk2MTY2Nzg=", "name": "Title", "values": [ { "value": "Default Title", "type": { "name": "String", "kind": "SCALAR" } } ], "refetchQuery": {}, "type": { "name": "ProductOption", "kind": "OBJECT", "fieldBaseTypes": { "id": "ID", "name": "String", "values": "String" }, "implementsNode": true } } ], "images": [ { "id": "Z2lkOi8vc2hvcGlmeS9Qcm9kdWN0SW1hZ2UvMjkxMjMxMzM2MzY3NzQ=", "src": "https://cdn.shopify.com/s/files/1/0568/1833/5910/products/ix_blue_hoodie.png?v=1621620398", "altText": null,
You will notice that you will see the name, description, images, and any other data you have entered. If you entered multiple images for each product, there will be multiple images in the images section. Since there potentially will be multiple images in the future, I would like to now focus on calling the first image which is the primary image for the product. I would also like to see the src url for each image. In order to do that, I am now going to modify the product I had entered, to now view the first image, which is displayed by a 0, followed by src. So here is the updated list:
<ul class="mt-4 text-center">Shopify JSON response
      <li v-for="product in products" :key="product.id">
        {{product.images[0].src}}
      </li>
    </ul>
This should now display the Shopify url for each of these images in a list. That's great, we can now easily call the image urls of the Shopify images! If you remember, I did say I was using Tailwind CSS with my Nuxt project when we initialized it. So if you aren't familiar with Tailwind, the items I put in the class of an element is the style I am adding. So the mt-4 text-center I added in the list class, is a margin of 4 and centering the text. I'm not going to explain much more about the Tailwind elements I am using, but certainly welcome you to check out more about Tailwind if you don't feel that you are great at css, because Tailwind makes it so much easier.
Outlining Our Product Component
Now that we know how to get specific data about each of our products, let's create a simple product component and display them. I am going to create a ProductWidget.vue in the components folder in our nuxt project. Then I'm going to create a couple of divs to display the image, title, and description of each product:
<div class="rounded-t-lg bg-grey pt-2 pb-2">
            <img :src="product.images[0].src"
                class="crop mx-auto"
                width="380"
                height="380"
                loading="lazy"
            />
        </div>
        <div class="pl-4 pr-4 pb-4 pt-4 rounded-lg">
            <h4 class="mt-1 font-semibold text-base leading-tight truncate text-gray-700">
                {{product.title}}
            </h4>
            <div class="mt-1 text-sm text-gray-700">{{product.description}}</div>
        </div>
You can see I used the same product.images[0].src for the img src, but remember to add a : to src, so it will bind correctly. For the title and description, they are just simply product.title or description. I am also going to update the script at the bottom of this component in order to identify product in the props and provide a name for the component to call on the index.vue page:
export default {
        name: 'productWidget',
        props: {
            product: {
                type: Object,
                default: null
            }
}
Now in order to make this component to work on the index.vue page, we are going to need to import the component and register it. I have updated my script like this:
<script>
import ProductWidget from '~/components/ProductWidget.vue'
export default {
  name: "IndexPage",
  components: {
    ProductWidget
  },
I am now going to add a div above my Shopify Json response list that will contain the component. I need to add the v-for and :key again like we did earlier for this div. I am also going to add a v-bind to allow me to use the product inside of the component. Here is what I did:
<template>
  <div>
    <div class="m-6 grid grid-cols-1 2col:grid-cols-2 3col:grid-cols-3 gap-4">
      <div v-for="product in products" :key="product.id" v-bind:product="product" class="border rounded-lg bg-gray-100 hover:shadow-lg">
        <productWidget :product="product"></productWidget>
      </div>
    </div>
Maybe you noticed the div I added with all of the tailwind css references in the class. That is how I will be using a grid with Tailwind. One unique item I did here was to actually customize my Tailwind setup, choosing at certain breakpoints whether to have 1, 2, or 3 columns. If you are wanting to up your Tailwind game, this is how I adjusted those sizes and created the custom 2col and 3col names. I created a tailwind.config.js file and added this:
module.exports = {
    theme: {
        screens: {
            '2col': '850px',
            '3col': '1290px',
        },
    }
}
Ok, now if you refresh your localhost again in the browser, you should be seeing several products.
Optimizing the images
Now that you are looking at your products, you might have noticed the images aren't really optimized, and maybe they might look a little odd next each other because they all have different aspect ratios. I am going to address that by using imgix to optimize these images. Just to confirm, I have been working at imgix since 2015, so I do like using imgix for my projects. You can certainly use another optimization service as well. This isn't a post sponsored by imgix, I just happen to be someone that works at imgix that is writing this post at night on my own time.
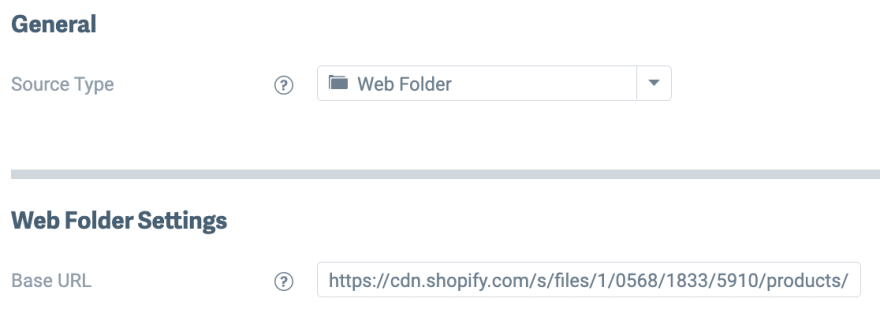
Now that we got that out of the way :) I need to essentially cname my shopify image urls to my imgix account. I can do that by creating a web folder source and pointing it to the shopify urls of my images. These are what my images look like:
https://cdn.shopify.com/s/files/1/0568/1833/5910/products/ix_blue_hoodie.png?v=1621620398
https://cdn.shopify.com/s/files/1/0568/1833/5910/products/ix_holo_sticker.jpg?v=1621620474
https://cdn.shopify.com/s/files/1/0568/1833/5910/products/ix_gamer_jersey.png?v=1621620521
All of the product image urls are the same up to the point after the account id and products. So if I cname up to that portion, I can replace it with my imgix url and start optimizing those images.
Now those urls could be this instead:
https://headless-shopify.imgix.net/ix_blue_hoodie.png
https://headless-shopify.imgix.net/ix_holo_sticker.jpg
https://headless-shopify.imgix.net/ix_gamer_jersey.png
In order to programmatically change these urls and add responsive design and optimization, I can use that vue-imgix SDK we installed in the beginning. Since this is more of a natively Vue SDK, we will need to create a file in the plugins folder to make it work on Nuxt. I am calling this file vue-imgix.js, this is what I put in it:
import Vue from 'vue';
import VueImgix from 'vue-imgix';

Vue.use(VueImgix, {
    domain: "headless-shopify.imgix.net",
    defaultIxParams: {
        auto: 'format,compress'
    },
});
Choose whatever domain you are using. I am also using auto format,compress as my default, which will just apply some smart formatting and compression. If the compression is too much for your nicer ecomm images, just remove the compress. The format will not hurt your image quality, so definitely always use that at least. Now just register the plugin in the nuxt.config file like this:
plugins: ['~/plugins/vue-imgix.js'],
Now we can go back to our ProductWidget component and adjust the img tag. Now you can update this to a ix-img tag, which will start using the vue-imgix sdk. I am going to keep the images at a fixed size of 380, but add in multiple sizes for each device resolution. I am also going to add some imgix parameters that will try to fit everything to the same size without cropping, filling in any extra space with a color the same as the background. Also, I am trimming away any extra space around the image, again, without cropping a part of the product. Here is what my img tag now looks like:
<ix-img :src="product.images[0].src"
                class="crop mx-auto"
                width="380"
                height="380"
                :imgixParams="{fit:'fill', fill:'solid', fillcolor:'f7fafc', trim:'auto'}"
                loading="lazy"
                fixed
            />
If you try to look at the images now, they will be broken. That is because the src is still calling the shopify image url, but I am also adding my imgix domain in front of the entire shopify image url. I need to remove the characters from that url that I identified in my webfolder source. I also want to remove the v= characters at the end of the url. In order to do that, I am going to create a method called imageSrc. Then I will just use a slice to remove the beginning and ending characters of the shopify url that we are receiving. So if I slice the first 57 characters, and slice the last 13 characters, that will get me just the file name ix_blue_hoodie.png. So however many characters you need to slice, you should do on your end as well. Here is my method I built in the ProductWidget component:
methods: {
   imageSrc() {
     return this.product.images[0].src.slice(57, -13)
   }
}
Now instead of the product.images[0].src, I can call imageSrc() in the src of the img tag. Here is the final img tag:
<ix-img :src="imageSrc()"
                class="crop mx-auto"
                width="380"
                height="380"
                :imgixParams="{fit:'fill', fill:'solid', fillcolor:'f7fafc', trim:'auto'}"
                loading="lazy"
                fixed
            />
Now we will see the images will work, they look similar, are all automatically trimmed, good quality, and performant!
Let's Deploy
We are on the home stretch. So I am going to choose to deploy on Vercel. I like how easy it is to deploy SSR with Vercel. In order to do that, I created a vercel.json file and added this:
{
    "builds": [
        {
        "src": "nuxt.config.js",
        "use": "@nuxtjs/vercel-builder",
        "config": {}
        }
    ]
}
Now, you can just commit this all to your Github account. Then log in to Vercel, import a new project from that Github account. While you are in the process of deploying the site on Vercel, the last item you need to do is to add the items you put in your .env file into the variables section.
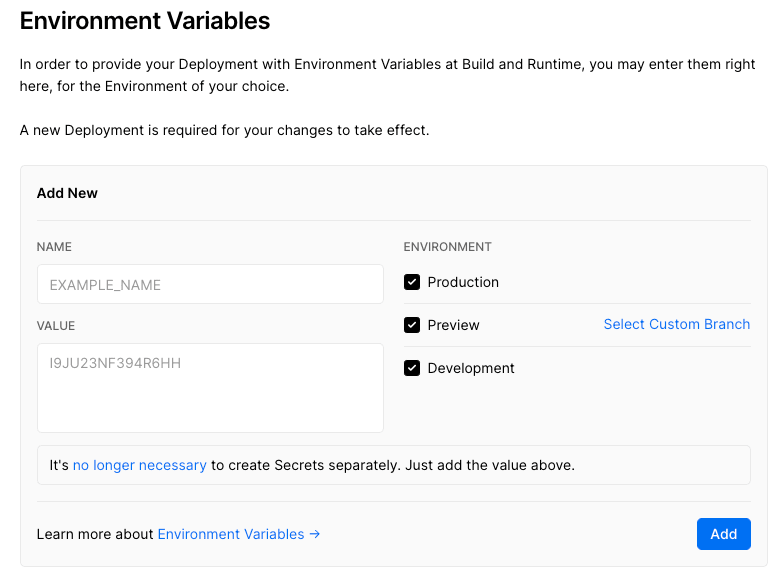
These would be the Storefront API tokens and shopify domain. You can just copy the values from there and enter them in Vercel. Just don't enter the values with a "" around them, that is not needed in Vercel. Press deploy and soon you should be seeing Vercel's fireworks, your site is up and running using headless Shopify!
Don't hesitate to comment or reach out if you have questions. I think the video recording can be very helpful to go along with this explanation. Would love to see anything you are all working on as well.


Oldest comments (6)
Looks like you have some issues here.
This Serverless Function has crashed.
Your connection is working correctly.
Vercel is working correctly.
500: INTERNAL_SERVER_ERROR
Code: FUNCTION_INVOCATION_FAILED
ID: sfo1::xldcl-1628292758449-caaf6495488d
If you are a visitor, contact the website owner or try again later.
If you are the owner, learn how to fix the error and check the logs.
Hi Dylan, sorry about that. The issue is actually that I stopped paying the $29 per month to Shopify in order to keep that demo running. The code and demo in the video really does work though. If anyone knows someone at Shopify, would love to get it back up just for demo purposes :)
Hi! You can create Shopify Partner account and create demo store absolutely for free. I'm using this approach right now! Hope this will help you 😉
Yeah i've been developing on Shopify for about 4 years. Never paid a cent.
I have another question about Shopify and Vercel combo. I made Next.js storefront with Shopify Storefront API and deployed it on Vercel without any plugins or something else. Works well, but what is this solution for (apps.shopify.com/vercel)?
Thanks for any information!
For anybody who's unable to find "private apps", the new location for this is Settings > Apps and sales channel > Develop Apps.