This is the sixth part of the "Deploying Django Application on AWS with Terraform" guide. You can check out the previous steps here:
- Part 1: Minimal Working Setup
- Part 2: Connecting PostgreSQL RDS
- Part 3: GitLab CI/CD
- Part 4: Namecheap Domain + SSL
- Part 5: Celery and SQS
In this step, we are going to:
- Create an S3 bucket for storing media files.
- Add S3 storage in the Django project.
- Add image upload in the Django admin.
- Add a S3 Terraform backend.
About S3
Why do we actually need S3 storage?
Why do we need S3 storage?
When a user uploads some file to the web server, Django, by default, saves this file in the filesystem. As far as we can have multiple containers for web ECS service, we can run into the situation when container web_1 creates the user file, and container web_2 tries to read them. Moreover, when ECS recreated container web_1, we will lose the user file.
So, now we have stateful behavior. To achieve a stateless behavior, we need to store user files in common global storage. S3 is the storage we are looking for.
In this case, container web_1 creates a new file in an S3 bucket, and container web_2 can read this file.
Here is an S3 description from AWS:
Amazon Simple Storage Service (Amazon S3) is an object storage service offering industry-leading scalability, data availability, security, and performance. Customers of all sizes and industries can store and protect any amount of data for virtually any use case, such as data lakes, cloud-native applications, and mobile apps. With cost-effective storage classes and easy-to-use management features, you can optimize costs, organize data, and configure fine-tuned access controls to meet specific business, organizational, and compliance requirements.
File upload to local storage
But first, let's add a file upload in our Django application.
To work with S3, we need to install django-storages and boto3 packages. And for handling images in Django, we need the Pillow library. Add them to requirements.txt and run pip install -r requirements.txt.
boto3==1.24.45
django_storages==1.13.1
pillow==9.1.0
But for now, we'll work with Django default FileSystemStorage.
Let's create a new Django application photos with a Photo model with image ImageField.
Navigate to the django-aws-backend project and create a new Django application with python manage.py startapp photos.
Then add the photos application in settings.py at the bottom of INSTALLED_APPS and specify MEDIA_URL and MEDIA_ROOT settings:
INSTALLED_APPS = [
    ...
    'photos.apps.PhotosConfig',
]

MEDIA_URL = "/media/"
MEDIA_ROOT = BASE_DIR / "media"
Now, we are ready to create a Photo model in photos/models.py:
from django.db import models


class Photo(models.Model):
    title = models.CharField("Title", max_length=255)
    image = models.ImageField("Image", upload_to="photos/")
To allow management of Photo objects in the admin panel, add PhotoAdmin class in photos/admin.py
from django.contrib import admin

from photos.models import Photo


@admin.register(Photo)
class PhotoAdmin(admin.ModelAdmin):
    list_display = ["title"]
Finally, to serve media files by the Django development server, add this code to the django_aws/urls.py:
from django_aws.settings import DEBUG, MEDIA_URL, MEDIA_ROOT
from django.conf.urls.static import static

...


if DEBUG:
    urlpatterns += static(MEDIA_URL, document_root=MEDIA_ROOT)
All the necessary code is in place. So we can make and apply migrations.
$ python manage.py makemigrations photos
Migrations for 'photos':
  photos/migrations/0001_initial.py
    - Create model Photo
$ python manage.py migrate
Operations to perform:
  Apply all migrations: admin, auth, contenttypes, photos, sessions
Running migrations:
  Applying photos.0001_initial... OK
Now, let's try to create a new Photo in Django admin. Run python manage.py runserver and go to the admin panel http://127.0.0.1:8000/admin/photos/photo/. Click "Add Photo", enter a title, and pick any image from your filesystem. Then, click "Save and continue editing".
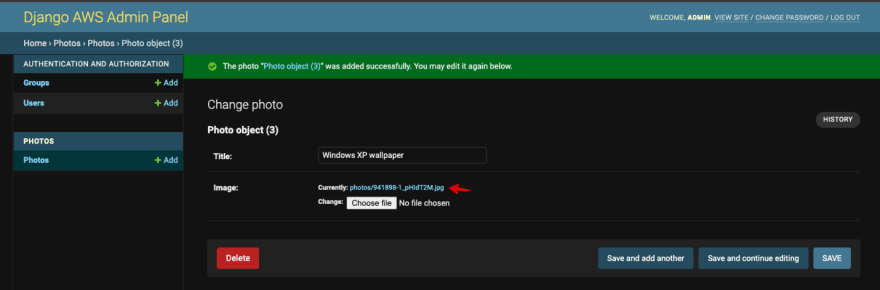
Django will save an image to the local filesystem. Verify that you can click on the "current image" and see it in the browser. You can also check it in the django-aws-backend/media/photos folder.
Django S3 settings
We've successfully uploaded an image to the local filesystem. I prefer to use FileSystemStorage for local development. It allows me to work and run tests without the internet connection.
But for the production environment, we need to provide S3 settings. So let's add to settings.py the following settings:
DEFAULT_FILE_STORAGE = env(
    "DEFAULT_FILE_STORAGE", default="django.core.files.storage.FileSystemStorage"
)
AWS_ACCESS_KEY_ID = env("AWS_ACCESS_KEY_ID", default="")
AWS_SECRET_ACCESS_KEY = env("AWS_SECRET_ACCESS_KEY", default="")
AWS_STORAGE_BUCKET_NAME = env("AWS_STORAGE_BUCKET_NAME", default="")
AWS_S3_REGION_NAME = env("AWS_S3_REGION_NAME", default="")
AWS_S3_ENDPOINT_URL = env("AWS_S3_ENDPOINT_URL", default="")
AWS_S3_FILE_OVERWRITE = False
We defined:
-
DEFAULT_FILE_STORAGE. We keep
FileSystemStoragefor local development and set S3Boto3Storage for production. -
AWS_ACCESS_KEY_ID,AWS_SECRET_ACCESS_KEY- AWS access key, as a string. We'll create a separate user and access key for accessing s3 storage. -
AWS_STORAGE_BUCKET_NAME- the name of S3 bucket. -
AWS_S3_REGION_NAME- AWS region. I'll use the sameus-east-2region; you can specify yours. -
AWS_S3_ENDPOINT_URL- URL for connecting to S3. -
AWS_S3_FILE_OVERWRITE- If the file with the specified name already exists,django-storageswill append extra characters.
We are done with the Django part. The application is ready to work with S3. Commit and push the changes, and ensure that CI/CD is passed successfully.
Creating S3 bucket
Move to the Terraform project. Let's create an S3 bucket. First, we need to specify the bucket name in variables.tf. The name should be unique in your AWS region.
# S3

variable "prod_media_bucket" {
  description = "S3 Bucket for production media files"
  default = "prod-media-427861343"
}
Then, create a new s3.tf file in the django-aws-infrastructure project with the following content and run terraform apply:
resource "aws_s3_bucket" "prod_media" {
  bucket = var.prod_media_bucket
  acl    = "public-read"

  cors_rule {
    allowed_headers = ["*"]
    allowed_methods = ["GET", "HEAD"]
    allowed_origins = ["*"]
    expose_headers  = ["ETag"]
    max_age_seconds = 3000
  }

  policy = jsonencode({
    Version = "2012-10-17"
    Statement = [
      {
        Sid = "PublicReadGetObject"
        Principal = "*"
        Action = [
          "s3:GetObject",
        ]
        Effect   = "Allow"
        Resource = [
          "arn:aws:s3:::${var.prod_media_bucket}",
          "arn:aws:s3:::${var.prod_media_bucket}/*"
        ]
      },
    ]
  })
}


resource "aws_iam_user" "prod_media_bucket" {
  name = "prod-media-bucket"
}

resource "aws_iam_user_policy" "prod_media_bucket" {
  user = aws_iam_user.prod_media_bucket.name
  policy = jsonencode({
    Version = "2012-10-17"
    Statement = [
      {
        Action = [
          "s3:*",
        ]
        Effect = "Allow"
        Resource = [
          "arn:aws:s3:::${var.prod_media_bucket}",
          "arn:aws:s3:::${var.prod_media_bucket}/*"
        ]
      },
    ]
  })
}

resource "aws_iam_access_key" "prod_media_bucket" {
  user = aws_iam_user.prod_media_bucket.name
}
Here we created:
- A new S3 bucket. We allowed public access to all files in this bucket and specified CORS rules to allow the browser to load files for any origin (and for our domain as well).
- A new IAM user with the IAM policy to connect to the S3 bucket.
- An IAM Access Key for the user to use in the Django application.
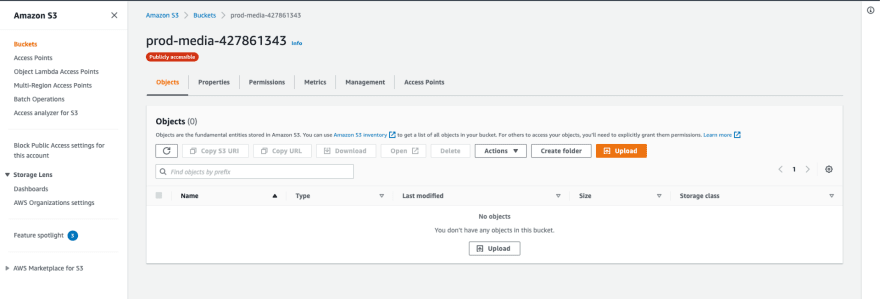
Let's check our bucket in AWS S3 Console:
Now, we are ready to pass S3 credentials to the ECS services. Add variables in ecs.tf:
...
locals {
  container_vars = {
    ...

    s3_media_bucket         = var.prod_media_bucket
    s3_access_key           = aws_iam_access_key.prod_media_bucket.id
    s3_secret_key           = aws_iam_access_key.prod_media_bucket.secret
  }
}
...
Use these variables for defining environment variables in templates/backend_container.json.tpl and apply changes with terraform apply:
[
  {
    ...
    "environment": [
      ...
      {
        "name": "DEFAULT_FILE_STORAGE",
        "value": "storages.backends.s3boto3.S3Boto3Storage"
      },
      {
        "name": "AWS_ACCESS_KEY_ID",
        "value": "${s3_access_key}"
      },
      {
        "name": "AWS_SECRET_ACCESS_KEY",
        "value": "${s3_secret_key}"
      },
      {
        "name": "AWS_STORAGE_BUCKET_NAME",
        "value": "${s3_media_bucket}"
      },
      {
        "name": "AWS_S3_REGION_NAME",
        "value": "${region}"
      },
      {
       "name": "AWS_S3_ENDPOINT_URL",
       "value": "https://${s3_media_bucket}.s3.${region}.amazonaws.com/"
      }
    ],
    ...
  }
]
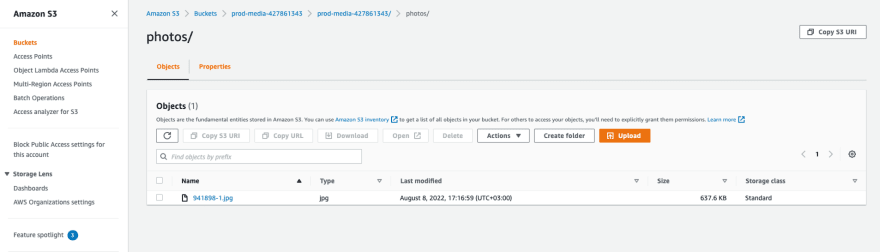
Wait for the deployment new version of ECS services. Then, go to the admin panel of the deployed application and try to add a new photo. Fill the fields and click "Save and continue editing." Then click the current image URL to ensure your photo is uploaded to S3 correctly.

Also, check your file in the S3 console:
So, we successfully added file uploading to S3 for our Django application. Now the application is stateless so that we can scale without problems.
The last feature I want to add to our Terraform project is an S3 backend.
Terraform S3 backend
Why do we actually need an S3 backend for Terraform?
Now Terraform stores the state of our infrastructure locally in the terraform.tfstate file. So, you can apply changes from your local machine only and cannot collaborate with other developers. Also, if you decide to add CI/CD to the Terraform project, your CD runner will have no information about the current infrastructure state.
The solution to these problems is a remote backend. Terraform will store terraform.tfstate file in S3 bucket. So, you can apply changes from different environments, including CD runners.
So, let's go to the AWS S3 Console and create an S3 bucket in your region. You can choose any name for your bucket, and I'll go with terraform-427861343. Be sure to disable public access so that nobody can know your infrastructure state. Also, it's better to enable versioning on this bucket. It allows you to roll back to the previous version in case of some problems.

Now, we can specify the S3 backend in providers.tf:
terraform {
  ...

  backend "s3" {
    bucket = "terraform-427861343"
    key    = "terraform"
    region = "us-east-2"
  }
}
and initialize the provider with terraform init.
Terraform will ask if you want to copy the existing state to the new backend. If you say no, Terraform will create an empty state in the S3 backend. We want to preserve the state of the infrastructure, so you need to respond yes.
$ terraform init

Initializing the backend...
Do you want to copy existing state to the new backend?
  Pre-existing state was found while migrating the previous "local" backend to the
  newly configured "s3" backend. No existing state was found in the newly
  configured "s3" backend. Do you want to copy this state to the new "s3"
  backend? Enter "yes" to copy and "no" to start with an empty state.

  Enter a value: yes


Successfully configured the backend "s3"! Terraform will automatically
use this backend unless the backend configuration changes.
...
So, let's check that we've migrated successfully. Run terraform apply to verify that our infrastructure matches the configuration. You should see the message
Terraform has compared your real infrastructure against your configuration and found no differences, so no changes are needed.
Also, check your S3 bucket. You should see a new terraform file here.

So, we successfully move our Terraform state to S3. Commit and push the changes in the Terraform project.
The end
Congratulations! In this part, we added image uploading to S3 for our Django application. Also, we moved Terraform backend to S3. If you want more insight into application state, resource usage, and changes, you can use Spacelift Terraform provider. Check how Spacelift can improve your workflow here.
You can find the source code of backend and infrastructure projects here and here.
If you need technical consulting on your project, check out our website or connect with me directly on LinkedIn.


Oldest comments (3)
Really cool tutorial !! Well done.
Have you planned to do a part about including dev/staging/prod good practices ?
Regard,
Thank you! I'm not sure :)
Anyone running into terraform deprecation can follow this:
stackoverflow.com/questions/764190...