
Are you learning Python? Practicing Flask? And tired of the usual Hello World?
Well! Then this post is for you.
In this post we will build a weather app in Python using Flask.
Project Overview ☁️
Flask is a framework for building web applications with Python. We will develop a web application that provides the weather forecast for 5 days.
Flask makes the task of creating a web application relatively simple. Our weather app will require no more than 22 lines of Python code and 48 lines of HTML.
An example ☀️
We need a web server to host our application.
An example of how our app will work:
- The user will open a browser and navigate to http://localhost:5000/forecast?city=London (like "Tell me the weather forecast for London").
- The web server will receive the request and call our web app to retrieve the weather forecast.
- Finally, the web server will send an HTML page containing the weather forecast back to the user.
The user will receive the HTML page and display the forecast for London in the browser.
There are many different web servers like NGINX or Apache HTTP Server. We will use the Flask's built-in server.
Accessing weather forecast ❄️
You may be wondering: where will our weather app get the forecast data from?
Well, there are many different weather services available. We will use OpenWeatherMap service. It supports different subscription plans. We will use the free plan that supports up to 60 calls/minute and 1,000,000 calls/month which are sufficient for the purpose of this tutorial.
Building the weather app ⚡
Prerequisites
Before starting to code, we need to install Flask. To install Flask, we open a terminal and execute the following command:
pip install flask
The installation requires few seconds.
Project Structure
We structure the project as follows:
.
├── static
│   └── icons
|       ├── 01d.png
|       ├── 01n.png
|       ├── 02d.png
|       └── ...
├── templates
│   └── index.html
├── weather.py
└── README.md
In weather.py we will put the Flask application.
The folder static/icons will contain all the icons used to represent the weather conditions. For example, we will have an icon for Clouds, another icon for Sunny, and so on.
templates is a folder containing a single file index.html. This HTML file only contains an empty table where we will put the weather data.
Sign up to OpenWeatherMap
Before moving on, we need to sign up to OpenWeatherMap.
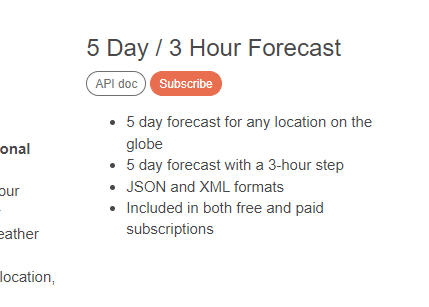
Visit https://openweathermap.org/api and click on the Subscribe button under the 5 Day / 3 Hour Forecast section:
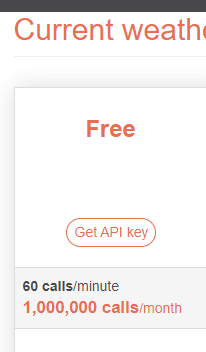
Click on Get API key and complete the registration:
Then, log into OpenWeatherMap website with your credentials and click on My API keys. Follow the instrutions to generate a new API key.
Implementing the Weather App
In weather.py we put the logic that receives user requests and provides weather forecast.
We need to create a function that retrieves the weather data from OpenWeatherMap API. This function is invoked when the user sends an HTTP GET request to our web app (for example http://localhost:5000/forecast?city=London) and returns an HTML page containing the weather forecast.
From flask package, we need to import the Flask class and other functions that we will use later:
from flask import Flask, render_template, request, abort, Response
Then we initialize the Flask application:
app = Flask(__name__)
We create a function called get_weather() that will be executed when the user sends an HTTP GET request to the weather app.
- This function will extract the city name from the request of the user.
- It will retrieve the weather for the requested city from OpenWeatherMap.
- Finally, an HTML page containing the weather is returned to the user.
The browser of the user will show the HTML page received from the web server. This HTML page contains a table showing the weather conditions for the requested city.
Let's create the get_weather() function step by step.
We define a function get_weather() that takes no arguments:
@app.route('/forecast', methods=['GET'])
def get_weather():
@app.route('/forecast', methods=['GET']) is a decorator. It is a directive that routes the HTTP GET requests made to the http://localhost/forecast URL to the get_weather() function. In this way, when an user navigates to http://localhost/forecast our Flask web server will execute the get_weather() function.
We want that the user specifies the city as an argument of the HTTP GET request. Therefore, we expect that the HTTP request contains an argument named city. We can extract the city from the HTTP request as follows:
city = request.args.get('city')
It is important to validate the parameters extracted from the HTTP request. In our case, city is a mandatory argument. We need to ensure that the user provided a city. If the request does not contain a city (i.e. city is None), we return a status code "400" (BAD REQUEST) and we provide a description that tells the user that the city argument is missing:
    if city is None:
        abort(400, 'Missing argument city')
If a city has been provided in the HTTP request, we prepare a request for OpenWeatherMap to get the weather forecast. The request will contain three parameters: q, appid and units.
q is the name of the city for which we want the forecasts. appid is your OpenWeatherMap API key.
    data = {}
    data['q'] = request.args.get('city')
    data['appid'] = 'XXXXXXXXX'
    data['units'] = 'metric'
We use urllib python library to perform the retrieve the forecast from OpenWeatherMap:
    url_values = urllib.parse.urlencode(data)
    url = 'http://api.openweathermap.org/data/2.5/forecast'
    full_url = url + '?' + url_values
    data = urllib.request.urlopen(full_url)
Finally, we use render_template to generate the HTML page containing the results. Basically render_template takes the template HTML file, fills it with the weather data received from OpenWeatherMap and return the generated HTML page to the user. Finally, the user will display the weather results in the browser:
    resp = Response(data)
    resp.status_code = 200
    return render_template('index.html', title='Weather App', data=json.loads(data.read().decode('utf8')))
HTML Template file
The HTML template file is reported below:
<html>
    <head>
        <title>{{ title }}</title>
        <style>
            table {
            font-family: arial, sans-serif;
            border-collapse: collapse;
            width: 100%;
            }

            td, th {
            border: 1px solid #dddddd;
            text-align: left;
            padding: 8px;
            }

            tr:nth-child(even) {
            background-color: #dddddd;
            }

            #weather {
                display: flex;
                flex-direction: row;
                align-items: center;
            }
        </style>
    </head>
    <body>
        <table>
            <tr>
                <th>Time</th>
                <th>Temperature</th>
                <th>Humidity</th>
                <th>Weather</th>
                <th>Wind</th>
            </tr>
            {% for item in data["list"] %}
                <tr>
                    <td>{{ item["dt_txt"] }}</td>
                    <td>{{ item["main"]["temp"] }}°C</td>
                    <td>{{ item["main"]["humidity"] }}%</td>
                    <td><div id="weather"><img src="/static/icons/{{ item["weather"][0]["icon"] }}.png"></img> {{ item["weather"][0]["main"] }}</div></td>
                    <td>{{ '%.2f' % (item["wind"]["speed"]*3.6) }} km/h ({{ item["wind"]["deg"] }} deg)</td>
                </tr>
            {% endfor %}
        </table>
    </body>
</html>
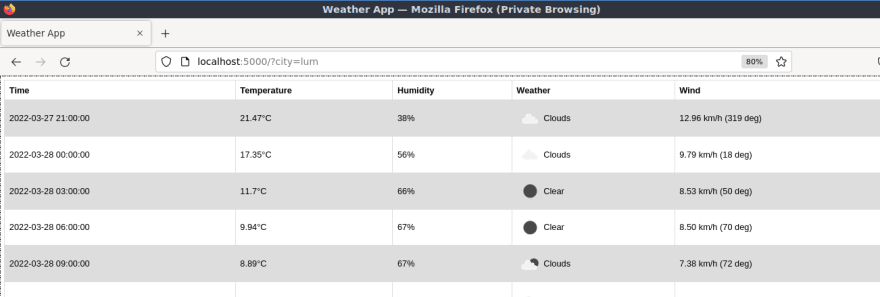
Here is the final result:
Conclusion
In this blog post we developed a simple weather app using Python and Flask. This is a great exercise for Python and Flask beginners.
If you like this post, consider following me on Twitter (https://twitter.com/cscarpitta94).
Credits for the images:
Weather icons created by iconixar - Flaticon


Top comments (0)