In this tutorial, we are going to build a simple Voting web application using Sinatra.
NOTE: Source code included. See Resources section.
Demo
Prerequisites
- Enthusiasm and passion to Learn
- Basic knowledge of HTML and CSS
- Basic knowledge of Ruby language
- Basic knowledge of Sinatra
Inspiration for the tutorial
The idea and content of this tutorial has been inspired by the
Rails Guides - create your first voting app in Sinatra.
I am presenting it in my own way with little or updated content.
What is Sinatra
Even though this tutorial assumes that you already have some knowledge of Sinatra, we will go through few components which will be used to build this application.
In a simplest form, Sinatra is a tiny web framework written in Ruby to create Web applications quickly.
Visit sinatrarb.com.
Setup your tools
- This tutorial assumes you have Ruby preinstalled else consider checking getting started with Ruby to install Ruby in your system.
- First we need to install the web framework in our system. Run the following command to install Sinatra into the system:
  $ gem install sinatra --no-document
  Successfully installed sinatra-2.1.0
  1 gem installed
NOTE: The flag --no-document will help to speed up the installation to gem by not installing the documentation. If you want documentation of the Sinatra gem too, consider removing it from the above command.
Basic app setup
Let's first create a project folder with name as voting_app.
$ mkdir voting_app
$ cd voting_app
Then, create a file named voting.rb with following content:
require 'sinatra'

get '/' do
  'Hello, voter!'
end
Run your app
Rechecking our location of project which is
$ pwd
/some/user/voting_app/

$ ls
voting.rb
Now, run the app by running the command as:
$ ruby voting.rb
== Sinatra (v2.1.0) has taken the stage on 4567 for development with backup from Thin
Thin web server (v1.7.2 codename Bachmanity)
Maximum connections set to 1024
Listening on localhost:4567, CTRL+C to stop
Now, open the url http://localhost:4567 in your browser to see your app.
You should see a web page with Hello, voter! as it's content.
Code explanation
The way to define route in Sinatra is to write a HTTP method paired with URL-matching pattern. Each route is associated with a block:
get '/' do
  # code
end

post '/' do
  # code
end
Check the Sinatra#routes to get more details.
In the above step, we have defined a GET route for our root URL (/) and inside it we are just return a string.
Simple enough so far.
HTML response
Let's update our implementation above to return HTML content instead of text.
Update the get '/' implementation as:
get '/' do
  '<h1>Hello, voter!</h1>'
end
Now, if you restart the app (Ctrl+C to stop the existing server and then run ruby voting.rb), you will see Hello, voter! in heading H1 format in the browser.
Adding View index
Now, if you are seeing above, then the HTML part might be too tricky to handle if the response we want to send is complex.
One of the way to handle displaying content is through View which is a component or part of web application which handles displaying the content.
To ease of management, let's create a folder with name views and write our content for our root URL (/) into index.erb file.
The content for index.erb file is as follows:
<!DOCTYPE html>
<html>
  <head>
    <meta charset='UTF-8' />
    <title>Voting App</title>
  </head>
  <body>
    <h2>What's for dinner?</h2>

    <form action='cast' method='post'>
      <ul>
        <% CHOICES.each do |id, text| %>
          <li>
            <label>
              <input type='radio' name='vote' value='<%= id %>' id='vote_<%= id %>' />
              <%= text %>
            </label>
          </li>
        <% end %>
      </ul>

      <button type='submit'>Cast this vote!</button>
    </form>
  </body>
</html>
And, add following dummy data for our list of voting options in voting.rb file as:
CHOICES = {
  'HAM' => 'Hamburger',
  'PIZ' => 'Pizza',
  'CUR' => 'Curry',
  'NOO' => 'Noodles'
}

get '/' do
 ...
end
After restarting the server, the web page will now show the following:

Code explanation
You might be wondering how about code is working. Right?
It is quite easy to understand. Just think the whole files including voting.rb or any erb files as part of one system.
Now, we have defined a constant CHOICES which is a global constant and available to all the Ruby files including erb files.
Hence, in the index.erb file we are able to access it.
Considering the following code snippet:
<% CHOICES.each do |id, text| %>
  ...
  <input type='radio' name='vote' value='<%= id %>' id='vote_<%= id %>' />
  <%= text %>
  ...
<% end %>
The ERB tag <% ... %> is used to perform execution of Ruby code. Here it is performing each iteration.
And, tag <%= ... %> is used to execute the Ruby code and replace the tag with evaluated results.
Hence, the above code will generate following HTML content:
<li>
  <label>
    <input type="radio" name="vote" value="HAM" id="vote_HAM">
    Hamburger
  </label>
</li>
<li>
  <label>
    <input type="radio" name="vote" value="PIZ" id="vote_PIZ">
    Pizza
  </label>
</li>
...
See ERB Templates for more.
Adding the CSS
Currently, our page looks ugly. We need to add CSS to make it enough beautiful which makes our eyes little happy.
Sinatra assumes that you should store all your static files like CSS, JS or images under public folder.
See static files for more details.
While including the static file in the view files, you don't add 'public' in the path. Hence, if you store your CSS inside 'public/css/style.css' then while linking the CSS inside view file, you just write '/css/style.css' as path.
Create a folder with name public and then create another folder with name css to store CSS specific files. Then, finally create a CSS file with name style.css. Add following content inside the style.css file to have minimum styling to our existing app.
.container {
  margin: auto;
  max-width: 1100px;
  padding: 0 20px;
}

form {
  background: #eee;
  width: 450px;
  padding: 1rem;
}
ul {
  list-style: none;
  margin: 0;
  padding: 0;
}
button {
  margin-top: 10px;
}

Passing data to View
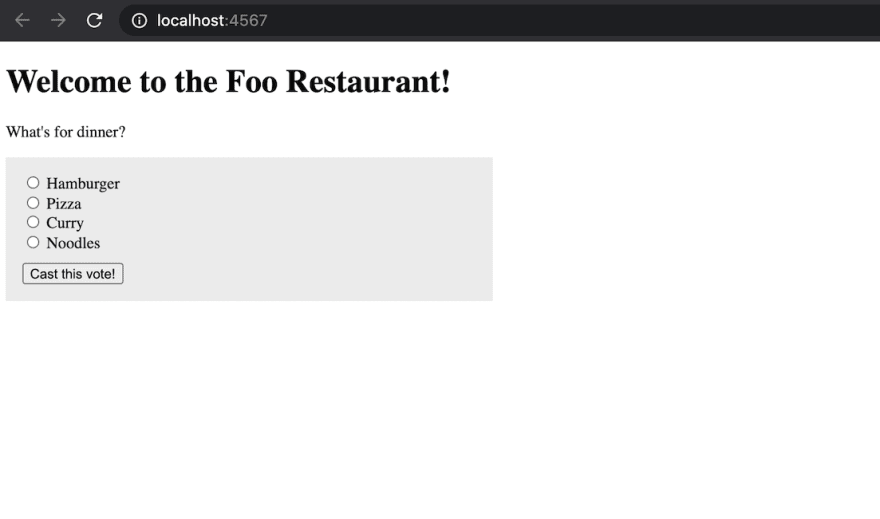
Let's add the main title for the page. Update the index.erb file with following content:
<body class='container'>
  <h1><%= @title %></h1>
  <p>What's for dinner?</p>
And, change the get action as:
get '/' do
  @title = 'Welcome to the Foo Restaurant!'
  erb :index
end
We are able to do this as templates in Sinatra are evaluated within the same context as route handlers like get.
Instance variables set in route handlers are directly accessible by templates.
Ability to cast Vote (POST results)
Let's add an ability to cast vote.
Add following action into voting.rb file:
post '/cast' do
  @title = 'Thanks for casting your vote!'
  @vote  = params['vote']
  erb :cast
end
Also, create a new file cast.erb in the views directory and put following code:
<!DOCTYPE html>
<html>
  <head>
    <meta charset='UTF-8' />
    <title>Voting App</title>
    <link rel="stylesheet" href="css/style.css">
  </head>
  <body>
    <h1><%= @title %></h1>
    <p>You cast: <%= CHOICES[@vote] %></p>
    <p><a href='/results'>See the results!</a></p>
  </body>
</html>
Now, restart the server and open https://loclhost:4567 and choose the item for the dinner and click on Cast this vote! button.

Code explanation
In the above we defined a new route post '/cast' to handle any post request who target url is /cast. Notice our index.erb for the same:
<form action='cast' method='post'>
...
</form>
Now, when we submit the form by clicking on the Cast the vote! button, then the form request is process by this post route handler at the server end.
Now, we have set the instance variables @title and @vote whose information can be displayed in the /cast url through cast.erb view template.
Note that @vote is set through params which is of a request object which contains following when cast vote.
{ "vote" => "NOO" }
See Rack::Request for in-depth information on params object.
Notice that this is actually the value of the radio button which we selected while voting.
And, the value NOO is coming as we had set the dummy values as:
CHOICES = {
  'HAM' => 'Hamburger',
  'PIZ' => 'Pizza',
  'CUR' => 'Curry',
  'NOO' => 'Noodles'
}
Common layout
If you notice both index.erb and cast.erb files, you will see some shared code. We can extract the shared code in Sinatra through Layout.
Create a layout file layout.erb under views directory and add the common HTML content from both which
looks as follows:
<!DOCTYPE html>
<html>
  <head>
    <meta charset='UTF-8' />
    <title>Voting App</title>
    <link rel="stylesheet" href="css/style.css">
  </head>
  <body>
    <h1><%= @title %></h1>
    <%= yield %>
  </body>
</html>
In general Layout is used to define the HTML structure of the web page.
In Sinatra, we deal with forms which is HTML fragments, not fully structured. Yield means that the layout should wait to the templates to render and then proceed. What happens is that the page is rendering the layout file then it stops when it hits the 'yield' statement and renders the associated template file. When the template is done, it keeps going to render everything else after the 'yield' statement in the layout. Therefore, it is very important to be cautious about choosing the right spot for yielding statement in your layout.
Update the views files
Update the views files index.erb and cast.erb as follows:
-
index.erbfile:
  <!-- Remove html, title and body tags -->
  <p>What's for dinner?</p>

  <form action='cast' method='post'>
    <ul>
      <% CHOICES.each do |id, text| %>
        <li>
          <label>
            <input type='radio' name='vote' value='<%= id %>' id='vote_<%= id %>' />
            <%= text %>
          </label>
        </li>
      <% end %>
    </ul>

    <button type='submit'>Cast this vote!</button>
  </form>
-
cast.erbfile:
  <!-- Remove html, title and body tags -->
  <p>You cast: <%= CHOICES[@vote] %></p>
  <p><a href='/results'>See the results!</a></p>
Now, if you reload the web app (https://localhost:4567) and cast the vote, you will get the same experience as before.
Add the results route and its view
The final route is the result page (/results) which you can see as a link in /cast page.
Add the following code into voting.rb file:
get '/results' do
  @votes = { 'HAM' => 7, 'PIZ' => 5, 'CUR' => 3 }
  erb :results
end
Here, we are creating dummy data @votes which simulates the number of votes for a particular dish.
Now, create its view file as results.erb under views directory.
<h1>Voting Results</h1>
<table>
  <% CHOICES.each do |id, text| %>
    <tr>
      <th><%= text %></th>
      <td><%= @votes[id] || 0 %>
      <td><%= '#' * (@votes[id] || 0) %></td>
    </tr>
  <% end %>
</table>

<p><a href='/'>Cast more votes!</a></p>
Now, check the results page after restarting the server (Ctrl+c and run the app again). You will see the following similar page:

Code explanation
The @votes is an instance variable which we had used to hold some dummy results at present.
In the results.erb page, @votes[id] has been used to get the count for the particular dish. The code snippet '#' * (@votes[id]) basically print the symbol # as many as vote count.
Persist the results using YAML::Store
So far we have played with static dummy date.
Let's store the voting done and update the count whenever we vote the specific dish.
Add following code at the top of voting.rb file:
require 'yaml/store'
Now, update the post '/cast' and get /results handlers:
post '/cast' do
  @title = 'Thanks for casting your vote!'
  @vote  = params['vote']

  # create a votes.yml file and update the particular votes
  @store = YAML::Store.new 'votes.yml'
  @store.transaction do
    @store['votes'] ||= {}
    @store['votes'][@vote] ||= 0
    @store['votes'][@vote] += 1
  end
  erb :cast
end

get '/results' do
  @title = 'Results so far:'
  @store = YAML::Store.new 'votes.yml'
  @votes = @store.transaction { @store['votes'] }
  erb :results
end
We are using YAML here to easily manage our voting data.
YAML stands for YAML Ain't Markup Language. It is a data serialization language that matches user’s expectations about data. It designed to be human friendly and works perfectly with other programming languages. It is highly useful in manage data.
Finally, the web app will look like as:

There are many areas of improvement here which I leave up to you. This is quite basic and serve as the base for further development.


Top comments (0)