
We've all probably seen the face detection box that pops up around people's faces when you go to take a photo on your mobile camera. If you've ever wondered how our phones detect human faces, then this article is for you! We are going to be building a web app that recreates just that - an app able to recognize any human face in any image.
What is a facial recognition and how does it work?
To start off, a facial recognition system is a technology that is able to match a human face from a digital image by using computer algorithms to pick up distinct features of a person's face.
In this app, we will be using the Face Detection model from Clarifai, which uses the Clarifai Predict API and gives us the probability score of the chances that the image contains human faces and coordinates locations of where those faces appear with a confining box.
Creating a React App with Codesphere
In this project, Codesphere is going to allow us to create and deploy our React app seamlessly. Codesphere is an online, collaborative programming environment, and a cloud provider. With Codesphere you can build your web app ready to scale without all the complicated config.
Let’s get started!
Once you are signed in to Codesphere, you will see an empty directory and can immediately create our React App by running this command from the terminal:
npx create-react-app face-detect
To go into our project directory and start-up our development server, we can run:
cd face-detect && npm start
We’ll be using react-bootstrap for this project. You can install React-Bootstrap with npm::
npm install react-bootstrap bootstrap
After the installation is done, it will let us add the Bootstrap into our project. You can read more on React Bootstrap here.
Creating Our React Components
We will need two components, a URL input box where we can enter the images from the internet— ImageSearchForm and an image component to reveal our image with a face detection box — FaceDetect.
First, let's create a new directory called "Components" inside src. We'll then create another two folders called ImageSearchForm and FaceDetect inside the src/Components. After that, open the ImageSearchForm folder and create two files - ImageSearchForm.js and ImageSearchForm.css. Then do the same for the FaceDetect directory with FaceDetect.js and FaceDetect.css.
Now we can move on to import our components into our App component. In your src/App.js folder insert the following. Note: Keep the FaceDetect commented for now.
import React, { Component } from "react";
import "./App.css";
import ImageSearchForm from "./components/ImageSearchForm/ImageSearchForm";
// import FaceDetect from "./components/FaceDetect/FaceDetect";


class App extends Component {
  render() {
    return (
      <div className="App">
        <ImageSearchForm />
        {/* <FaceDetect /> */}
      </div>
    );
  }
}
export default App;
Next, in our ImageSearchForm.js we are going to create our component with an input form and a button.
const ImageSearchForm = () => {
  return (
    <div className="ma5 to">
      <div className="center">
        <div className="form center pa4 br3 shadow-5">
          <InputGroup className="mb-3">
            <FormControl className="f4 pa2 w-70 center" id="basic-url" aria-describedby="basic-addon3" />
          </InputGroup>
          <Button variant="secondary"> Detect </Button>
        </div>
      </div>
    </div>
  );
};
export default ImageSearchForm;
Image Recognition API
We'll now move on to the key functionality. What we want is an image to show up with the face detection box around the face, if one exists, when we enter an URL of an image on the internet and press the button.
Before we can do that, we need to set up our Clarifai account to make use of the API.
How to set up your Clarifai account
This API allows users to apply its machine learning app or services. You can read more here and sign up. After signing in, you will be redirected to your account dashboard. Click on ‘my first application’ or create an application to receive your API key.
Important: You will need your own API key.

Here we are going to make use of their Face Detection model.
To install the Clarifai package, open your terminal and run: npm install clarifai
Then we need to import the package into our app by putting this line of code into our app.js.
import Clarifai from "clarifai";
Next, we need to create functionality in our input search box to identify what the user enters. For this, we need a state value so that our app knows what the user entered, stores it, and updates it anytime changes are made.
We (the user) will have to manually enter a URL of an image from the web into the input field and that URL will be in the state value of imageUrl below. In our app.js, the code will have to be updated to the following:
Note: uncomment FaceDetect component now.
import FaceDetect from "./components/FaceDetect/FaceDetect";
import "./App.css";

const app = new Clarifai.App({
  apiKey: "ADD YOUR OWN API KEY HERE",
});

class App extends Component {
  // Add the State for input and grab image
  constructor() {
    super();
    this.state = {
      input: "",
      imageUrl: "",
    };
  }

  // use onInputChange function to setState for our input
  onInputChange = (event) => {
    this.setState({ input: event.target.value });
  };


  // execute a function when submitting with onSubmit
  onSubmit = () => {
    this.setState({ imageUrl: this.state.input });
    app.models.predict(Clarifai.FACE_DETECT_MODEL,
    this.state.input).then(
      function (response) {
        // response data fetch from FACE_DETECT_MODEL
        console.log(response);
        /* the data needed from the response data from
 clarifai API, we are just comparing the two*/
        console.log(
response.outputs[0].data.regions[0].region_info.bounding_box
        );
      },

      function (err) {
        // there was an error
      }
    );
  };

  render() {
    return (
      <div className="App">
      // update your component with their state
        <ImageSearchForm
          onInputChange={this.onInputChange}
          onSubmit={this.onSubmit}
        />
// uncomment your face detect app and update with imageUrl state
        <FaceDetect imageUrl={this.state.imageUrl} />
      </div>
    );
  }
}
export default App;
The onSubmit function will perform an action when the “Detect” button is pressed. It will update the state of imageUrl and grab the image with the Clarifai Face Detect Model. We now need to update our Components.
Update the ImageSearchForm.js file.
// update the component with parameters
const ImageSearchForm = ({ onInputChange, onSubmit }) => {
  return (
    // create an onChange to monitor input state
    <InputGroup className="mb-3">
      <FormControl className="f4 pa2 w-70 center" id="basic-url" aria-describedby="basic-addon3" onChange={onInputChange}
    />
    </InputGroup>
    // add onClick function to execute task
    <Button variant="secondary" onClick={onSubmit}>
     Detect
    </Button>
Now we will create the FaceDetect component in the src/App.js. Write the following code in the FaceDetect.js file:
The FaceDetect component will pass the props imageUrl.
import React from "react";

const FaceDetect = ({ imageUrl }) => {
  return (
    <div className="center ma">
     <div className="absolute mt2">
      <img alt="" src={imageUrl} width="500px" heigh="auto" />
     </div>
    </div>
  );
};
export default FaceDetect;
This component will display the image using a URL from the response that we’ll get from the API.
Creating A Face Detection Box
Finally, we need to get our facial recognition to work by calculating the position of the face in an image with Clarifai FACE_DETECT_MODEL and then display a facial box.
Let’s open our src/App.js file and include the code below:
In the example below, we created a calculateFaceLocation function that takes the data Clarifai returns and calculates the coordinates of the face to the image in order to style the face box.
class App extends Component {
  constructor() {
    super();
    this.state = {
      input: "",
      imageUrl: "",
      box: {},
};
  }

//This function calculates the FaceDetect location of the image

calculateFaceLocation = (data) => {
    const clarifaiFace =
      data.outputs[0].data.regions[0].region_info.bounding_box;
    const image = document.getElementById("input-image");
    const width = Number(image.width);
    const height = Number(image.height);
    return {
      leftCol: clarifaiFace.left_col * width,
      topRow: clarifaiFace.top_row * height,
      rightCol: width - clarifaiFace.right_col * width,
      bottomRow: height - clarifaiFace.bottom_row * height,
    };
  };

//To show the face-detect box on the state values:

  displayFaceBox = (box) => {
    this.setState({ box: box });
  };

  onInputChange = (event) => {
    this.setState({ input: event.target.value });
  };

  onSubmit = () => {
    this.setState({ imageUrl: this.state.input });
    app.models
      .predict(Clarifai.FACE_DETECT_MODEL, this.state.input)
      .then((response) =>
     this.displayFaceBox(this.calculateFaceLocation(response))
      )
      .catch((err) => console.log(err));
  };

  render() {
    return (
      <div className="App">
        <ImageSearchForm onInputChange={this.onInputChange}
          onSubmit={this.onSubmit}
        />
        <FaceDetect box={this.state.box}
         imageUrl= {this.state.imageUrl} />
      </div>
    );
  }
}
export default App;
Here we added another state value called box which is an empty object that holds the response values that are returned. In the displayFaceBox method, we update the state of box value to hold the data we get from calling calculateFaceLocation.
Next, we need to update our FaceDetect component. To do that open the FaceDetect.js file and add an id to the image so we can manipulate it in the DOM. Let’s also add some styling.
const FaceDetect = ({ imageUrl, box }) => {
  return (
  //This div is the container that is holding our fetch image
 and the face detect box
    <div className="center ma">
      <div className="absolute mt2">
    // we set our image SRC to the url of the fetch image
        <img id="inputimage" alt="" src={imageUrl}
         width="500px" heigh="auto" />
          <div className="bounding-box"
           style={{
             top: box.topRow,
             right: box.rightCol,
             bottom: box.bottomRow,
             left: box.leftCol,
           }}
          ></div>
      </div>
    </div>
  );
};
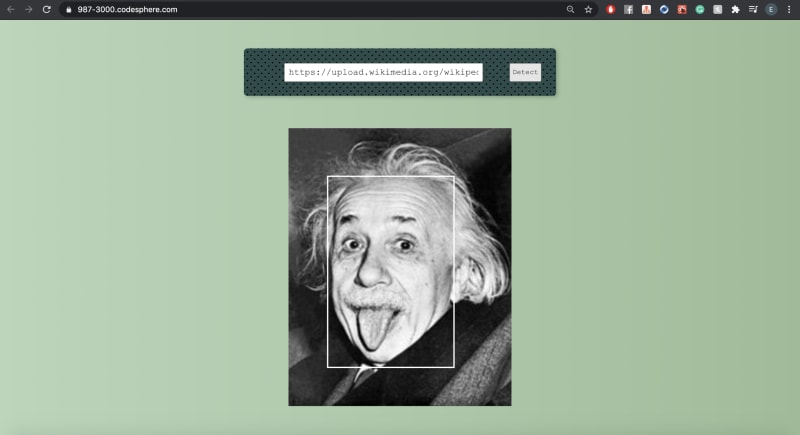
Finally, the output should look like the screenshot below. In the output below, we now have our face detection working with a face box to display and a border-style color of white.


Top comments (0)