Controlling the flow of events on a frontend can appear to be a simple task but it becomes significantly more challenging as there are more elements that need to be controlled in unison. In this post I'm going to discuss best practices for controlling many objects at once using a unified store of state. This technique is called finite state machines and it is frequently used with backend code because it can eliminate whole classes of errors by ensuring that the app never goes into combinations of states that are flat out prohibited from happening.
I found using a unified store of state immensely useful in developing the home page for an app that I just released called Source Compare which allows people version control images within their team to keep everyone on the same page.
If you check out the home page in the link above, you'll see that there is an interactive set of steps for how the app works that has 17 different elements which can show, hide or dim based on which step the person is hovering on. Combinatorially, this could result in about 50 possible states, but here I only ever wanted to show 6. Initially I tried the approach of having certain hover events set the state of other elements but this quickly turned to madness as the number of elements that I needed to control grew.
In this post, we will first discuss in more detail the actual problem that we are trying to solve, and then we will go into how to use the unified store of state. Let's start with a simple hover event. We'll be using React and Tailwind but I'll be ignoring the fact that Tailwind has built in hover support using the hover:opacity-50 type classes so that we can get in the practice of storing state in variables, not as a class setting.
With that in mind, a simple image with a hover event would look something like this:

export const OneIcon = () => {
  const [hoverState, setHoverState] = useState(false)

  return (
    <img
      src="path/to/image.jpg"
      onMouseEnter={() => setHoverState(true)}
      onMouseLeave={() => setHoverState(false)}
      className={`${hoverState ? 'opacity-100' : 'opacity-50'}`}
    />
  )
}
This image shows how when we hover over the image, its opacity increases. The component uses onMouseEnter and onMouseLeave to detect when the person is hovering over the image and we will set the hover state to true or false accordingly. Then, in the class we will set the desired opacity based on the hoverState variable. Now let's say we want to level up the complexity to this:

Here, we have 2 steps and 2 icons. When the mouse cursor is over neither step, both of the images' opacity are set to 50%. When we hover over step 1, the opacity of image 1 goes to 100% and image 2 remains at 50. Then when we move the mouse cursor to step 2, the opacities of the two images flip.
Let's create the react code for a 2 step, 2 image system:
// Bad- don't do it this way!
export const IconSet = () => {
  const [hoverState1, setHoverState1] = useState(false);
  const [hoverState2, setHoverState2] = useState(false);


  return (
    <span
        onMouseEnter={() => {
            setHoverState1(true)
            setHoverState2(false)
        }}
        onMouseLeave={() => {
            setHoverState1(false)
            setHoverState2(false)
        }}
    >
        1
    </span>
    <span
        onMouseEnter={() => {
            setHoverState1(false)
            setHoverState2(true)
        }}
        onMouseLeave={() => {
            setHoverState1(false)
            setHoverState2(false)
        }}
    >
        2
    </span>
    <img
      src="path/to/image1.jpg"
      className={`${hoverState1 ? 'opacity-100' : 'opacity-50'}`}
    />
    <img
      src="path/to/image2.jpg"
      className={`${hoverState2 ? 'opacity-100' : 'opacity-50'}`}
    />
  );
};
This will work, but it is less than ideal- we need to have individual setState calls for each <img> and every onMouse event has a series of setState calls that are brittle because if you ever wanted to change the behavior of something you'd need to change them in the corresponding handlers. This means that it would be all too easy to introduce bugs if you accidentally caused contention among the handlers by, say, setting a hover state to true on a mouse leave.
We can improve the code clarity and eliminate unexpected state combinations by creating a state that is shared amongst all the images and triggers. Let's define the 3 states right now to match what we had in Figure 2.
- Mouse is neither hovered over step 1 or step 2.
- Mouse is hovered over step 1.
- Mouse is hovered over step 2.
For each finite state of the system, we will need to specify the local state for each of the images. Let's say that state 0 is if the opacity is 50% and state 1 is if the image opacity is 100%. Then we can create a string for each finite state which will be a bunch of 1s and 0s for each of the images.
- Image 1 is in state 0, Image 2 is in state 0 => "00"
- Image 1 is in state 1, Image 2 is in state 0 => "10"
- Image 1 is in state 0, Image 2 is in state 1 => "01"
From here we can create an array possibleStates which has all the possible states will allow for this system. Note that although "11" is technically a situation that could occur, we flat out prohibit it from happening since it is not in the possibleStates array we define here:
const possibleStates = ['00', '10', '01']
By virtue of being in an array, we can easily tell for a given finite state what all of the individual image's behaviors should be. Starting with the possibleStates array as the bounds of possible states, we create a IconSet component which has the only useState hook we will use. Our default state will be '00' so we will set that as the default state.
Next for the images, we will use a OneIcon component which takes a src parameter which is simply the path to the image and hoverState which we take the current state, say '00' and use the charAt function call to pick out either the 0th or 1st position in that string and we convert it to an integer. We can use whatever kind of switching logic we want based on this hoverState number. Here it is the case that if its 1 we set the opacity to 100% and otherwise we set it to 50%, but you could imagine that we could use a multitude of numbers to signify a variety of states for that OneIcon component.
The OneStep component, uses the setMainState method to change the global state to either '10' or '01' based on the positional variable that we pass in to stateArrayPosition.
const possibleStates = ['00', '10', '01']

const OneIcon = ({ src, hoverState }) => (
  <img
    src={src}
    className={`${hoverState === 1 ? 'opacity-100' : 'opacity-50'}`}
  />
)

const OneStep = ({ setMainState, stateArrayPosition }) => (
  <span
    onMouseEnter={() => {
      setMainState(possibleStates[stateArrayPosition])
    }}
    onMouseLeave={() => {
      setMainState(possibleStates[0])
    }}
  >
    {`${stateArrayPosition}`}
  </span>
)

const IconSet = () => {
  const [mainState, setMainState] = useState(possibleStates[0])

  return (
    <div>
      <OneStep setMainState={setMainState} stateArrayPosition={1} />
      <OneStep setMainState={setMainState} stateArrayPosition={2} />
      <OneIcon
        src={'path/to/image1.png'}
        hoverState={parseInt(mainState.charAt(0))}
      />
      <OneIcon
        src={'path/to/image2.png'}
        hoverState={parseInt(mainState.charAt(1))}
      />
    </div>
  )
}
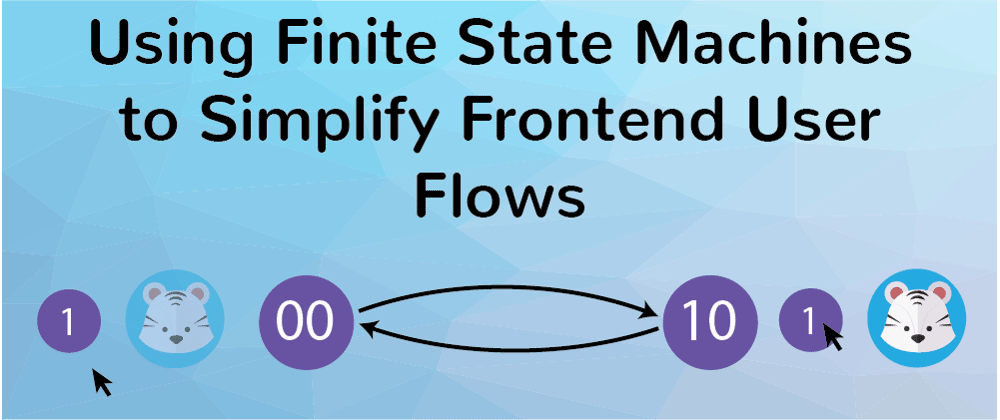
We can visualize this system by drawing circles for each of the finite states and we label them with the strings we have been using from the possibleStates array that represent what each of the elements are doing within a particular finite state.

Each of the transitions are represented by arrows and they get triggered whenever any of the onMouseEnter or onMouseLeave events gets triggered on the OneStep components.
The beauty of this whole setup, is that it is adaptable to a variety of changes we might want to make in the future:
Need to add a step 3? No problem, just add a 3rd state to all the strings in
possibleStatesand then copy and paste theOneStepandOneIconcomponents and you are good to go.Need to allow an image to have more possible states than a 1 and 0? Just add the additional state handling to the
OneIcon.Need to add more possible states, like '11'? Just add it to the array and then have some function call where you call this new possible state like this:
setMainState(possibleStates[3])Need to change around the individual behaviors for a given finite state? All of that information is contained within the
possibleStatesarray so just flip those numbers around to match the desired image state for a particular finite state.
No method is without its drawbacks, and probably the biggest thing to watch out for here is that having state arrays for some systems that have, say, 10 or 20 items in it could be a little daunting when you need to count and change individuals 1s and 0s in a large block of numbers. Here, some code documentation about what all the positions are for can go a long way to clarify your intent to future developers (and yourself!).
Without a doubt though, finite state machines make moderate tasks easy and challenging tasks possible, so this is definitely my go-to method for managing complex state on a web page.
There is more where that came from!
Click here to give us your email and we'll let you know when we publish new stuff. We respect your email privacy, we will never spam you and you can unsubscribe anytime.
Originally posted at Code Mochi.


Latest comments (2)
This code could be simplified with binary masks:
Ooh that's super slick, thanks so much for the suggestion!