
Web development is all about building apps and ecosystems around causes and needs that bring people from similar and even different backgrounds together. The evolution of such space rest on its user being able to maintain identities. These are tied to their content and contributions within the network.
The process of identification or authentication is core to any application and the security at this level is quite important. Yet, what we are here to speak about today is to make the process of creating an identity less of a chore.
Think of the web as big continent where apps and subnetworks are like countries which come in touch and sometimes even overlap. Wouldn’t be nice to be able to port identities from one land to another? For that you need Passport.js.
From their main website,
Passport is authentication middleware for Node.js. Extremely flexible and modular, Passport can be unobtrusively dropped in to any Express-based web application.
This package come with 500+ authentication strategies to suit almost all needs. Whether your users comes from google, facebook or any other platform, there is a strategy you can implement to make their entry to your network easier than having to fill a form all over again.
The workflow has two phases in general, (1) define your strategy and (2) place it within your scheme. To do that, we have the following functions at our disposal.
passport.use(
    // Configure an Authentication Strategy
)

passport.initialize() // Initialize the Strategy

passport.authenticate(
    // Handle the Authentication Request
)
We will detail how to use these within a working example right below. Before that, we point out that our choice of an authentication medium landed on an interesting piece of technology called JWT, or JSON Web Token. In contrast to a more classic way to store identification data, JWT offers flexible security in addition to the possibility to be employed in more complex schemes.
If you have never heard about JWT, well
JWT, is an open standard used to share security information between two parties — a client and a server. Each JWT contains encoded JSON objects, including a set of claims. JWTs are signed using a cryptographic algorithm to ensure that the claims cannot be altered after the token is issued.
A JWT is a string made up of three parts, separated by dots (.), and serialized using base64. The JWT looks something like this: xxxxx.yyyyy.zzzzz. And once decoded it gives us two JSON strings, header+payload and signature.
The header indicates the type of token and the signing algorithm. The payload contains the claims which technically are optional but certain fields are necessary for certain standards. And finally, the signature which works as a hash and helps us check the integrity of the payload against potenetial alteration.
To sum it up, JWT can be used as tickets to cross borders between platforms as the same entity and naturally, they have to be signed by the embassy!
Now time for some application. We will build the simplest working code that uses Google’s OAuth2 scheme. In a nutshell, it is a technology that employs two tokens, the access and refresh token. The first is meant for access and is short-lived while the second is used to refresh the access when the first expires.
What you need to keep in mind is that the Refresh Token, or RT, is the most important piece in this whole scheme.
Enough chatter, let’s get to the code.
Beside passport.js we will use the following packages, express.js, mongoose.js and jsonwebtoken.js and passport-google-oauth2. Make sure to have them installed.
We will build a simple express app which contains a route that implements authentication through Google using OAuth2. The tokens will naturally be JWT. We assume that you know how to set up mongoose as we will use it to store the pair of tokens related to a certain user.
The outline of the work is as follow,
- Construct a token schema.
- Define the refresh token middleware
- Specify our strategy.
- Make a route for Google authentication
1. Token Schema
/* filename: ***tokenSchema.js*** */
const jwt = require("jsonwebtoken")
const mongoose = require("mongoose")

// The Schema
const jwtSchema = new mongoose.Schema({
  userId: { type: mongoose.Schema.Types.ObjectId, ref: "users" },
  Token: { type: String },
  expAt: Date,
});

// Token Creation
jwtSchema.statics.CreateToken = async function (_id) {
  let expiredAt = new Date()
  expiredAt.setSeconds(expiredAt.getSeconds() + 60);
  let _token = jwt.sign({ id: _id }, JWTREFRESHTOKENSECRET);
  let _object = new this({
    userId: _id,
    Token: _token,
    expAt: expiredAt.getTime(),
  })
  let refreshToken = await _object.save()
  return refreshToken
}

// Token Verification
jwtSchema.statics.VerifyToken = async function (token) {
  return (await token.expAt.getTime()) < new Date().getTime();
};

const RefreshToken = mongoose.model("JwtCollection", jwtSchema);

module.exports = { RefreshToken };
2. RT Middleware
/* Refresh Token */

const jwt = require("jsonwebtoken");
const RefreshToken = require(/* path to tokenSchema.js */);

const RTMiddleware = async (req, res, next) => {

  const { refreshToken: requestToken } = req.body

  if (requestToken == null) {
    return res.status(403).json({ message: "Refresh Token is required!" })
  }

  try {
    let refreshToken = await RefreshToken.findOne({ Token: requestToken });
    console.log(refreshToken)
    if (!refreshToken) {
      res.status(403).json({ message: "Refresh Token is not in database!" });
      return;
    }

    const isValid = await RefreshToken.VerifyToken(refreshToken)

    if (isValid) {
      RefreshToken.findByIdAndRemove(refreshToken._id, {
        useFindAndModify: false,
      }).exec()
      res.status(403).json({
        message: "Refresh Token expired. Please make a new sign-in request!",
      })
      return;
    }

    let newAccessToken = jwt.sign(
      { id: refreshToken.userId },
      JWTSECRET,
      {
        expiresIn: JWT_ACC_EXP_TIME,
      }
    )
    return res.status(200).json({
      accessToken: newAccessToken,
      refreshToken: refreshToken.Token,
    })
  } catch (err) {
    return res.status(500).send({ message: err })
  }
}

module.exports = { RTMiddleware }
3. Strategy Definition
/* filename: authentication.js */

const passport = require("passport")
/*
    It is assumed that you have a userSchema.js file with the following fields:
    name, email, password, verified and picture.
*/
const userModel = require(/* path to the userSchema.js */)

passport.use(
  new GoogleStrategy(
    {
      clientID: CLIENTID,
      clientSecret: SECRETID,
      callbackURL: "http://localhost:5000/auth/google/redirect",
    },
    async (accessToken, refreshToken, profile, done) => {

            // Deconstruct the data
      const { email, name, email_verified, picture } = profile._json

      // Verify if user exists
      const userExists = await userModel.findOne({ email })

      // True: redirect user
      if (userExists) {
        return done(null, User)
      }
      // False: create new user, then redirect
      const newUser = await UserModel.create({
        email,
        name,
        verified: email_verified,
        picture,
      });
      done(null, newUser)
    }
  )
)
4. Route Definition
/* filename: ***index.js*** */

const express = require("express")
const jwt = require("jsonwebtoken")
const passport = require(/* path to authentication.js */)
const { RefreshToken } = require(/* pathe to tokenSchema.js */);

const App = express()

App.get(
  "/auth/google",
  passport.authenticate("google", { scope: ["email", "profile"] })
);

App.get(
  "/auth/google/redirect",
  passport.authenticate("google", { failureRedirect: "/", session: false }),
  async (req, res) => {

    const { _id } = req.user;
    try {
      //AT = accses Token
      //RT = refresh Token
      const AT = jwt.sign({ id: _id }, JWTACSESSTOKENSECRET, {
        ACSESSTOKENTIME,
      });
      const RT = await RefreshToken.CreateToken(_id);
      res.status(200).json({ AT, RT });
    } catch (error) {
      res.status(500).json({ msg: "Something went wrong!" })
      console.log(error);
    }
  }
)

// ... define other routes and start the server.
Explanation
To use Google sign-up, the user will visit the route /auth/google that we configured as shown above. Upon doing the following page will prompted.

It is configured by passport and the Google API console
After filling the form and clicking next. There is verification process — detailed in the strategy specification — which checks if the user is already in our database or not and performs the action coded in authentication.js .
If the user exist, they will be logged in. If not, we add them to the database and then redirect them to the callback URL that we specified in Google console to start our JWT Process.
In the callback URL, we will craft the two tokens we spoke about before. The RT will be saved in the database and we will send both the AT and RT to the client.
The final piece to this strategy is the middleware which checks if there is a token attached to the request when the client tries to access private service or resource and refreshes the token if its the AT dead. If the RT expires then the client is required to login again.
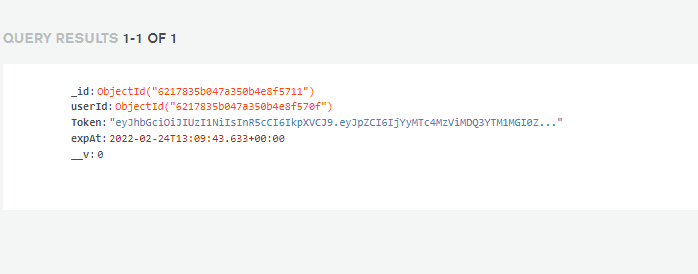
Below you will find a typical response we would get from calling the /auth/google and then going through the callback URL

Database entries for,
(1) Tokens
(2) Users

This concludes our short exposition of this quite rich and indispensable tool for anything identity. For those of you who might interested in the full code, here is the repo. The usage can be extended for things like API access or anything similar.
As we said at the beginning this package comes with a lot of strategies. Each has its specificities and that is too much to cover in a single article. There is an interesting in-depth guide by Zach Gollwitze, so feel free to check it if you hungry for more.
As always this was the Codding Addicts, peace out!


Top comments (0)