In this project, we will be adding a standalone virtual machine to an existing availability set on Azure . The PowerShell script can also be used to change the availability set of a virtual machine to another availability set.
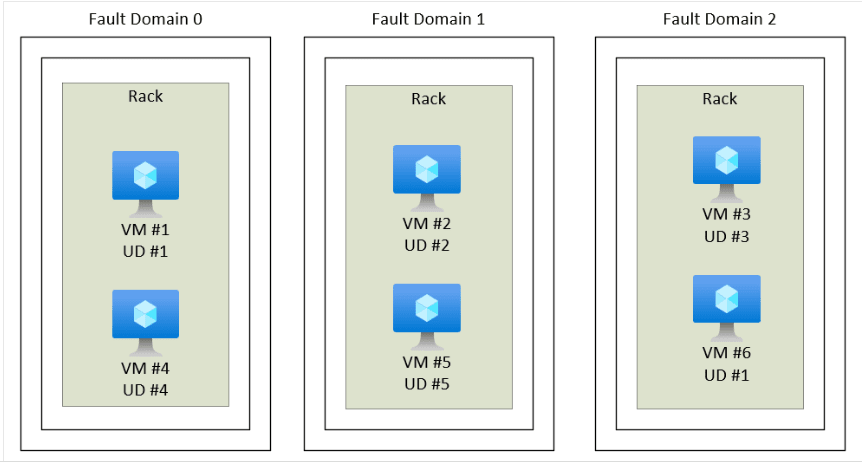
An availability set is a logical grouping of VMs that allows Azure to understand how your application is built to provide for redundancy and availability. We recommended that two or more VMs are created within an availability set to provide for a highly available application and to meet the 99.95% Azure SLA, for more information see : https://learn.microsoft.com/en-us/azure/virtual-machines/availability-set-overview#what-is-an-availability-set
 (IMAGE 1)
Each availability set can be configured with up to three fault domains and twenty update domains. These configurations can't be changed once the availability set has been created.
 (IMAGE 2)
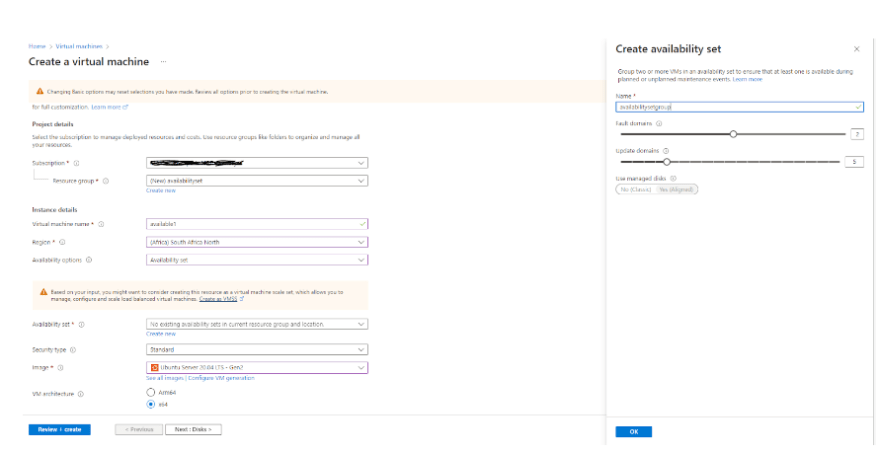
First we create two virtual machines, available1 and available2, into the same availability set (availabilitysetgroup).
 (IMAGE 3)
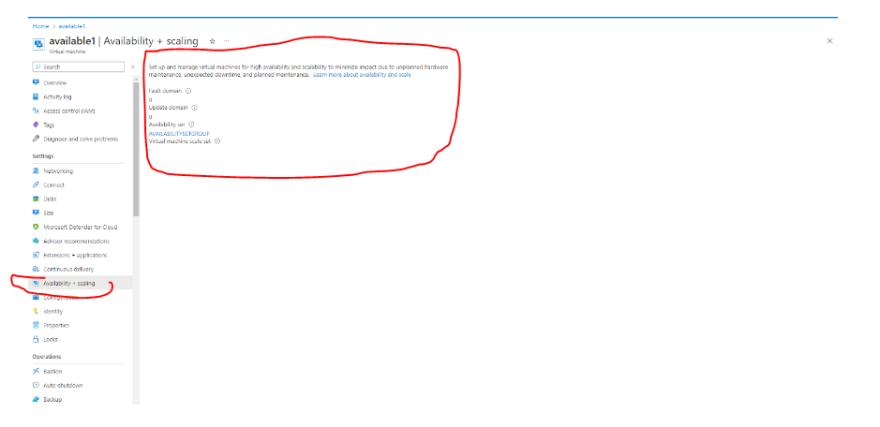
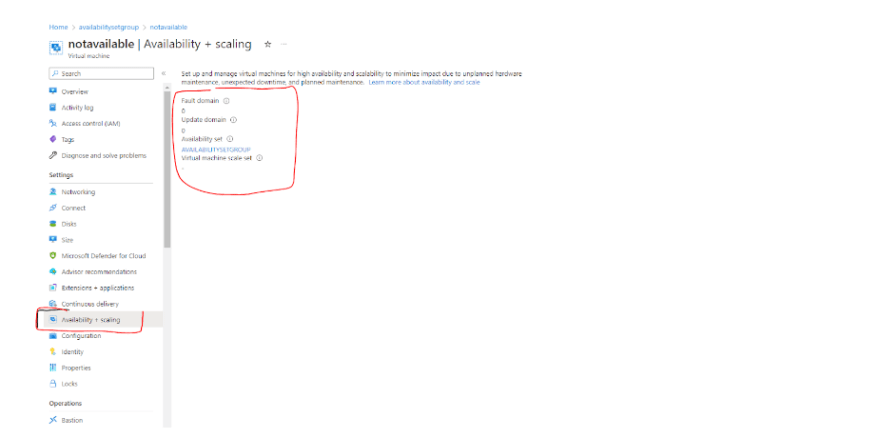
We can confirm the availability of a virtual machine from the availability + scaling option. In image 4 below, the virtual machine (available1) is in the fault domain--0 and update domain--0.
 (IMAGE 4)
The second virtual machine (available2), IMAGE 5, is in the Fault domain--1, and Update domain--1.
 (IMAGE 5)
 (IMAGE 6)
The virtual machine named "notavailable" is to be added to the availability sets (availabilitysetgroup), IMAGE 7.
 (IMAGE 7)
Before carrying out the process , crosscheck that the following are in place:
- The VM (notavailable) disks, NICs, and Public IPs associated with a VM are not configured to be deleted when the VM is deleted.
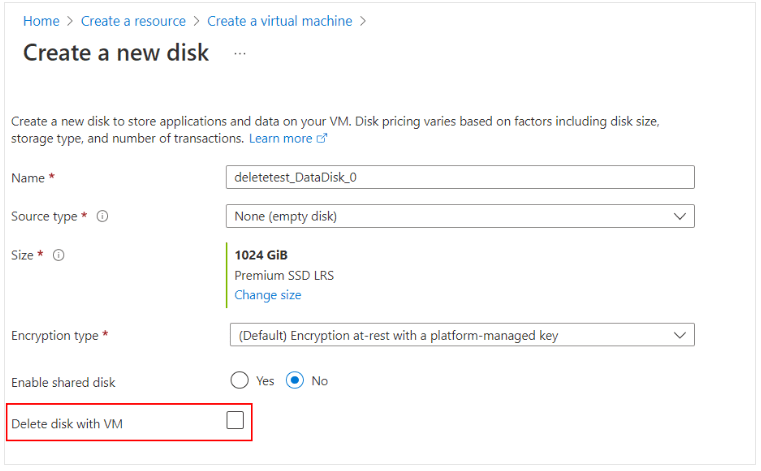 (IMAGE 8)
 (IMAGE 9)
If you configure these resources to be automatically deleted, you can update the settings so that the resources remain after the VM is deleted. To keep these resources, set the deleteOption property to Detach
az resource update --resource-group myResourceGroup --name myVM --resource-type virtualMachines --namespace Microsoft.Compute --set properties.storageProfile.osDisk.deleteOption=detach
- Move the VM (notavailable) to the same resource group , where the availability sets VM are in.
Launch Cloudshell from Azure portal
![]() (IMAGE 10)
(IMAGE 10)
Switch to PowerShell
 (IMAGE 11)
We will execute the PowerShell commands block by block , and then press enter. The complete PowerShell is inserted in the code block after image 12.
 (IMAGE 12)
# Set variables
    $resourceGroup = "availabilityset"
    $vmName = "notavailable"
    $newAvailSetName = "availabilitysetgroup"

# Get the details of the VM to be moved to the Availability Set
    $originalVM = Get-AzVM `
       -ResourceGroupName $resourceGroup `
       -Name $vmName

# Create new availability set if it does not exist
    $availSet = Get-AzAvailabilitySet `
       -ResourceGroupName $resourceGroup `
       -Name $newAvailSetName `
       -ErrorAction Ignore
    if (-Not $availSet) {
    $availSet = New-AzAvailabilitySet `
       -Location $originalVM.Location `
       -Name $newAvailSetName `
       -ResourceGroupName $resourceGroup `
       -PlatformFaultDomainCount 2 `
       -PlatformUpdateDomainCount 2 `
       -Sku Aligned
    }

# Remove the original VM
    Remove-AzVM -ResourceGroupName $resourceGroup -Name $vmName

# Create the basic configuration for the replacement VM.
    $newVM = New-AzVMConfig `
       -VMName $originalVM.Name `
       -VMSize $originalVM.HardwareProfile.VmSize `
       -AvailabilitySetId $availSet.Id

# For a Linux VM, change the last parameter from -Windows to -Linux and vice-versa
    Set-AzVMOSDisk `
       -VM $newVM -CreateOption Attach `
       -ManagedDiskId $originalVM.StorageProfile.OsDisk.ManagedDisk.Id `
       -Name $originalVM.StorageProfile.OsDisk.Name `
       -Linux

# Add Data Disks
    foreach ($disk in $originalVM.StorageProfile.DataDisks) {
    Add-AzVMDataDisk -VM $newVM `
       -Name $disk.Name `
       -ManagedDiskId $disk.ManagedDisk.Id `
       -Caching $disk.Caching `
       -Lun $disk.Lun `
       -DiskSizeInGB $disk.DiskSizeGB `
       -CreateOption Attach
    }

# Add NIC(s) and keep the same NIC as primary; keep the Private IP too, if it exists.
    foreach ($nic in $originalVM.NetworkProfile.NetworkInterfaces) {
    if ($nic.Primary -eq "True")
    {
            Add-AzVMNetworkInterface `
               -VM $newVM `
               -Id $nic.Id -Primary
               }
           else
               {
                 Add-AzVMNetworkInterface `
                -VM $newVM `
                 -Id $nic.Id
                }
      }

# Recreate the VM
    New-AzVM `
       -ResourceGroupName $resourceGroup `
       -Location $originalVM.Location `
       -VM $newVM `
       -DisableBginfoExtension
You should see the image output in image 13 if the PowerShell script execution was successful.
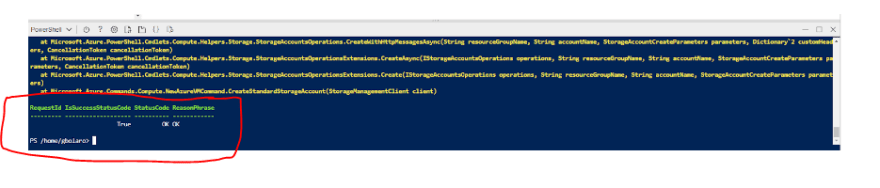 (IMAGE 14)
Checking back into the availability set group, we can confirm the VM (notavailable) has been added to the available set.
 (IMAGE 15)
 (IMAGE 16)
Notice that two VMs, notavailable and available1, are in the same fault domain. This is due to the fact that during the availability set creation we only configured for two fault domains.
Microsoft documentation to change the availability sets :https://learn.microsoft.com/en-us/azure/virtual-machines/windows/change-availability-set
Github: https://github.com/Gydera/PowerShell-Script-To-Add-Azure-Virtual-Machine


Oldest comments (0)