Introduction to multi-tenant Azure Active Directory (Azure AD) applications
If you provide a Software-as-a-Service (SaaS) application to many organizations or build a B2B partner-facing application for many partners, you can integrate your application with Azure AD to accept logins from any Azure Active Directory (Azure AD) tenant. This is known as making your application multi-tenant. Users from their own Azure AD (Microsoft 365) tenants can sign into your application after agreeing to use their accounts for your application. You can select the multi-tenant Azure AD option when creating an App Registration in the Azure Portal. See the following screenshot for an example.

Multi-tenant is very useful, especially for B2B companies. For example, if you have two customers (or partners) who use Azure AD, you can make your application a multi-tenant Azure AD app and let the users from both organizations login to your application without any user provisioning or registration flow. Users can simply log in with their own Azure AD username and password. However, if you choose one of the multi-tenant configurations above, users in any Azure tenant from any organization can log into and use your application!
If you want to limit access to your multi-tenant application — say to paying customers or approved partners — is there a way to specify which Azure AD tenants can access your app?
Allow specific tenants when building the multi-tenant Azure AD application
Unfortunately, this specification feature isn’t available in Azure AD today. One solution is to check if the claim tid in the token is in your tenant allow list. If your app is implementing Azure AD OIDC SSO login, after receiving and validating a valid and authorized Token Request from the Client, the Authorization Server returns a successful response that includes an ID Token and an Access Token. The tid is one of the payload claims that represents the tenant that the user is signing into. To receive this claim, your app must request the profile scope.
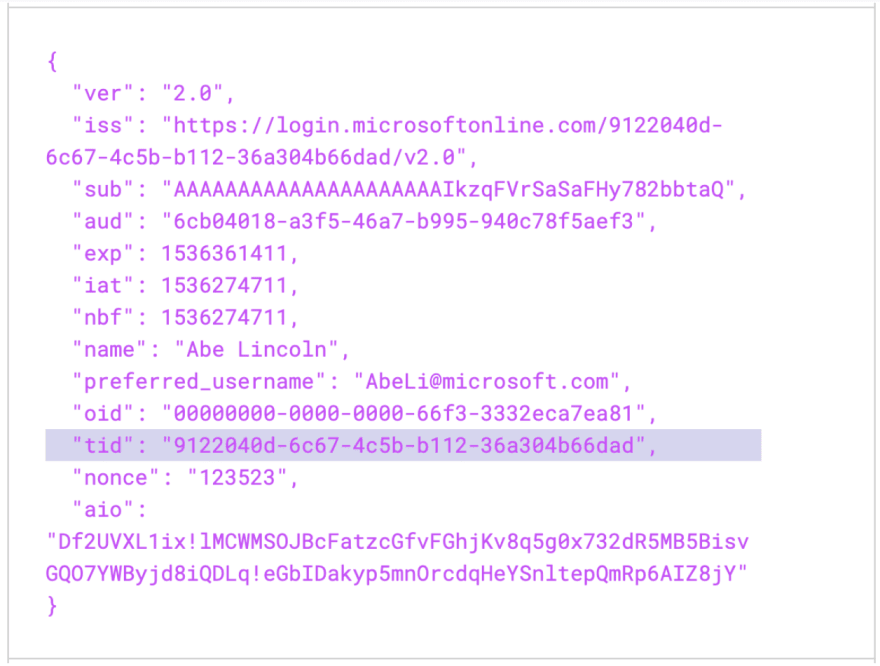
Then you can build a tenant whitelist logic based on the receiving tid from the ID token inside your application. The simple implementation would be like the following:
When a user signs in, you decode his/her tid from the ID Token and compare it with a pre-defined tenant whitelist. If the tid is in the whitelist, allow this user in; otherwise, deny access for this user.
While this method works for specifying users, it requires a custom integration and coding effort.
So is there a no-code way to accomplish this using only configuration? The answer is YES.
How to achieve tenant restriction using Datawiza Access Broker
The Datawiza Access Broker (DAB) provides access control based on user attributes, and you can use this ability to place restrictions on access. You can configure this easily in the Datawiza Cloud Management Console (DCMC).
DAB is a distributed, lightweight, container-based identity-aware proxy that provides a unified authentication and authorization layer, decoupled from the application itself.
What’s more, if you are not familiar with Azure AD configuration, Datawiza provides a one-click integration that can create a multi-tenant application easily. This integration guide will create an application in DCMC as well.
Here’s how to use DCMC to configure restrictions based on tenants:First, add a new attribute, which is a tid, in the Profile tab of the application.

Then, add a mapping from tid to tid:

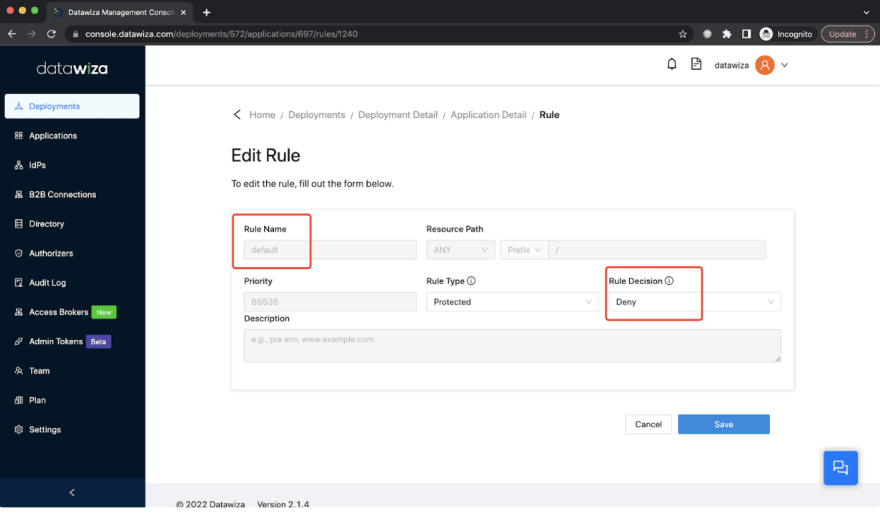
Last, add rules:
Add a rule that allows only specific users in tenant A, for example, xxxxxxxx-xxxx-xxxx-xxxx-000000000001 and different specific users in tenant B, xxxxxxxx-xxxx-xxxx-xxxx-000000000002:

Change the default rule to deny users in any other tenant:
As a result, only the users in these two tenants can access the service. The following screenshot shows a user in the whitelist tenant successfully logged in.

The following screenshot shows the access from users from other tenants is denied.

Summary
In this article, we introduced the Azure AD multi-tenant application and discussed two methods for restricting access to specific tenants. The first method requires coding the logic inside your application. The second method relies on no-code Datawiza to easily configure the access policy.
Written by the Datawiza team — hope you enjoyed! Join us if you have any questions or need any help on our Discord server.


Top comments (0)