
Alright, you've dabbled with web developments, made a few projects here and there, deployed a few applications that helped you grasp essential concepts of Front-End development, from routing, server-side rendering, state-management to asynchronous queries etc.
But there's one thing you haven't put to practice, either because you were willingly avoiding it, or simply because you didn't see its use: testing. More specifically, Front-End unit testing, one very important part of the testing ecosystem.
I posted this very article on my blog earlier today and wanted to have some feedback from you all, enjoy !
Unit testing? 🧐
I'll just go over the basic knowledge to understand the role of unit testing in your everyday applications.
Essentially, testing Front-End code can be divided into 3 categories:
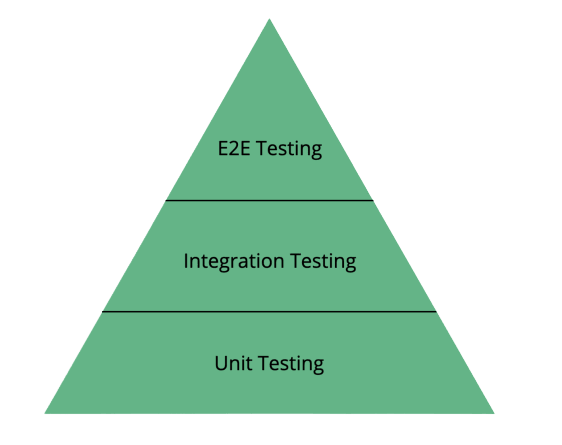
E2E Testing or end-to-end testing, is the practice of testing if the execution of an application is performing as designed from start to finish. The entire application is tested in real-world scenarios, which includes testing the communication between components such as the database, network, APIs etc. and executing your code in a diversity of browsers. Basically testing everything. It takes a lot of time to set up and costs the most.
Integration Testing consists of testing the interaction between elements of your application, for example, communication between your UI and an API. It takes a shorter amount of time to set up, and isn't too expensive.
Unit Testing is different as it consists of testing isolated parts of the code, as units. These units usually take the form of methods, properties, UI element actions etc. It is the fastest and cheapest to implement.
You've probably noted that the higher you go in our pyramid, the more time and money it takes to set up our tests. That's why a lot of projects tend to focus on unit tests as they can help you know if your code truly works by covering most scenarios, save time, and simplify deployment processes.
Example of a unit test ⚙️
Before we get into it, it's worth mentioning what a testing framework is.
A testing framework allows you to easily set up your testing environment and run test suites. You could see testing frameworks as what React or Vue are to UI development, they give you a multitude of tools and make your life easier by doing so.
I would immensely recommend Jest as it is commonly seen on most projects and is maintained by a great team of engineers at Facebook. Note that I will be using this framework in my examples.
I'll be covering a few basic examples of unit tests, so let's get to it. If you want to follow along, feel free to use a website called TDDBin.
// 1. The method we want to test
function add(x, y) {
  return x + y
}

// 2. A test suite
describe("add method", () => {

  // 3. A unit test
  it("should return 2", () => {
    // 4. An assertion
    expect(add(1, 1)).toBe(2)
  })
})
Let's break down the code:
- The method we want to test. As we noted earlier, unit testing often applies to methods or UI element interactions. A great way to know what to test is to go from the ground up looking at an application's components. "What does my method take as an input and what is its output?", "Does my method impact my component's state?", "What are the edge cases?" are all good questions to find a starting point.
- A test suite, that should be described briefly and groups unit tests that are related. For example, a test suite could include all tests that concern a specific method. You can declare as many test suites as you want, its primary role is to make your test logs more readable.
- A unit test, accompanied by a description, the statement(s) inside the callback is the test itself.
-
A test assertion. Testing is all about assertions, comparing a given value to an expected one. Here, we give the return value of our
addmethod with 1 and 1 as parameters and expect the result to be 2.
Other tests we could add
Here are some other tests that would be reasonable to add for this example:
Testing negative results:
it("should return -2", () => {
  expect(add(0, -2)).toBe(-2)
})
Testing our method's error handling (when anything other than a number is passed as parameter):
function add(x, y) {
  // Check if the parameters are numbers
  // If not, throw an error
  if (isNaN(x) || isNaN(y)) {
    throw new Error("Parameter is not a number !")
  }
  return x + y
}

describe("add method", () => {
  it("should throw an error if NaN is given as parameter", () => {
    expect(add).toThrow()
  })
})
Note: you may have seen that we used
toThrow()and nottoBe(). Jest offers a multitude of matchers to check if a value matches a given result. So you can check if a value isnull,true, greater or less than etc.
Concrete example of unit testing 🧪
Alright, I've shown a pretty unrealistic example of unit testing, so let's try it on a real component from start to finish.
I've created a project using create-react-app, which comes out-of-the-box with Jest set up. Whatever framework you're using, most of their CLIs configure Jest for you, so it's just a matter of creating your test files and writing your tests ! If you're not using one of those CLIs or just need to configure Jest from scratch, feel free to read up on their getting started documentation.
Now, let's install Enzyme which will allow us to test our components' output by rendering them. Note that there are many well known tools that can be used to test Front-End applications, Jest and Enzyme being some of the most well known.
Let's follow their introduction documentation by installing the necessary packages:
npm i --save-dev enzyme enzyme-adapter-react-16 react-test-renderer
We then need to set up our adapter by creating the following file:
// /src/setupTests.js
import { configure } from 'enzyme';
import Adapter from 'enzyme-adapter-react-16';

configure({ adapter: new Adapter() });
Note: if you're using an older version of React, make sure to configure the right adapter for the version you're using, feel free to read up on their installation documentation.
You may have noted that create-react-app creates the following unit test:
// App.spec.js
import React from 'react';
import ReactDOM from 'react-dom';
import App from './App';

it('renders without crashing', () => {
  const div = document.createElement('div');
  ReactDOM.render(<App />, div);
  ReactDOM.unmountComponentAtNode(div);
});
All test files have a similar format: *.spec.js or *.test.js depending on your preference. I personally always use the first format. 😄
Try it out by running npm run test in your console. You should get the following output:
 PASS  src/App.spec.js
  ✓ renders without crashing (2ms)

Test Suites: 1 passed, 1 total
Tests:       1 passed, 1 total
Snapshots:   0 total
Time:        0.097s, estimated 1s
Ran all test suites.
Awesome, we've run our first unit test.
We'll now build a basic counter application that lets the user click on a button to increase a value on the screen. The source code can be found here so feel free to clone or fork the repo to try it out.
Our component looks like the following:
class App extends Component {
  state = {
    counter: 0
  }

  handleClick = () => {
    this.setState(state => {
      return {
        counter: state.counter + 1
      }
    })
  }

  render() {
    return (
      <div className="App">
        <header className="App-header">
          <h1>{this.state.counter}</h1>
          <button className="button" onClick={this.handleClick}>
            Click Me !
          </button>
        </header>
      </div>
    );
  }
}
So where do we start? Ask yourself what aspects of the component we could test, in this case:
- What's displayed on the screen initially
- That the counter increases when the user clicks on the button
Testing rendered values
Enzyme's JQuery-like syntax and Jest's assertions make it extremely easy to test these cases, here's how we should go about it:
import React from 'react';
import App from './App';
import { shallow } from 'enzyme'

// 1. Test suite
describe("[UNIT] Testing the App component", () => {
  let wrapper

  // 2. A Jest setup helper function
  beforeEach(() => {
    // 3. Enzyme's shallow rendering
    wrapper = shallow(<App/>)
  })

  describe("Component validation", () => {
    // 4. Our unit test, checking if the initial value is 0
    it('displays 0 as a default value', () => {
      expect(wrapper.find("h1").text()).toContain("0")
    })
  })
})
You probably noticed a couple of things, so let's go through the code.
- As we mentioned earlier, Jest allows us to create test suites to organize our tests.
- Sometimes you want to setup something before a test runs or wrap other things after they do. This is why Jest offers setup and teardown helper functions that you can read up on here. The main one's you'll find yourself using are
beforeEachandbeforeAllas they will allow you to render your components, which brings us to number 3. - Shallow rendering is one of the few rendering methods Enzyme offers. In the case of shallow rendering, we render the component itself without its children. This allows you to test the component as a unit, so that if you modify a child it won't affect the current component being tested. See Enzyme's rendering as an instance of your component as it is when it first comes up on your screen, with its internal states, HTML and all.
- Our first test is simple: we look up the component's
h1title by passing a selector to thefindmethod and access its text directly; we then check, using Jest's assertion methods, that it contains the value 0. Simple, right?
Alright, on to our second test.
Testing events
Testing events is made very simple thanks to Enzyme, here's how we test that a click to our button increases our counter:
it("should increase counter when the button is clicked", () => {
   wrapper.find("button").simulate("click")
   expect(wrapper.find("h1").text()).toContain("1")
})
We use the simulate method on the button wrapper to trigger the event and then check our title to see if it is equal to 1.
Note: most event types can be simulated using the simulate method including inputs, clicks, focus, blurs, scrolls etc.
Testing code coverage
An important concept to grasp is code coverage, it represents the percentage of your code being tested.
Code coverage tools check the following:
- Statements: how many statements of your code are executed.
- Branches: branches created by conditional statements (if/else) that may or may not be executed.
- Functions: the number of functions that have been called.
- Lines: the proportion of lines executed during the tests.
And could look something like this (based on our previous example):

One of the most used code coverage tools our there is called Istanbul and is used by create-react-app to report your application's code coverage when you run the following command npm run test --coverage.
Tools like Istanbul generate a code coverage report in the form of HTML files that can help you have an overview of what parts of your code haven't been tested. It highlights the specific lines not covered during your unit tests to help you reach that sweet 100% coverage.
Note: code coverage isn't everything and 100% coverage doesn't mean you've tested every scenario for a given component, so you should only strive to it when it makes sense.
As noted by @edaqa, code coverage can be seen as a bad metric, as it may "provide a false sense of security by equating lines executed with lines tested" amongst other problems. So use it with caution as a way to have an overview over how much of your code is covered, and by not confusing a metric with an objective.
Honorable mentions 👏
Here are some things that I didn't talk about that deserve to be mentioned, in no particular order:
- Jest has a
--watchoption that allows to run your tests automatically when a test file is changed. - A great cheatsheet for Enzyme.
- Make sure to check out the files generated during code coverage reports, knowing exactly which lines haven't been covered can save tremendous amounts of time.
- Make sure that you're testing something that needs to be tested, avoid testing that third-party packages do their job and focus on testing that your component fits your specifications.
- The concept of Test Driven Development (TDD) can be described as follows: "Test-driven development is the act of first deciding what you want your program to do (the specifications), formulating a failing test, then writing the code to make that test pass" (link), don't worry if you don't understand it fully right away, but it's important to eventually understand its value and to know that you might be asked to one day practice it. Here's a great starting point.
Closing thoughts 🎁
I believe this is enough information for a single introduction to Front-End testing and should get you on your way to learning many, many things about unit testing as a whole.
Testing may feel like a time-consuming and useless practice to you right now, but believe me, you will eventually realize how relevant testing an application is. It will help you debug and structure your code, save time, reduce technical debt, improve your workflow and overall boost your productivity on the long run.
As always, thank you so much for taking the time to read this, I hope you've learned something along the way.
If you have any questions please feel free to send them to me on Twitter @christo_kade, and if you enjoyed this post, following me will give you a heads up whenever I upload anything new !


Top comments (6)
Coverage is one of the worst and most counter productive metrics you can measure on code.
I recommend against using coverage tools as I have only seen them work as a detriment.
This is a very interesting point !
Is there anything like "User Story coverage" or something like that ? 😄
I've see requirements tools that do this... but well, the rest of those tools was nothing to be desired. :)
I learnt a lot from this post. Thank you.
thank you for the clear explanation !!
This is a wonderful read. I've been looking for a comprehensive introduction - and I just found it. Thank you for writing it. ❤️