The other day, I watched Season Two of The Umbrella Academy (have you watched it? It's good!), and it got me thinking about the 1960s. Now I have to mention that I was not born yet in the 1960s - heck, neither were my parents - but do you know what was born in the 1960s? HIPPIES! HIPPIES! HIPPIES! ☮✌❤

Now, how do I incorporate my newfound awareness of Hippies into my React journey? Well, a whack-a-mole game has been on my list of React projects to attempt, and when I thought about the code logic I realized that I could transform it into Whack-A-Hippie!
Okay okay, so we won't actually be able to whack a hippie as we would in the traditional mole one, but we will be able to turn off the tv when one pops up to "Stop The Hippie Propaganda" for thirty whole seconds, easy enough right?
For this game to work, we will use these libraries:
Redux
Redux allows us to manage our app's state in a single place and keep the changes in our app more predictable and traceable.
I would suggest that you have a look at this tutorial if you are not familiar with Redux or if you would like to brush up on some of its core concepts.
seamless-immutable
By default, React (JavaScript) objects or values are mutable, meaning they can be changed whenever a new update to a function occurs or a state is changed. Here comes our problem! For this app, we need to make use of immutability since we will need to return immutable (unchanged) states of our game array after each round.
To achieve this, we will make use of the seamless-immutable library, but you could also opt for Immutable.js if you want to work with an API. The two are at its core quite indifferent, but depending on the scope of your React project, you will need to look at the pros and cons of each to make a well informed decision.
Lodash
Lodash is a JavaScript library which provides utility functions for common programming tasks, such as simplifying strings, numbers, arrays, functions and objects. Whenever you see _. know that we are using lodash on our arrays and collections, and honestly, I wish that I could go into greater detail on this library but my explanation would do it extremely cruel injustice! Their documentation is the right place to start.
Now, I would like to suggest that you code along with me because it is best to type in the code yourself than to copy it because it builds up that muscle memory. When you're ready, let's get started - future React Redux Master! 😉
All explanations for the project are in the code itself via the comments, but if you get stuck or want to download my CSS file, fonts or even images, check it out on my GitHub Repository.
Want to test it before you make it? Test it out on Heroku.
Pre Setup - Installing Packages
To complete this project as I did, you will need to do the following in your preferred command line at a comfortable location on your computer:
npx create-react-app whack-a-hippie
npm i lodash seamless-immutable redux --save
cd whack-a-hippie
Now you can go ahead and open up your newly created project in your favorite code editor. I use Visual Studio Code, which isn't worth mentioning at all really, but I just wanted to announce it into the void! 🧠
Step 1 - Initial Setup
Now that we are in our project folder, it is time to set up our project frame. Before we start, head over to your index.html file and add your FontAwesome CDN so that we can use an icon later on (you can remove the icon completely if you want). I add the CDN to my project instead of installing it via npm because I've ran into some issues in the past, so it's just easier for the type of project that we are making.
In your ./src folder, modify it to meet the following file structure:
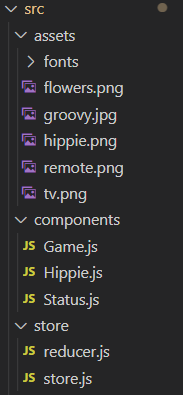
Our components folder contains all the objects needed to create the game that we will see on the actual screen, and our store folder contains all our Redux files which will store the game logic to make our components files function. Once all your folders, files, and assets have been created, we can go ahead and create our reducer!
Step 2 - Reducer.js
Our Reducer file will contain all functions that take the current state and an action as arguments, and return a new state result. In other words, (state, action) => newState. For this project, we will make use of reducer functions that can handle updating our game states. It is important to not make any mistakes in this file because our store.js will be directly dependent on it!
➡ If you want to learn more about Redux Reducers, check this out!
In your reducer.js file, make the following changes:
//reducer.js

//Immutable will allow our Redux state to become an immutable solution, in other words, every update creates new value, leaving the old object or value unchanged
import Immutable from 'seamless-immutable';
//Lodash is a JavaScript library which provides utility functions for common programming tasks, such as simplifying strings, numbers, arrays, functions and objects.
import _ from 'lodash';

//Sets the initial states of our Game
const initialState = Immutable({
  //initial state of the game is new game/unstarted
  gameState: 'unstarted',
  //initial number of hippies(screens) to display is 10 and the hippies will be hidden(in)
  hippies: _.times(10, i => ({ index: i, hippieState: 'in' })),
  //initial/default time of our game is 3000ms or 30 seconds
  gameLength: 30000,
});

//exports our main reducer function and passes the actions and initialState props to it
export default function reducer(state=initialState, action) {

//actions can be thought of as an event (usually with a type) that happens in the application.

  //we will switch between the game states using action.type to see when it needs to update the immutable state
  switch (action.type) {
    //case if the game starts, we start the game with a new round
    case 'GAMESTATE_START':
      return state
        //game has started
        .set('gameState', 'started')
        //score is equal to 0
        .set('score', 0)
        //timer is initialized
        .set('time', state.gameLength)
        //the game will store the High Score acheived by the player in the Local Browser Storage
        .set('highScore', localStorage.getItem('highScore') || 0)
        //will initialize the display of the hippies on randomized basis
        .set('hippies', state.hippies.map(hippie => hippie.set('hippieState', 'in')));

    //case if the game starts, then the timer will count down 1000ms (1s)
    case 'TICK':
      return state.update('time', time => time - 1000);

    //if the game ends, it updates the High Score stored in the Local Browser Storage
    case 'GAMESTATE_END':
      if (state.score > state.highScore) {
        localStorage.setItem('highScore', state.score);
      }
      //it will also end the game by updating the state to game over and hiding the hippies again
      return state
        .set('gameState', 'gameover')
        .set('hippies', state.hippies.map(hippie => hippie.set('hippieState', 'in')));

    //case if the hippies' state is 'out', then they will be displayed
    case 'HIPPIE_COMES_OUT':
      return state
        .setIn(['hippies', action.index, 'hippieState'], 'out');

    //case if the hippies' state is 'in', then they will be hidden again
    case 'HIPPIE_GOES_IN':
      return state
        .setIn(['hippies', action.index, 'hippieState'], 'in');

    ////case if the hippies' are being hit with cursor, then the score will update with 1
    case 'HIPPIE_HIT':
      return state
        .setIn(['hippies', action.index, 'hippieState'], 'hit')
        .update('score', score => score + 1);

    //default state is initialState
    default:
      return state;
  }
}
Step 3 - Store.js
Now that we have created our reducer, our store can call from it. Our Redux store, in basic terms, will bind together all our reducer state functions that we created in the previous step to compile our app functionality.
➡ If you want to learn more about the Store, check this out!
In your store.js file, make the following changes:
//store.js

//Create a new Redux store which will tie together the state, actions, and reducers that make up our app.
import { createStore } from 'redux';
//Lodash is a JavaScript library which provides utility functions for common programming tasks, such as simplifying strings, numbers, arrays, functions and objects.
import _ from 'lodash';
//Our reducer file contains our new state functions
import reducer from './reducer.js';

const gameLength = 30000, //will set our game lenght to 30s
      secondLength = 1000, // this will set the time it takes for a new hippie to pop out, ie. 1s
      hippiesPerSecondLow = 1, // minimum amount of hippies per second
      hippiesPerSecondHigh = 5, // maximum amount of hippies per second
      hippieOutLengthLow = 1000, //minimum time a hippie can stay on screen
      hippieOutLengthHigh = 2500; //maximum time a hippie can stay on screen
//initializes our store by passing root reducer functions
const store = createStore(reducer);

//Will contain the game logic for when we start the game
function startGame() {
  //gets initial state from reducer
  const gameState = store.getState().gameState;

  //if the game has started
  if (gameState !== 'started') {
    //play this sound and update the game to dispatch the GAMESTATE_START action from our reducer.js
    const audio = new Audio(process.env.PUBLIC_URL + '/whack.mp3');
    audio.play();

    //dispatch calls the reducer, saves the state, and runs the listeners
    store.dispatch({ type: 'GAMESTATE_START' });

    //dispatch the TICK action from our reducer.js to initialize the timer
    const clockInterval = setInterval(() => {
      store.dispatch({ type: 'TICK' })
    }, 1000);

    //repeats a the hippies per second at every given time-interval
    const secondsInterval = setInterval(triggerSecond, secondLength);

    // timeout function will end the round, reset game lenght, and clear up the timer/hippies per second by dispatching the GAMESTATE_END action from our reducer.js
    setTimeout(() => {
      clearInterval(secondsInterval);
      clearInterval(clockInterval);
      store.dispatch({ type: 'GAMESTATE_END' });
    }, gameLength);
  }
}

//will contain the function to trigger the hippies upon each round second
function triggerSecond() {
  //will randomize our hippies between their 'in' and 'out' states to display on the tv, and set the min and max amount of hippies to be shown per hippie display second
  const hippies = store.getState().hippies,
        //_.filter() iterates over our hippies collection, returning an array of all hippie predicate that returns true.
        hippiesIn = _.filter(hippies, hippie => hippie.hippieState === 'in'),
        //_.map() method creates a hippiesIn array of values by running each element in our hippie collection through the iteratee.
        indexList = _.map(hippiesIn, hippie => hippie.index),
        //_.random() will return a random value which is in the hippiesPerSecondLow and hippiesPerSecondHigh range
        hippiesThisSecond = _.random(hippiesPerSecondLow, hippiesPerSecondHigh);

  //_.sampleSize() will return a hippie array of (n) random hippies per second
  _.sampleSize(indexList, hippiesThisSecond).forEach(triggerHippie);
}

//function to trigger the hippies per second for each game round
function triggerHippie(index) {
  //random in and out of hippies
  const hippieOutLength = _.random(hippieOutLengthLow, hippieOutLengthHigh);
  //dispatch the HIPPIE_COMES_OUT action from our reducer.js
  store.dispatch({ type: 'HIPPIE_COMES_OUT', index });

  //timeout will dispatch the 'HIPPIE_GOES_IN action to stop hippies from popping up
  setTimeout(() => {
    store.dispatch({ type: 'HIPPIE_GOES_IN', index })
  }, hippieOutLength);
}

//will render our action when player clicks on a hippie
function onHippieClick(index) {
  return function () {
    //will render the hippies as 'out' or displayed, and play a clicking sound when a player clicks on them
    if (store.getState().hippies[index].hippieState === 'out') {
      const audio = new Audio(process.env.PUBLIC_URL + '/click.mp3');
      audio.play();
      //dispatch the ''HIPPIE_HIT' action to add to our score
      store.dispatch({ type: 'HIPPIE_HIT', index });
    }
  }
}

//exports our store
export default store;
export { startGame, onHippieClick };
With our store created, we will need to modify our index.js file so that we can make use of the store components when the game loads. Do not test out your application at this stage, because it will crash! 🤖
//index.js

import React from 'react';
import ReactDOM from 'react-dom';
//import our store
import store, { startGame, onHippieClick } from './store/store';
import App from './App';
import './index.css';

//subscribe keeps an array of listener callbacks and returns a function to remove the new callback
store.subscribe(render);

//renders our store
render();

//renders our main function which contains the game objects
function render() {
  ReactDOM.render(
    <App
      state={store.getState()}
      onStart={startGame}
      onHippieClick={onHippieClick}
    />,
    document.getElementById('root')
  );
}
Step 4 - Status.js
With our Redux Store complete, we can now turn our focus to our game components in our ./components folder. Let's start with our Status.js file. This components file will contain our game status outputs as our game state changes.
The status for our changing game states would be as follows:
- If the game is unstarted, meaning we haven't begun playing yet, it will only display the welcome header "Click here to start".
- If the game is started, meaning we have clicked the button to start the game, it will render the game status as the player score and a timer.
- If the game is over, meaning the round has ended, we will display the status with the final score, and the players highest score achieved so far. We will also make use of Local Browser Storage to store the highest score achieved by the player.
In your Status.js file, make the following changes:
//Status.js
import React from 'react';

//will display the status of our game throughout round states
export default class Status extends React.Component {
  render() {
    //initial properties of defined functions
    const { gameState, onStart, score, highScore, time } = this.props;
    //will render top piece of game (header) upon each game state
    return (
      //when you click the header, it will start the game
      <div className="Status" onClick={onStart}>
        {
          //game unstarted will render unstarted header with normal heading
          gameState === 'unstarted' ?
            renderUnstarted()
          //game started will render started header with score and timer
          : gameState === 'started' ?
            renderStarted(score, time)
          //game over will render over header with final score and highest score
          : gameState === 'gameover' ?
            renderGameOver(score, highScore)
          : null
        }
      </div>
    );
  }
}

//unstarted game screen with default information
function renderUnstarted() {
  return (
    <div>
      <h1>Whack-A-Hippie</h1>
      <h3>Stop the Hipster Propaganda! Remote click <span className="clicker">here</span> to start.</h3>
      <div className="flower"></div>
    </div>
  );
}

//started game screen with timer and current score
function renderStarted(score, time) {
  const date = new Date(time),
        format = time => time < 10 ? '0' + time : time,
        minutes = format(date.getMinutes()),
        seconds = format(date.getSeconds());

  return (
    <div>
      <h2 className="score">Current Score: {score}</h2>
      <h3 className="time">Time Left: {minutes}:{seconds}</h3>
    </div>
  );
}

//game over screen with final score and highest score achieved
function renderGameOver(score, highScore) {
  return (
    <div>
      <h1>Game Over</h1>
      {/*Will display final score for current round */}
      <h3 className="results"> You stopped {score} Hipsters dude!</h3>
      {/*Will show high score stored in Local Browser Storage */}
      {
        score > highScore ?
        <h2 className="groovy"> Groovy, you got a new High Score! </h2>
        :
        <h2 className="groovy"> Groovy, your Highest Score is: {highScore} points </h2>
      }
      {/*Will allow player to restart game */}
      <h2 className="replay"><span className="clicker"><i class="fas fa-play"></i></span> Try Again? </h2>
    </div>
  );
}
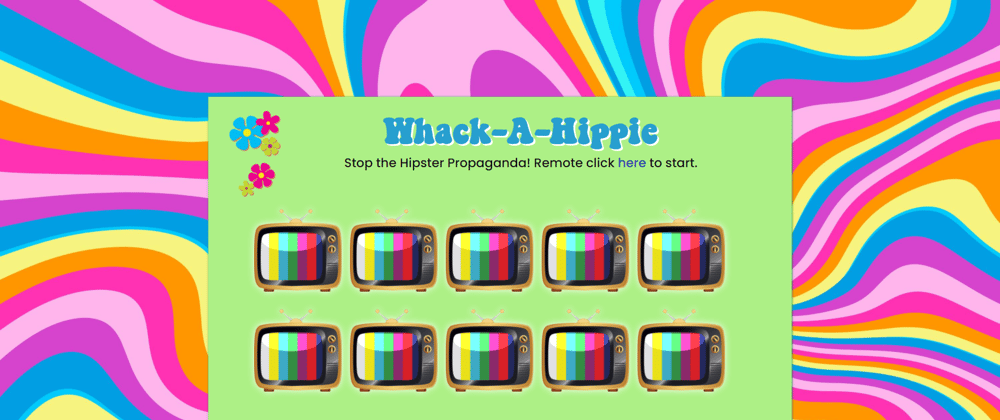
In the end, this is what we want to achieve:
Game Unstarted:

Game Started:

Game Over:

Step 5 - Hippie.js
Now we need to create our hippies and the screens where the hippies will hide behind and pop out on! We also need to add functions that will be able to change the state of these components so that we can hit the hippie, and make the hippies appear/hide on the screen!
Please Note that we will make use of a CSS animation to have the hippies 'pop-out' on the screen, but as a challenge, you could try and replace this with a React Animation
Get your Hippie and TV image ready, because we will need them to make the following changes in our Hippie.js file:
//Hippie.js
import React from 'react';
//will display our hippie image to be rendered
import hippieIMG from '../assets/hippie.png';

//Main hippie component that will display our hippies between game states
export default class Hippie extends React.Component {
  render() {
    //initial properties of defined functions
    const { hippieState, onHippieClick } = this.props;

    return (
      //render our screen
      <div className={getScreenClass(hippieState)} onClick={onHippieClick}>
        {/*render our hippies*/}
        <img
          className={getHippieClass(hippieState)}
          src={hippieIMG}
          alt="hippie"
        />
      </div>
    );
  }
}

//will render the hippie to pop out if its state is out/displayed
function getHippieClass(hippieState) {
  return `Hippie ${hippieState === 'out' ? 'Pop-out' : ''}`;
}

//will render the screen to allow player to hit the hippie if its state is out/displayed
function getScreenClass(hippieState) {
  return `Screen ${hippieState === 'hit' ? 'Hippie-hit' : ''}`;
}
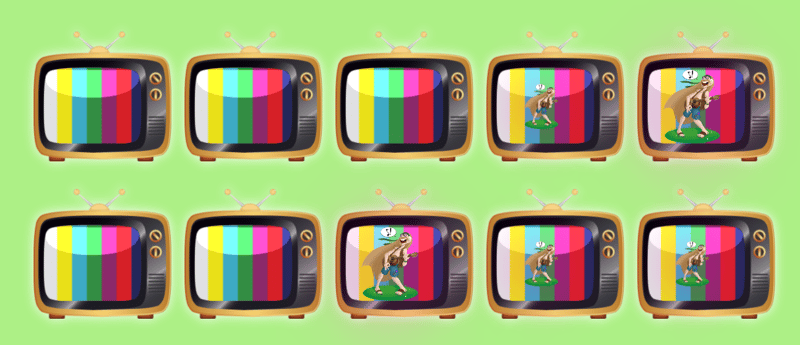
This file should be able to render something like this:
Step 6 - Game.js
This is our second last step to completing our game. Our main "gameboard" will be rendered here, and our hippies that we created in the previous step will be put to use.
Make the following changes in our Game.js file:
//Game.js
import React from 'react';
import Hippie from './Hippie.js';

//main Game component
export default class Game extends React.Component {
  render () {
    //initial properties of defined functions
    const { hippies, onHippieClick } = this.props;

    return (
      <div className="Game">
        {/*Render all the Hippies from Hippie.js according to its state*/}
        {hippies && hippies.map((hippie) =>
          <Hippie
            key={hippie.index}
            hippieState={hippie.hippieState}
            onHippieClick={onHippieClick(hippie.index)}
          />
        )}
      </div>
    );
  }
}
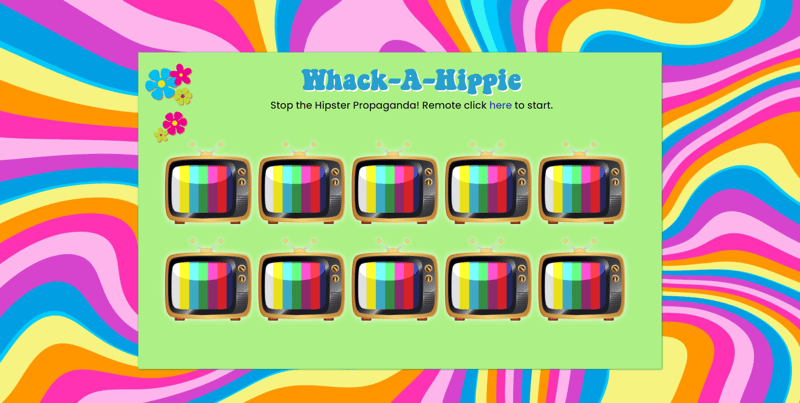
This file should be able to render something like this:

Step 7 - App.js
To tie it all together (and to make our previous changes to our index.js file work) we will now import our Game and our Status components to our main App component. 😊
Make the following changes in our App.js file:
//App.js
import React from 'react';
import Game from './components/Game';
import Status from './components/Status';

export default class App extends React.Component {
  render() {
    //initial properties of already defined functions
    const {state, onStart, onHippieClick} = this.props;
    //initial state of already defined functions
    const {hippies, gameState, score, highScore, time} = state;

    return (
      <div className="App">
        {/*Will display the game status per each round*/}
        <Status
          onStart={onStart}
          gameState={gameState}
          score={score}
          highScore={highScore}
          time={time}
        />
        {/*Will display the game objects per round */}
        <Game
          hippies={hippies}
          onHippieClick={onHippieClick}
          gameState={gameState}
        />
      </div>
    );
  }
}
Step 8 - Final Touches
Now that we have created all the components and our Redux Store, and added the necessary CSS styling, it is time to test our application. I do this frequently during project creation to test my code, but during this tutorial we only test it at the end - however you want to do it, is up to you! Run your project with the following command:
npm start
You should get something similar to this:
Good job for reaching the end of this tutorial. When you're done, deploy your new project to GitHub and take a well-deserved break. Did you learn something new? What would you do different? Did you use something other than hippies? Let me know in the comments down below!😊


Top comments (0)