Run multiple DBMS and C# Containers Behind an HAProxy Load Balancer with Docker Compose. Test Scaling with Different Number of Instances
In the previous article, you created a microservice architecture and manually implemented application-layer database sharding.
Now, you will scale the application and run multiple container instances of the microservice and databases. You will use Docker Compose and an HAProxy load balancer:

Then you run JMeter load tests to see how the application scales when using a different number of instances. Finally, you will also publish and receive messages from RabbitMQ.
1. Run Multiple Database and Microservice Instances
Dockerize the Microservice
Use the code and environment from the previous article as the basis.
Rename the file “Dockerfile” in the Visual Studio Project-Explorer to “dockerfile” (first character lowercase). Then right-click the dockerfile and select “Create Docker Image”. This will also push the image to docker.
Run the Application in Docker
Create the file docker-compose.yml:
The docker file configures 3 database containers and 4 instances of the Post service. Currently, only 2 databases are used by the Post service instances. You can later remove the comment to use the third database. An HAProxy load balancer exposes the Post service containers on port 5001.
There is a 0.5 CPU limit for each container to help with a realistic load test on a local machine. On my 12 core notebook, there are still unused resources so that adding more service and database instances can bring a benefit.
Start the Application
C:\dev>docker-compose up -d

Init the Databases
Open your browser at http://localhost:5001/swagger/index.html
Init the database with at least 100 users and 10 categories.
You could create more users and categories, but it will take some time because of the CPU limits.

2. Load Test the Scaled Application with JMeter
Create the JMeter Test Plan
Install and open JMeter.
Create a test plan and a thread group:

32 threads is a good number to start. On each loop of a thread, it adds one post and reads 10 posts.
Add an HTTP request to create a post:

Servername: localhost
Port: 5001
HTTP-Request: POST
Path: /api/Posts
Body Data:
    {
     "title": "MyTitle",
     "content": "MyContent",
     "userId": ${__Random(1,100)},
     "categoryId": "Category${__Random(1,10)}"
    }
It creates a post for a random user (ID 1–100) and category (1–10).
Add a Content-Type application/json HTTP header to the request:

Read 10 posts of a random category:
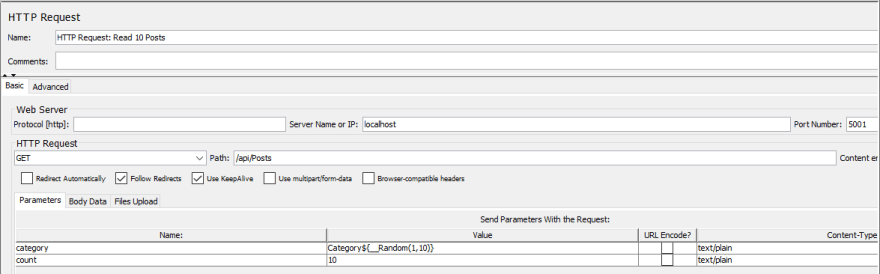
Servername: localhost
Port: 5001
HTTP-Request: GET
Path: /api/Posts
Send Parameters with the Request:
    NAME | VALUE | CONTENT-TYPE
    category | Category${__Random(1,10)} | text/plain
    count | 10 | text/plain
Run the Test
Take a look at the Summary Report while the test is running:

There should be no errors.
Wait some time until the values for the average (response time) and throughput get stable.
Modify the Test Parameters
Stop the test in JMeter.
You can change the threads in the test plan. Rise them to e.g. 64 or 128 threads. Or decrease the threads to 16 or even 1.
Shutdown the application before you edit the docker-compose.yml:
C:\dev>docker-compose down
You can change the number of post service instances via the “scale” property. Change the “environment” property for the number of databases (add/remove the comments):

Start the application after your changes:
C:\dev>docker-compose up -d
It takes some time until the database servers are running. And remember to initialize the database:
3. Example Test Results
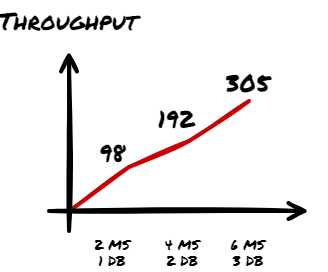
A ratio of two post services to one database gives good results on my computer. I can scale it up to six services and three databases until I reach the limits of my hardware. The average time stays below 500ms. Increasing the threads higher than 64 produces errors.
The results depend on my environment and the CPU limitations. They will be different on your machine.

The throughput per second is proportional to the number of instances:
305 requests per second with the CPU limited containers are about 25 million requests per day. That would allow 1 million users to write 10 posts a day and read posts. Of course, a real-life application will be more complex, but I hope the example shows the basic ideas.
4. Inter Microservice Communication and Replicating User Changes
The Post service receives changes to the users from the User microservice via Rabbitmq messages:

You will simulate that with JMeter, too.
Create the RabbitMQ Container
Issue the following command (in one line in a console window) to start a RabbitMQ container with admin UI:
C:\dev>docker run -d -p 15672:15672 -p 5672:5672 -e RABBITMQ_DEFAULT_USER=test -e RABBITMQ_DEFAULT_PASS=test --hostname my-rabbit --name some-rabbit rabbitmq:3-management
The command configures “test" as user and password instead of the default Guest credentials. Guest is limited to localhost, but inside docker, the containers are on different hosts.
Modify the Post Microservice
Install the RabbitMQ.Client NuGet package in Visual Studio.
Add the IntegrationEventListenerService class:
The background service uses the “test" account to access RabbitMQ and host.docker.internal and localhost as hosts. This allows connections from inside a container and the Visual Studio debugger.
Single active consumer guarantees that only one Post service instance receives messages.
If the active instance crashes then the next instance will take over. You can later try it by stopping the currently receiving instance in docker.
The code creates the exchange and pipe if they are not already existing. It uses manual acknowledgments.
Modify Startup.cs to run the IntegrationEventListenerService:
Run the Changed Microservice in Docker
Shutdown the application in docker:
C:\dev>docker-compose down
Build the Post service, dockerize it and publish it to docker.
Start the application after your changes:
C:\dev>docker-compose up -d
It takes some time until the database servers are running. And remember to initialize the database:
Modify the JMeter Tests
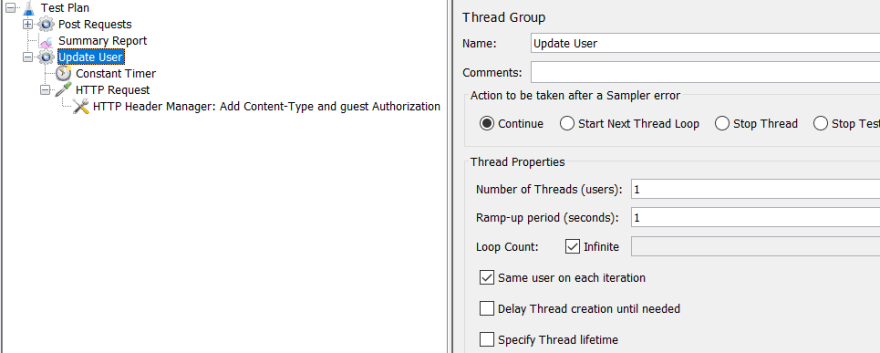
In the JMeter test plan add a thread group with only one thread:
Add a constant timer:
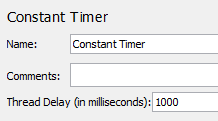
The constant timer limits the test to one message per second.
One message per second is still very often. Even if 1,000,000 users sign up in half a year it would be only 4 new users per minute.
Add the HTTP Request to publish the message to RabbitMQ:
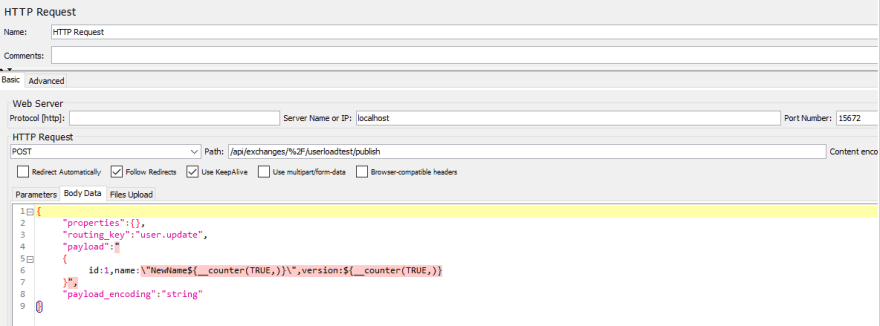
Servername: localhost
Port: 15672
HTTP-Request: POST
Path: /api/exchanges/%2F/userloadtest/publish
Body Data:
    {
     "properties":{},
     "routing_key":"user.update",
     "payload":"
     {
      id:1,name:\"NewName${__counter(TRUE,)}\",version:${__counter(TRUE,)}
     }",
     "payload_encoding":"string"
    }
The user entity has a version field to handle out-of-order messages. To keep the test simple, it only updates a single user and increments the version field. The performance impact should stay the same.
Add an HTTP Header Manager for the Content-Type and the authorization to RabbitMQ.
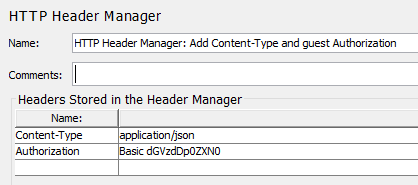
Content-Type | application/json
Authorization | Basic dGVzdDp0ZXN0
“dGVzdDp0ZXN0" is the base64 encoded user and password “test".
Run the Tests
The throughput should be similar to the previous tests.
You can also identify the active RabbitMQ consumer in docker by looking at the console output. You can stop the container and another instance will take over.
5. Final Thoughts and Outlook
You created a microservice architecture and implemented application-layer database sharding. Then you scaled the application with multiple container instances and load tested it. You also processed user change events from RabbitMQ.
This is only an example application. You will have to adjust the code to use it in a production environment.
What’s next? Getting data like the top 10 categories with the most posts requires querying multiple database instances. This might cause delays and kill performance. Redis can be a solution for querying aggregated data. I will show it in one of my next posts.
You can also run the application in Kubernetes. See my other articles:
Please contact me if you have any questions, ideas, or suggestions.


Oldest comments (0)