
Last time, I introduced Tailwind CSS and showed how you can get it up and running with Blazor. This time I'm going to go a little deeper and show how you can customise and configure Tailwind for your application, optimise the final CSS, as well as how to integrate it all into a CI pipeline.
Customising Tailwind
I mentioned in part 1, it's possible to custom Tailwind to your specific needs. The default settings include, a set of colour palettes, fonts, padding and margin spacing, plus many more. And you can customise all of them via the tailwind.config.js file.
The file is split into three different sections, theme, variants and plugins. The theme section allows us to customise things like fonts, colour palettes, border widths, essentially anything related to the visual style of your site. The variants section allows you to configure the responsive and pseudo-class variants which are generated. These control the generation of classes which style things like hover and focus events. Finally, the plugins section allows you to add third party plugins which can generate even more CSS classes for your app. For a full breakdown of every option you can checkout the fantastic official docs.
To see this in action we're going to add a custom colour on top of the default colour palettes. In the root of your app, create a new file called tailwind.config.js, if you don't have one already, and paste in the following code.
module.exports = {
  theme: {
    extend: {
      colors: {
        blazoredorange: '#ff6600'
      }
    }
  }
};
The key here is the use of the extend object, this tells Tailwind we want to ADD to the existing colours. If we had written the config like this instead.
module.exports = {
  theme: {
    colors: {
      blazoredorange: '#ff6600'
    }
  }
};
Then we would be telling Tailwind to replace the existing colour palettes. It's worth noting that everything in Tailwinds configuration is optional, so you only need to include the things you want to override or extend.
This file is automatically picked up by Tailwind during the build process so once you've finished adding your custom configuration, just rerun the gulp css task to generate your new custom CSS. With the above configuration change we now get access to the following extra classes.
text-blazoredorangeborder-blazoredorangebg-blazoredorange
Optimising Your CSS
One downside of Tailwind is that there are a lot of classes generated by default and you're potentially not using a lot of them in your application. This means that the size of your CSS file can be a bit large, relatively speaking. So what can we do about this?
Removing unused CSS with PurgeCSS
There is a great plugin which solves this exact problem called PurgeCSS. It scans through your files and tries to determine what CSS classes you are using and then removes all the ones you don't. If we look back at the configuration we had for our Gulp file from part 1, it looks like this.
const gulp = require('gulp');

gulp.task('css', () => {
  const postcss = require('gulp-postcss');

  return gulp.src('./Styles/site.css')
    .pipe(postcss([
      require('precss'),
      require('tailwindcss'),
      require('autoprefixer')
    ]))
    .pipe(gulp.dest('./wwwroot/css/'));
});
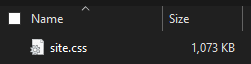
If we look at the size of the CSS file produced from this configuration, it's pretty large, 1073kb.
This is fine while we are working locally, in fact it's needed so we can have access to all those utility classes while we're developing. But once we've finished there will be a lot of unused classes that are now just taking up space. Let's update our config to use PurgeCSS and see what kind of saving we can make.
First we need to install PurgeCSS using npm and the following command
npm install --save-dev gulp-purgecss
Once that has completed we can update our gulpfile.js to use PurgeCSS.
const gulp = require('gulp');

gulp.task('css', () => {
  const postcss = require('gulp-postcss');
    const purgecss = require('gulp-purgecss');

  return gulp.src('./Styles/site.css')
    .pipe(postcss([
      require('precss'),
      require('tailwindcss'),
      require('autoprefixer')
    ]))
    .pipe(purgecss({ content: [' **/*.html', '** /*.razor'] }))
    .pipe(gulp.dest('./wwwroot/css/'));
});
As part of the configuration for PurgeCSS I've passed in the types of files I want it to scan in order to look for CSS classes. I've specified it should look for any files ending in .html or .razor within my application. We can then run our Gulp task using the command gulp css, as before, to regenerate our CSS.

Wow! That's a pretty impressive size reduction! 1073kb down to 12kb. At this point it's worth checking your application to make sure everything still looks as it should, but so far I haven't found any issues.
We could stop there but I think there are more savings to be had. After all, we've not even minimised the file. Let's do that next and see how we get on.
Minimising CSS
In order to minimise our CSS we need to install another plugin or two. First, we'll install CleanCSS which is going to do the minimising for us.
npm install gulp-clean-css --save-dev
Optionally, you can also install Sourcemaps which will generate sourcemap files so you can debug your CSS once it's been minified. This isn't essential and I'll leave it up to you to decide if you want to include it or not.
npm install gulp-sourcemaps --save-dev
With those plugins installed we can return to our gulpfile and add some more configuration.
const gulp = require('gulp');

gulp.task('css', () => {
  const postcss = require('gulp-postcss');
  const purgecss = require('gulp-purgecss');
  const sourcemaps = require('gulp-sourcemaps');
  const cleanCSS = require('gulp-clean-css');

  return gulp.src('./Styles/site.css')
    .pipe(sourcemaps.init())
    .pipe(postcss([
      require('precss'),
      require('tailwindcss'),
      require('autoprefixer')
    ]))
    .pipe(purgecss({ content: [' **/*.html', '** /*.razor'] }))
    .pipe(cleanCSS({ level: 2 }))
    .pipe(sourcemaps.write('.'))
    .pipe(gulp.dest('./wwwroot/css/'));
});
The changes here are calling into CleanCSS once we have purged any unused classes. Then generating the sourcemap for the minified CSS file. If you don't want to create a sourcemap file then just leave those lines out of the config.
Once you're done rerun your gulp task gulp css, and let's see what the savings are.

4KB! Now that is a pretty small file, I think you'll agree. I'm pretty happy with our work, we've taken the original file weighing in at 1073KB and we've managed to reduce it to only 4KB. This is great but we do have one problem.
With the current configuration we only have one gulp task which produces our CSS and now it's producing a version which doesn't include all the utility classes we might need for future development. It would be much better to create two gulp tasks, one to use during development and one to use when we want to ship to production.
const gulp = require('gulp');
const postcss = require('gulp-postcss');
const sourcemaps = require('gulp-sourcemaps');
const cleanCSS = require('gulp-clean-css');
const purgecss = require('gulp-purgecss');

gulp.task('css:dev', () => {
  return gulp.src('./Styles/site.css')
    .pipe(sourcemaps.init())
    .pipe(postcss([
      require('precss'),
      require('tailwindcss'),
      require('autoprefixer')
    ]))
    .pipe(gulp.dest('./wwwroot/css/'));
});

gulp.task('css:prod', () => {
  return gulp.src('./Styles/site.css')
    .pipe(sourcemaps.init())
    .pipe(postcss([
      require('precss'),
      require('tailwindcss'),
      require('autoprefixer')
    ]))
    .pipe(purgecss({ content: [' **/*.html', '** /*.razor'] }))
    .pipe(cleanCSS({ level: 2 }))
    .pipe(sourcemaps.write('.'))
    .pipe(gulp.dest('./wwwroot/css/'));
});
Here is the final configuration, we now have two gulp tasks, css:dev and css:prod.
By running the css:dev task we can get the full CSS file with all of Tailwinds utility classes and any customisations we've made. The great thing is we only need to run this once to generate the initial CSS locally and then only again if we change any customisations.
The css:prod task is going to give us the super optimised version of our CSS to use in production. But we wouldn't want to run this locally, at least in an ideal world, it would be much better to use this in a CI pipeline when we deploy our application. So to finish things up, let look at how we can integrate all our work so far into a CI pipeline using Azure DevOps.
Using with TailwindCSS in a CI pipeline
As our CSS file is compiled, we should check it into source control, we should have it be dynamically generated by our build process for each release. In order to do this we will need to install the tools we've been using locally via npm and then run our Gulp task to produce the production CSS.
Unsurprisingly, there are already tasks available on Azure DevOps to do this. There is an npm task which will install all our npm packages and a Gulp task we can use to build our CSS.
trigger:
- master

pool:
  vmImage: 'windows-latest'

variables:
  buildConfiguration: 'Release'

steps:
- task: UseDotNet@2
  displayName: 'Installing .NET Core SDK...'
  inputs:
    packageType: sdk
    version: 3.1.102
    installationPath: $(Agent.ToolsDirectory)/dotnet

- task: Npm@1
  displayName: 'Running NPM Install...'
  inputs:
    command: 'install'
    workingDir: 'MySite'

- task: gulp@1
  displayName: 'Running Gulp tasks'
  inputs:
    gulpFile: 'MySite/gulpfile.js'
    targets: css:prod

- script: dotnet build --configuration $(buildConfiguration) MySite/MySite.csproj
  displayName: 'Building $(buildConfiguration)...'
The first task installs the latest .NET Core SDK. Then the npm install command is run via the npm task. Use the workingDir setting to point to where your package.json file lives in your project structure. Then the gulp css:prod task is run before building the app.
You can then publish your app where ever you wish and if you need some guidance on how to do that with Azure DevOps, I have a couple of posts which should help you out, here and here.
Summary
That bring us to an end. We now have Tailwind CSS integrated into our Blazor app allowing us to take advantage of its awesome utility based approach to styling UI.
We have learned how to customise Tailwind using its extensive configuration options. We then saw how we can optimise the CSS we produced using PurgeCSS and CleanCSS to create the smallest file possible for a production scenario. Then we finished up by integrating Tailwind into a CI pipeline using Azure DevOps.


Top comments (0)