The KendoReact Conversational UI creates a connection that closes the gap between the web and the next-gen natural language processing applications. It also provides a React Chat component that allows end users to participate in chat sessions with other chatbots or users. It provides a wide range of features, from integration with Chatbot services, data binding and customization, to globalization and suggested actions. That isn’t all—we will go over the key features that make this an ideal component for adding chat functionality into your React application.
Key Features of KendoReact Conversational UI
Integration With Chatbot Services
The Chat component provides a means of integrating and connecting chatbots. Visit the KendoReact documentation for a code example on the integration of the React Chat component with a sample DialogFlow Agent or an Azure Bot Service.
Data Binding
This React Conversational UI Component provides a data model, which allows you to bind the list of messages from a remote streaming service. You can read more on the data binding options of the Chat component in the docs.
Suggested Actions
You can use the built-in action types to configure the Chat to display the suggested actions of the last messages, which prevents chat users from losing valuable time when responding to the messages. Find more on the implementation details of the suggested actions here.
Using KendoReact Conversational UI in a React App
Let's demonstrate how to use this React Chat component by building a simple chat website.
Prerequisites
To follow along with this tutorial, you will need to have:
- A basic knowledge of ReactJS
- A text editor
Setting Up the React Project
Those who are already familiar with scaffolding a React app using npx can skip ahead, because next I will show how to get a React app off the ground. All you need to do is follow the steps below, and you will get your React app development server running on your local machine.
Run the following boilerplate command listed below, to quickly set up a React project for development.
npx create-react-app chat-web --use-npm
cd chat-web
npm start
And those who use yarn can use the following commands:
    yarn create react-app chat-web
    cd chat-web
    yarn start
Locate the chat web project's directory and open it in your code editor. Now you can begin by striping down the codes in the App.js file to look like this.
import "./App.css";

function App(){
    return <div classname="app"></div>
}
export default App;
Now that we are done scaffolding our React application, let's begin installing the dependencies for the application.
Dependency Installation
Next, let's add the KendoReact packages we'll be using for this project. I will use the KendoReact Default theme for this project, but other options exist—for example, the KendoReact Bootstrap and the KendoReact Material themes.
Note: KendoReact is a commercial UI component library, and as a part of this you will need to provide a license key when you use the components in your React projects. You can snag a license key through a free trial or by owning a commercial license. For more information, you can head over to the KendoReact Licensing page.
Enter the following command into your CLI (command line interface) and run the command.
npm install --save @progress/kendo-theme-default @progress/kendo-react-conversational-ui @progress/kendo-react-buttons @progress/kendo-licensing @progress/kendo-react-intl
The command above installs the KendoReact Default theme, which will set the default CSS style of the React Chat component.
We also installed @progress/kendo-react-conversational-ui, where we will import the Chat component for the website and all its peer dependencies.
I am sure by now you will have noticed the @progress scope we’ve used. The KendoReact library provides many decoupled modules for different purposes; they all scope to @progress (Progress is the parent company behind KendoReact)—think of it as a global scope for the modules in KendoReact.
Now that all the modules we need are installed, let's start developing the chat application.
The React Chat Application
Firstly, paste the following code into the App.js file.
import * as React from "react";
import { Chat } from "@progress/kendo-react-conversational-ui";
import "@progress/kendo-theme-default/dist/all.css";

const user = {
    id: 1,
    avatarUrl: "https://via.placeholder.com/24/008000/008000.png",
};
const bot = {
    id: 0,
};
const initialMessages = [
    {
    author: bot,
    suggestedActions: [
    {
    type: "reply",
    value: "Neat!",
    },
    ],
    timestamp: new Date(),
    text: "Hello, this is a demo bot. I don't do much, but I can count symbols!",
    },
];
const App = () => {
    const [messages, setMessages] = React.useState(initialMessages);
    const addNewMessage = (event) => {
    let botResponse = Object.assign({}, event.message);
    botResponse.text = countReplayLength(event.message.text);
    botResponse.author = bot;
    setMessages([...messages, event.message]);
    setTimeout(() => {
    setMessages((oldMessages) => [...oldMessages, botResponse]);
    }, 1000);
    };
    const countReplayLength = (question) => {
    let length = question.length;
    let answer = question + " contains exactly " + length + " symbols.";
    return answer;
    };
    return (
    <Chat
    user={user}
    messages={messages}
    onMessageSend={addNewMessage}
    placeholder={"Type a message..."}
    width={400}
    />
    );
};
Let's break the code into smaller chunks and explain them bit by bit for better understanding.
import * as React from "react";
import { Chat } from "@progress/kendo-react-conversational-ui";
import "@progress/kendo-theme-default/dist/all.css";
Above we imported react, and we will be using some of its React features, i.e., useState. Chat is imported from @progress/kendo-react-conversational-ui and @progress/kendo-theme-default/dist/all.css, which provides the style we need to make our Chat components elegant.
const user = {
    id: 1,
    avatarUrl: "https://via.placeholder.com/24/008000/008000.png",
};
const bot = {
    id: 0,
};
const initialMessages = [
    {
    author: bot,
    suggestedActions: [
    {
    type: "reply",
    value: "Neat!",
    },
    ],
    timestamp: new Date(),
    text: "Hello, this is a demo bot. I don't do much, but I can count symbols!",
    },
];
In the above code section, we first created the user object, which contains the id and avatarUrl (user image). These two properties can be modified however you want or based on the needs of our application.
Next, we created the bot object with an id property, but the bot could have an avatarUrl if required. The initialMessages contain array objects, which are the message(s) you want the user to see upon starting the chat session.
const App = () => {
    const [messages, setMessages] = React.useState(initialMessages);
    const addNewMessage = (event) => {
    let botResponse = Object.assign({}, event.message);
    botResponse.text = countReplayLength(event.message.text);
    botResponse.author = bot;
    setMessages([...messages, event.message]);
    setTimeout(() => {
    setMessages((oldMessages) => [...oldMessages, botResponse]);
    }, 1000);
    };
    const countReplayLength = (question) => {
    let length = question.length;
    let answer = question + " contains exactly " + length + " symbols.";
    return answer;
    };
    return (
    <Chat
    user={user}
    messages={messages}
    onMessageSend={addNewMessage}
    placeholder={"Type a message..."}
    width={400}
    />
    );
};
Finally, in our App function, we used the useState hook to mutate the messages, which is passed as props in the Chat component. Also, we created an addNewMessage function, which is called whenever we send a message.
In the addNewMessage function implementation, we first mutated the properties text and author of botResponse. We passed an array into setMessages, where we used the spread operator syntax to copy all the messages and add the event.message.
We also implemented the setTimeout function, which calls the setMessages function; then, the previous state is copied into an array using the spread operator syntax and adds the botResponse. The countReplyLength just returns the length of the sent message.
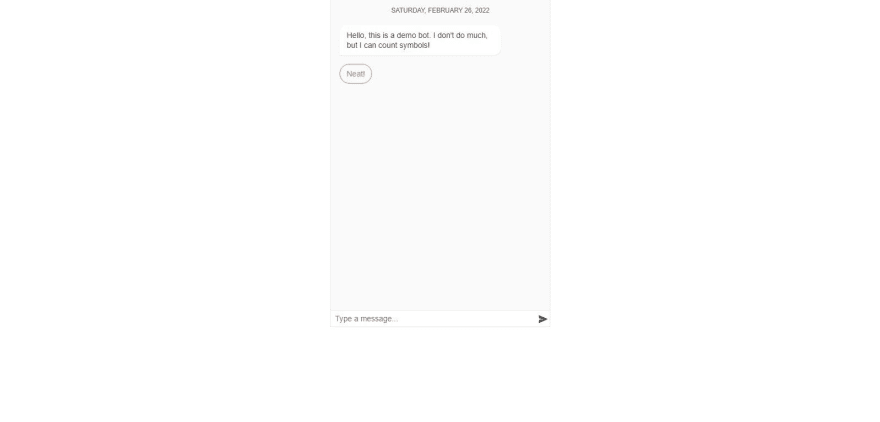
The image below shows the chat application with the initial response.
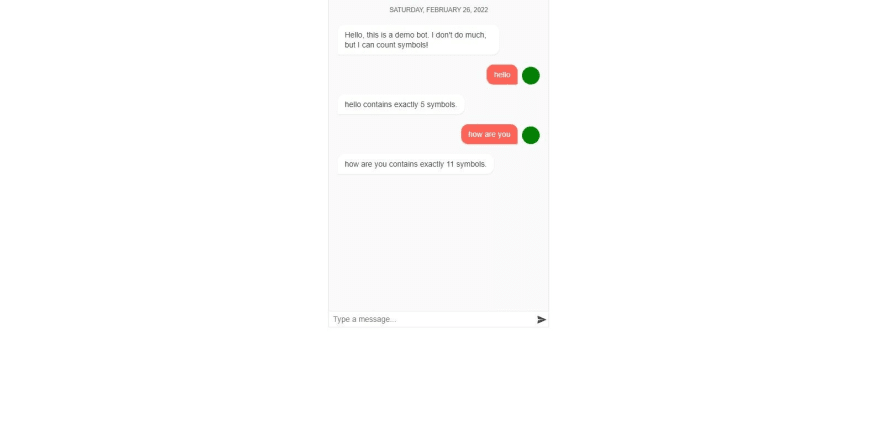
The following image below shows the chat application after interacting with the chatbot.
Conclusion
In this post, we covered an introduction to the KendoReact CConversational UI. Still, for a production application, you would replace the bot response with the response of either a Google chatbot or a Microsoft chatbot.
This implementation is similar to an end-to-end user chat application. Note that KendoReact has to be licensed before you can use your application for commercial purposes, as it is not free for commercial purposes.


Oldest comments (0)