Introduction
Hi there! In this tutorial, I will be going over how you can create a CRUD application in Angular, that utilizes forms in dialogue boxes.

This tutorial is suitable for those that are new to Angular.
Please note, this tutorial will not be integrated with any database. So, changes made to the data will be temporary.
Project Setup
Firstly, we must ensure that you have Nodejs, NPM and Angular installed. You can check this by opening a new terminal and running the following commands:
node -v
npm -v
ng version
If you haven’t yet installed any of these, I would recommend you check out this guide.
Now let’s create our application. In your terminal, run the following command.
ng new inline-table-editor
Then, navigate into your project and open up the file in your code editor of choice.
Now that the application has been created, we’ll need to install and set up the UI library which in this case is going to Bootstrap. Install NGXBootstrap:
ng add ngx-bootstrap
Next, we’ll need to add the Bootstrap & Bootstrap Icons CSS libraries into the application. To do so, navigate to the index.html page, and in the <head> section add the following code:
<!-- Bootstrap CSS -->
<link rel="stylesheet" href="https://cdn.jsdelivr.net/npm/bootstrap@5.0.2/dist/css/bootstrap.min.css">

<!-- Bootstrap Icons CSS -->
<link rel="stylesheet" href="https://cdn.jsdelivr.net/npm/bootstrap-icons@1.5.0/font/bootstrap-icons.css">
With that, the project is ready to go.
Create the Users Table
Let’s get started by creating the user’s table. First, we’ll need to define our data model. Under the app folder, create a new folder called data and then another called users. This is where our seed data and model will live.
Then create a file titled Users.ts and add the following code to define the user:
// src > app > data > users
export interface User {
    id: number;
    name: string;
    email: string;
    description: string;
    company: string;
}
Next, we’ll seed some demo data into the table. We can use JSON Generator, to generate the seed data for us. Navigate to the page and replace the code in the left tab with the following code and hit generate.
[
  '{{repeat(8)}}',
  {
    id: '{{index()}}',
    name: '{{firstName()}} {{surname()}}',
    email: '{{email()}}',
    description: '{{lorem()}}',
    company: '{{company()}}'
  }
]
This will generate 8 random objects that can then be pasted into our application. Create another file under the users folder names UsersSeedData.ts, and add the following code:
// src > app > data > users
export const UsersSeedData: User[] = [
    // paste your generated content here
]
It’s worth pointing out that in real-life applications, the data would be stored in a database and retrieved once need using an API.
Now with that completed, navigate to the app.component.ts file, and make the following changes:
import { User } from 'src/app/data/users/Users';
import { UsersSeedData } from 'src/app/data/users/UsersSeedData

...

// add implements OnInit
export class AppComponent implements OnInit {
    users: User[] = []

    constructor() {}

    ngOnInit(): void {
        // add the seed data here
    this.users = UsersSeedData;
  }
}
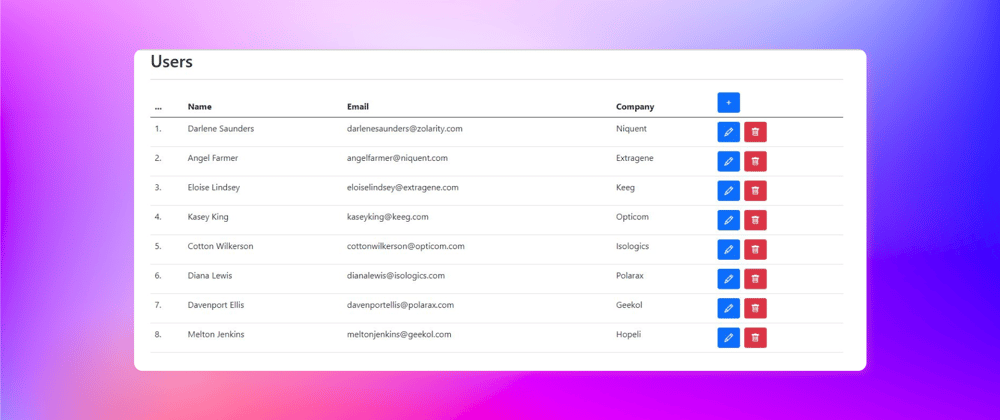
Next, navigate to the template (app.component.html), and make replace the existing content with the following:
<div class="container">
  <h2>Users</h2>

  <hr>

  <table class="table">
    <thead>
      <tr>
        <th>...</th>
        <th>Name</th>
        <th>Email</th>
        <th>Company</th>
        <th>
          <button
            class="btn btn-primary mx-1"
            title="Add New User"
            >
            <i class="bi bi-plus"></i>
          </button>
        </th>
      </tr>
    </thead>

    <tbody>
      <tr *ngFor="let user of users; let i = index">
        <td>{{ i + 1 }}.</td>

        <td>{{ user.name }}</td>
        <td>{{ user.email }}</td>
        <td>{{ user.company }}</td>

        <td>
          <div>
            <button
              class="btn btn-primary mx-1"
              title="Edit User"
              >
              <i class="bi bi-pencil"></i>
            </button>

            <button
              class="btn btn-danger mx-1"
              title="Delete User"
              >
              <i class="bi bi-trash"></i>
            </button>
          </div>
        </td>
      </tr>
    </tbody>
  </table>
</div>
Once completed, run the application and navigate to http://localhost:4200, view your table with the demo data inside of it.
ng serve
Creating a New User
As the description of this post mentioned, we’ll be adding our forms to our application using a dialogue box (modal). Let’s start by importing the module that is going to run the modal UI for us. In the app.module.ts file, add make the following changes:
import { ModalModule } from 'ngx-bootstrap/modal';

...

@NgModule({
    ...
    imports: [
    // Existing Modules
    ModalModule,
    ],
    ...
})
Next, navigate back to the app.component.ts and add the following:
modalRef?: BsModalRef;

constructor(
    private modalService: BsModalService
) { }

openModal(template: TemplateRef<any>) {
  this.modalRef = this.modalService.show(template);
}
We injected the modal service, that is provided by the modal module we imported, and created a method to open the modal. Now in the template, add the following to the bottom of the file:
<ng-template #template>
<div class="modal-header">
<h4 class="modal-title pull-left">
Add New User
</h4>
<button type="button" class="btn-close close pull-right" aria-label="Close" (click)="modalRef?.hide()">
<span aria-hidden="true" class="visually-hidden">×</span>
</button>
</div>
<div class="modal-body">
<form action="#">
<input
type="text"
title="Full Name"
placeholder="Full Name"
class="form-control my-2"
>
<input
type="text"
title="Email"
placeholder="Email"
class="form-control my-2"
>
<input
type="text"
title="Company"
placeholder="Company"
class="form-control my-2"
>
<textarea
title="description"
class="form-control my-2"
placeholder="Description"
>
</textarea>
<button
[title]="Add New User"
class="btn btn-primary"
type="submit"
>
Add New User
</button>
</form>
</div>
</ng-template>
Once that has been added, update the “Add New User”, button with the openModal().
<button
  class="btn btn-primary mx-1"
  title="Add New User"
  (click)="openModal(template)"
  >
  <i class="bi bi-plus"></i>
</button>
You can now see that when you click on the “Add New User” button, the modal will pop up with the form inside of it. However, the form does not have any functionality yet. To do that, we’ll be making use of Reactive Forms which comes built-in with Angular. First import the Reactive Forms Module in the app.module.ts file:
import { ReactiveFormsModule } from '@angular/forms';

...

@NgModule({
    ...
    imports: [
    // Existing Modules
    ReactiveFormsModule
    ],
    ...
})
Next, we’ll inject the form builder and build our new form. Navigate to the app.component.ts file, and make the following changes:
...

form = this.fb.group({
    name: new FormControl<string>('', [Validators.required]),
    email: new FormControl<string>('', [Validators.required, Validators.email]),
    description: new FormControl<string>(''),
    company: new FormControl<string>('', [Validators.required])
})

...

constructor(
  private modalService: BsModalService,
  private fb: FormBuilder,
) { }
One thing to note: In Angular 14, a new feature was added called TypedForms. This adds type safety to be added to your forms as well as allows Intellisense, to be used on your form. Now we need to make the necessary changes to our form, to add functionality. In the app.component.html file, replace the contents of the modal with the following:
<ng-template #template>
<div class="modal-header">
<h4 class="modal-title pull-left">
Add New User
</h4>
<button type="button" class="btn-close close pull-right" aria-label="Close" (click)="modalRef?.hide()">
<span aria-hidden="true" class="visually-hidden">×</span>
</button>
</div>
<div class="modal-body">
<form
[formGroup]="form"
(ngSubmit)="addUser()"
>
<input
type="text"
title="Full Name"
placeholder="Full Name"
class="form-control my-2"
formControlName="name"
>
<input
type="text"
title="Email"
placeholder="Email"
class="form-control my-2"
formControlName="email"
>
<input
type="text"
title="Company"
placeholder="Company"
class="form-control my-2"
formControlName="company"
>
<textarea
title="description"
class="form-control my-2"
placeholder="Description"
formControlName="description"
>
</textarea>
<button
[title]="Add New User"
class="btn btn-primary"
type="submit"
[disabled]="form.invalid"
>
Add New User
</button>
</form>
</div>
</ng-template>
Finally, let’s create the add addUser(), method to add a new user.
addUser() {
if (this.form.valid) {
  const user: User = {
    id: this.users.length,
    name: this.form.value.name,
    email: this.form.value.email,
    description: this.form.value.description,
    company: this.form.value.company
  } as User;

  this.users.push(user);

  this.modalRef?.hide();
}
Now we can successfully add a new user!
Updating an Existing User
To update an existing user, we’re going to make use of the existing functionality used to add a new user. Let’s start by making a modification to the openModal() to pass a user in if there is an existing user. In the app.component.ts file, make the following changes:
openModal(template: TemplateRef<any>, user?: User) {
  if(user != null) {
        // updates form values if there is a user
    this.form.patchValue({
      name: user.name,
      email: user.email,
      description: user.description,
      company: user.company
    })
  } else {
        // clears the form if there is no user
    this.form.reset();
  }
  this.modalRef = this.modalService.show(template);
}
Now, we need to make changes to the template. Make the following changes to the “Add New User” button and “Edit User” button, respectively:
...

<button
    class="btn btn-primary mx-1"
    title="Add New User"
    (click)="openModal(template, undefined)"
    >
        <i class="bi bi-plus"></i>
</button>

...

<button
  class="btn btn-primary mx-1"
  title="Edit User"
  (click)="openModal(template, user)"
  >
  <i class="bi bi-pencil"></i>
</button>
As you can see, in the “Edit User” button, we pass in the user that is being displayed in the table column. However, for the “Add New User” button, we pass in an undefined user that would act as a null user.
We now need to make changes to handle the update functionality, but before we do that, we first need to create a way to detect if we’re updating an existing user or if we’re adding a new user. To do this, we’re going to add another control to the form:
form = this.fb.group({
    id: new FormControl<number | null>(null),
    name: new FormControl<string>('', [Validators.required]),
    email: new FormControl<string>('', [Validators.required, Validators.email]),
    description: new FormControl<string>(''),
    company: new FormControl<string>('', [Validators.required])
})
As you can see, we added a nullable form control that corresponds to the ID. Now we need to make our final changes to our openModel(), to add our ID into the form when we pass a user into the method.
openModal(template: TemplateRef<any>, user?: User) {
    if(user != null) {
      this.form.patchValue({
                // add the users id
        id: user!.id,
        name: user.name,
        email: user.email,
        description: user.description,
        company: user.company
      })
    } else {
      this.form.reset();
    }
    this.modalRef = this.modalService.show(template);
  }
Now we need to update the addUser(), by changing it to updateUsers(), and making changes to the method:
// change addUser() to updateUsers()
updateUsers() {
    if(this.form.value.id != null) {
      if (this.form.valid) {
                // get the index of a user
        const index: number = this.users.findIndex((user: User) => user.id === this.form.value.id);

        if (index !== -1) {
          this.users[index] = {
            id: this.form.value.id,
            name: this.form.value.name,
            email: this.form.value.email,
            description: this.form.value.description,
            company: this.form.value.company
          } as User;
        }

        this.modalRef?.hide();
      }
    }
    else {
      if (this.form.valid) {
        const user: User = {
          id: this.users.length,
          name: this.form.value.name,
          email: this.form.value.email,
          description: this.form.value.description,
          company: this.form.value.company
        } as User;

        this.users.push(user);

        this.modalRef?.hide();
      }
    }
}
We also need to update our template to use the correct method as well as to indicate that we’re editing a user. in the app.component.html file, replace the modal with the following:
<ng-template #template>
<div class="modal-header">
<h4 class="modal-title pull-left">
{{ form.value.id != null ? 'Edit User' : 'Add New User' }}
</h4>
<button type="button" class="btn-close close pull-right" aria-label="Close" (click)="modalRef?.hide()">
<span aria-hidden="true" class="visually-hidden">×</span>
</button>
</div>
<div class="modal-body">
<form
[formGroup]="form"
(ngSubmit)="updateUser()"
>
<input
type="text"
title="Full Name"
placeholder="Full Name"
class="form-control my-2"
formControlName="name"
>
<input
type="text"
title="Email"
placeholder="Email"
class="form-control my-2"
formControlName="email"
>
<input
type="text"
title="Company"
placeholder="Company"
class="form-control my-2"
formControlName="company"
>
<textarea
title="description"
class="form-control my-2"
placeholder="Description"
formControlName="description"
>
</textarea>
<button
[title]="form.value.id != null ? 'Edit User' : 'Add New User'"
class="btn btn-primary"
type="submit"
[disabled]="form.invalid"
>
{{ form.value.id != null ? 'Edit User' : 'Add New User' }}
</button>
</form>
</div>
</ng-template>
Now we can successfully update an existing user!

Delete a User
The final part of all of this is to delete a user. Let’s start by updating the “Delete User” button:
<button
  class="btn btn-danger mx-1"
  title="Delete User"
  (click)="deleteUser(i)"
  >
  <i class="bi bi-trash"></i>
</button>
As you can see, we pass in the user’s index to the deleteUser(). Finally let’s add the deleteUser(), in the app.component.ts file.
deleteUser(index: number) {
  if(confirm("Are you sure you want to delete this user?")) {
    const user: User = this.users[index];

    if(user != null) {
      this.users.splice(index, 1);
    }
    else {
      alert("User not found");
    }
  }
}
And with that we can now delete a user and the CRUD functionality is complete.

Conclusion
As always, I hope you found this post useful!
Be sure to check me out on Twitter for more Angular and development tips. Thanks for reading and have a great day! 😄


Oldest comments (0)