Introduction
We will learn how to implement a RESTful API for a simple todo application using NestJS framework. But what is NestJS?
"A progressive Node.js framework for building efficient, reliable and scalable server-side applications."
You can read more about NestJS here.
In this article, it assumes you have at least the basic understanding of TypeScript and even better with NodeJS and ExpressJS. However if you aren't familiar with these requirements, I will list down you what I recommend you to watch to learn from:
- TypeScript by Fireship
- NodeJS by Fireship
- ExpressJS by Traversy Media
I also recommend you to subscribe on those YouTube channels as they produce high quality content and it's for free! I have other favorite YouTube channels as well but I will write it in another article.
And if you are a frontend developer and have been using Angular for awhile, then this should be very familiar to you since NestJS is very similar with how Angular code is structured! Dependency injections, modules, generate code using CLI, and so much more!
Installation
This installation guide will be based on for Linux since I am using WSL2 on Windows and it is my preference and find it more convenient. I believe installation process is very similar but in case for other platforms I suggest you to consult the documentation that can be found here
Installing Nest CLI
Open up your terminal and execute this command to install Nest CLI
sudo npm install -g @nestjs/cli
To test it out if it has been successfully installed just execute the command below and that should tell you the current version installed for Nest CLI
nest -v
Create a new Nest project
Navigate to your projects directory or in any directory whichever you prefer and run this command below to install you a new project
nest new todo-rest-app
If it asks you which package manager to select from, just choose anything you prefer but in this article I will select NPM.
And now wait for the entire CLI to scaffold the new starter project for you.
Open the project in your IDE
Once that is done installing, open it on your preferred code editor. In my case I will open it with VSCode (Visual Studio Code), so I will execute in the terminal with this command
cd todo-rest-app && code .
Then that should open up your IDE.
Creating "Todo" feature
We can easily generate code for the Module class, Service class, Controller class by using the powerful CLI.
One thing to take note is that when creating a new feature, you should start by generating a module class for the particular feature. So for instance TodoModule is being generated first.
So let us generate them right on!
# TodoModule
nest g module Todo
# Using alias: nest g mo Todo

# TodoService
nest g service Todo
# Using alias: nest g s Todo

# TodoController
nest g controller Todo
# Using alias: nest g co Todo
This should create a folder called "todo" and it will also add the TodoService under the providers array in TodoModule and the TodoController in the controllers array.
Creating a Todo model/schema
Before we proceed to writing the code for handling data and exposing it to the REST API we first create a data model for Todo. So let us create a schema using Mongoose package, so let's install it
npm install --save @nestjs/mongoose mongoose
Right after installation make sure to add MongooseModule into the imports array. We'll want to import this under AppModule so we let the application know where the MongoDB is coming from.
However if you don't have MongoDB installed in your system you can use this as reference if you are using Linux based system
// app.module.ts

import { Module } from '@nestjs/common';
import { MongooseModule } from '@nestjs/mongoose';

@Module({
  imports: [MongooseModule.forRoot('mongodb://localhost/nest')],
})
export class AppModule {}
After adding MongooseModule.forRoot() in AppModule we can then proceed to defining our Todo schema, so head on over to "todo" directory as this feature directory has been generated by the CLI, so under this directory create a folder named "schemas" and it's where the Todo schema resides
Or you can do so by using this terminal commands
mkdir src/todo/schemas && touch src/todo/schemas/todo.schema.ts
Then let us define our Todo schema
import { Prop, Schema, SchemaFactory } from '@nestjs/mongoose';
import { Document } from 'mongoose';

export type TodoDocument = Todo & Document;

@Schema()
export class Todo {
  @Prop({ required: true })
  title: string;

  @Prop()
  description?: string;

  @Prop()
  completedAt?: Date;

  @Prop({ required: true })
  createdAt: Date;

  @Prop()
  deletedAt?: Date;
}

export const TodoSchema = SchemaFactory.createForClass(Todo);
Then let's create a DTO (Data Object Model) for creating and updated a Todo. But first I want to create a base class DTO
mkdir src/todo/dto

touch src/todo/dto/base-todo.dto.ts
Then we define the class and properties
// todo/dto/base-todo.dto.ts
export class BaseTodoDto {
   title: string
   description?: string
}
Then let us create a DTO for Create and Update that will extend this BaseTodoDto so for all properties defined under BaseTodoDto will carry over the new classes and so we won't have to rewrite all of these properties. So in a sense we aren't writing any boilerplate code in this case.
touch src/todo/dto/create-todo.dto.ts

touch src/todo/dto/update-todo.dto.ts
Then we can define it
// todo/dto/create-todo.dto.ts
import { BaseTodoDto } from "./base-todo.dto";

export class CreateTodoDto extends BaseTodoDto {}

// todo/dto/update-todo.dto.ts
import { BaseTodoDto } from './base-todo.dto';

export class UpdateTodoDto extends BaseTodoDto {
  completedAt: Date;
}
We added completedAt field on the UpdateTodoDto so we'll allow this field to update with that particular field we specified.
After defining out model make sure to import this under TodoModule so this will be recognized as a Model in the codebase.
import { Module } from '@nestjs/common';
import { TodoService } from './todo.service';
import { TodoController } from './todo.controller';
import { MongooseModule } from '@nestjs/mongoose';
import { Todo, TodoSchema } from './schemas/todo.schema';

@Module({
  providers: [TodoService],
  controllers: [TodoController],
  imports: [
    MongooseModule.forFeature([{ name: Todo.name, schema: TodoSchema }]),
  ],
})
export class TodoModule {}
Injecting the Model in TodoService
Under class TodoService, is here we want to define the logic for handling data. So in the constructor we will then inject the Model as our dependency for this class. The model I am referring to is what we just added into the imports array of the TodoModule
import { Injectable } from '@nestjs/common';
import { InjectModel } from '@nestjs/mongoose';
import { Model } from 'mongoose';
import { Todo, TodoDocument } from './schemas/todo.schema';

@Injectable()
export class TodoService {
  constructor(@InjectModel(Todo.name) private readonly model: Model<TodoDocument>) {}
}
In the constructor we use @InjectModel(Todo.name) annotation and we pass in the name of the model and we set it as a private property and gave it a type of Model where we also pass a generic type of TodoDocument that we defined from the Todo model from todo.schema.ts. This will give us all the methods from Mongoose for querying, altering ang creating data for MongoDB which is very convenient as it gives us the auto-completion.
You may also notice that it has the @Injectable() annotation which is very similar to Angular's service classes. This annotation creates the meta data and this makes the class recognized in the service locator other classes will be available to use this class as their dependency.
Defining CRUD functionalities
Now let us proceed with defining the usual CRUD methods. We will have the following methods to write up the implementation details, findAll(), findOne(id: string), create(createTodoDto: CreateTodoDto), update(id: string, updateTodoDto: UpdateTodoDto), and delete(id: string).
import { Injectable } from '@nestjs/common';
import { InjectModel } from '@nestjs/mongoose';
import { Model } from 'mongoose';
import { CreateTodoDto } from './dto/create-todo.dto';
import { UpdateTodoDto } from './dto/update-todo.dto';
import { Todo, TodoDocument } from './schemas/todo.schema';

@Injectable()
export class TodoService {
  constructor(
    @InjectModel(Todo.name) private readonly model: Model<TodoDocument>,
  ) {}

  async findAll(): Promise<Todo[]> {
    return await this.model.find().exec();
  }

  async findOne(id: string): Promise<Todo> {
    return await this.model.findById(id).exec();
  }

  async create(createTodoDto: CreateTodoDto): Promise<Todo> {
    return await new this.model({
      ...createTodoDto,
      createdAt: new Date(),
    }).save();
  }

  async update(id: string, updateTodoDto: UpdateTodoDto): Promise<Todo> {
    return await this.model.findByIdAndUpdate(id, updateTodoDto).exec();
  }

  async delete(id: string): Promise<Todo> {
    return await this.model.findByIdAndDelete(id).exec();
  }
}
Defining methods and route endpoints in TodoController
It is very easy to define routes in our Controller class and all thanks to TypeScript for these annotations just made everything a breeze! We have to inject the TodoService as our dependency for this Controller class and then define all methods with its corresponding annotation as this will handle which HTTP method it will be used to access the functionality.
We will use the following names in the Controller where index() is for querying all Todo, find() to query a single Todo, create() is to add a Todo in DB, update() to update an existing Todo based on given ID, and lastly delete() to delete a Todo.
import {
  Body,
  Controller,
  Delete,
  Get,
  Param,
  Post,
  Put,
} from '@nestjs/common';
import { CreateTodoDto } from './dto/create-todo.dto';
import { UpdateTodoDto } from './dto/update-todo.dto';
import { TodoService } from './todo.service';

@Controller('todos')
export class TodoController {
  constructor(private readonly service: TodoService) {}

  @Get()
  async index() {
    return await this.service.findAll();
  }

  @Get(':id')
  async find(@Param('id') id: string) {
    return await this.service.findOne(id);
  }

  @Post()
  async create(@Body() createTodoDto: CreateTodoDto) {
    return await this.service.create(createTodoDto);
  }

  @Put(':id')
  async update(@Param('id') id: string, @Body() updateTodoDto: UpdateTodoDto) {
    return await this.service.update(id, updateTodoDto);
  }

  @Delete(':id')
  async delete(@Param('id') id: string) {
    return await this.service.delete(id);
  }
}
Testing it with a REST client
You can use any REST client of your choice, but for me I prefer Insomnia. Once you have your REST client opened by now we can proceed to testing the REST API we created so we can expect to add a todo, update a todo, delete a todo, read a todo.
First let's make a GET request to todos endpoint.

It just returned an empty array, and it only makes sense since we did not create any todo. So let's create one!
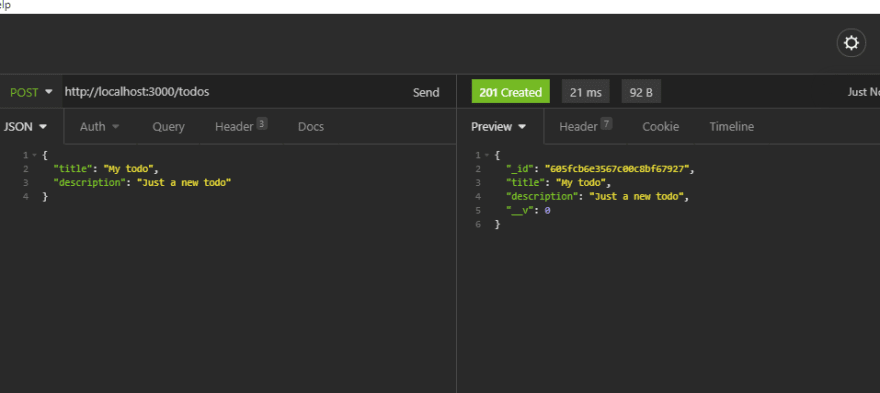
Make this as the request payload then make a POST request to the same endpoint and that it should return as the new document from MongoDB with an _id field since that is auto generated for us.
You can create more todos, but for now we can check again with the same endpoint but using GET method.

Now it returns as a array with our recently created todo.
Now let's update this todo, to change its title. First copy _id field from the response. Now using this ID, let's create a PUT request with the same payload but now we add the completedAt field

As you can see we have filled up the completedAt field. On the first request that you make which returns 200 response but the response data is still the same, don't worry because behind the scenes the document was really updated. You can proceed to check again by GET request method to see the changes, alternative way is to update the document again. So double the PUT request we are making right now and you should see the changes.
Now we want to delete this todo, then let's use the DELETE method in this case using the same endpoint but different HTTP method. It will return us the document deleted.

And that is all we have for now.
Conclusion
When you want to create a quick REST API with NodeJS and you also love TypeScript, then NestJS is the way to go! Not only this is good for "quick" implementation for REST APIs but NestJS is also great for huge projects since the framework itself encourages the developer to use Domain Driven Design.
Hope you enjoyed this tutorial, be sure to hit thumbs up or upvote if you liked it. Cheers!
Full source code can be found from the repository


Oldest comments (22)
Greats!
Thanks man!
Good one!
Thanks!
How did you connected to MongoDB without any credentials?
I didn't setup a password when I installed MongoDB in Ubuntu.
Excellent post!
I've been hacking NodeJS, MongoDB, Mongoose for last month working on REST API for client-side Blazor app. I've been wanting to learn TypeScript and came across this post via a look into Nest.
Since I'm new to TypeScript, I'll definitely checkout the links at the top to gain a deeper understanding of the code presented here.
Any thoughts on where to head next to gain a broader understanding of Nest?
Hey thanks for reading and glad you enjoyed it!
That's good to know, hope you'll enjoy writing more of TypeScript. I can suggest you to take a look at how validation rules is being implemented in Nest by creating Pipes, middleware, all related to security.
Then I think you can take a look at how you can implement web sockets with Nest, which is also something I want to explore/learn more about it.
i love this write. it will be a next power if you had added the auth module in it.
Hey, thanks! That's a good idea, I'll create an Auth implementation hopefully soon. Just got a lot of things going on my end.
hi buddy, when we are using: async function(....) { return await ..... },
should we add Promise or not? (like below):
async func(....): Promise {
return await ......
}
Hey, yea it's good too if you explicitly define the return type of the function. You can pass down a generic type argument to
Promiseas well so you don't accidentally return a different type of data and that might cause bugs to your code.Ang galing nito Miguel, thanks for writing the article.
How do I force the schema to use a collection name?
OK na Miguel, I figured it out.
@Schema({ collection: 'collection name' })
Mongoose will pluralize the collection name from the schema name unless explicitly declared like this.
Sounds good! Thanks Ian 🎉
thanks i also have same doubt but you cleared now
Thank you po Ian! Happy that you enjoyed reading it!
This tutorial is what I want exactly, thanks for sharing!
Thanks for post <3
Thank you so much for your valuable content :)
Is possible to have all the validations only in one place (the schema), and reuse the schema to create the dto?
Anyone has a complete starter with mongoose?
Too simple this article, _id must be id, also population needed… module in module.
Entities? No one is using them? Also about the mapping? And creating custom fileds (like name + surname)