Originally published at www.carloscaballero.io on January 25, 2019.
One day your blog, code or pretty much anything may crash, and sadly, your most
valuable information could be irredeemably lost ! Consider the consequences if
this ever happens (touch wood!). Pictured them? Scary, right? Now, just imagine
how relaxed you would have been instead, if only you’d bothered to make a
backup.
Today I’m going to show you my personal backup method. I use the awesome
rdiff-backup tool which combines an incremental backup with a mirror.
You
can read more about this tool on the official
page.
What is it? *rdiff-backup** backs up one directory to another, possibly over
a network. The target directory ends up a copy of the source directory, but
extra reverse diffs are stored in a special subdirectory of that target
directory, so you can still recover files lost some time ago. The idea is to
combine the best features of a mirror and an incremental backup.*
Installation
rdiff-backup is available in the most important linux distribution. In my case,
I’m using an ArchLinux distributions (Manjaro) and the
yay package (Yet another Yogurt — An AUR Helper
written in Go) to install the tool.
If you use another distribution, this software can also be installed:
Using rdiff-backup
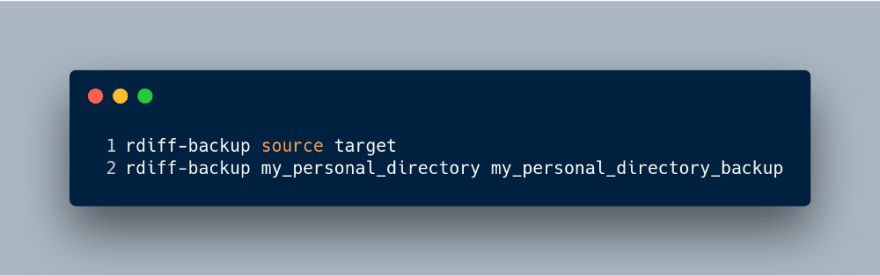
Making backups is very easy when you using rdiff-backup. You may picture this
tool as similar to the cp command. In other words, rdiff-backup has two
arguments:
- source directory.
- target directory.
Both directories can be local or remote disk. For example, if you want to use
rdiff-backup in a local directory you would use the following command:
In the same way, if any of the directories are in a remote server, you need only
to indicate the path using the classic way: user@server::PATH. The following
commands show how either the remote or local servers can be used in both the
source and target directories:
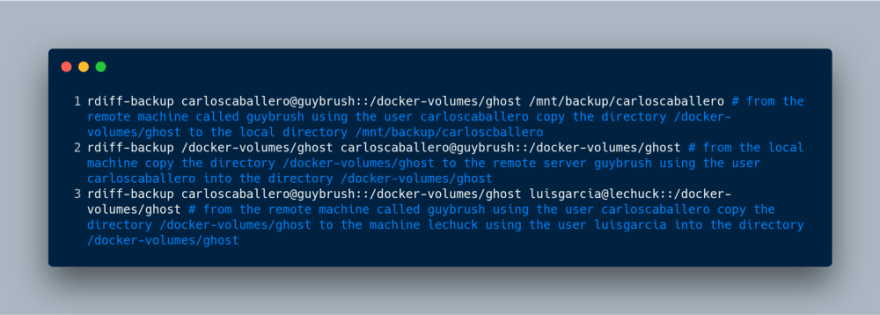
When using these commands, the remote machine will probably request the user’s
password (for the previous commands, carloscaballero and luisgarcia
respectively). You can omit this step by configuring an SSH Key-Based
Authentication on a Linux
Server.
The real power of this tool is truly appreciated when wanting to restore the
information. If you list the contents of the directory in which you made your
copy, you will see the contents that you’d previously copied, and futhermore,
you will find a directory named rdiff-backup-data. This directory is very
important, since it stores the incremental
backups of our data.
In this directory, the contents shown consist of the last version of our backup,
plus the incremental copies, which are stored in the
rdiff-backup-data/increments directory.
Now imagine that I’ve created a file called file1.txt which contains a single
sentence. A copy is done using rdiff-backup and, a few minutes after another
copy is done. Now, we shown the list of files in our system wich is the
following:
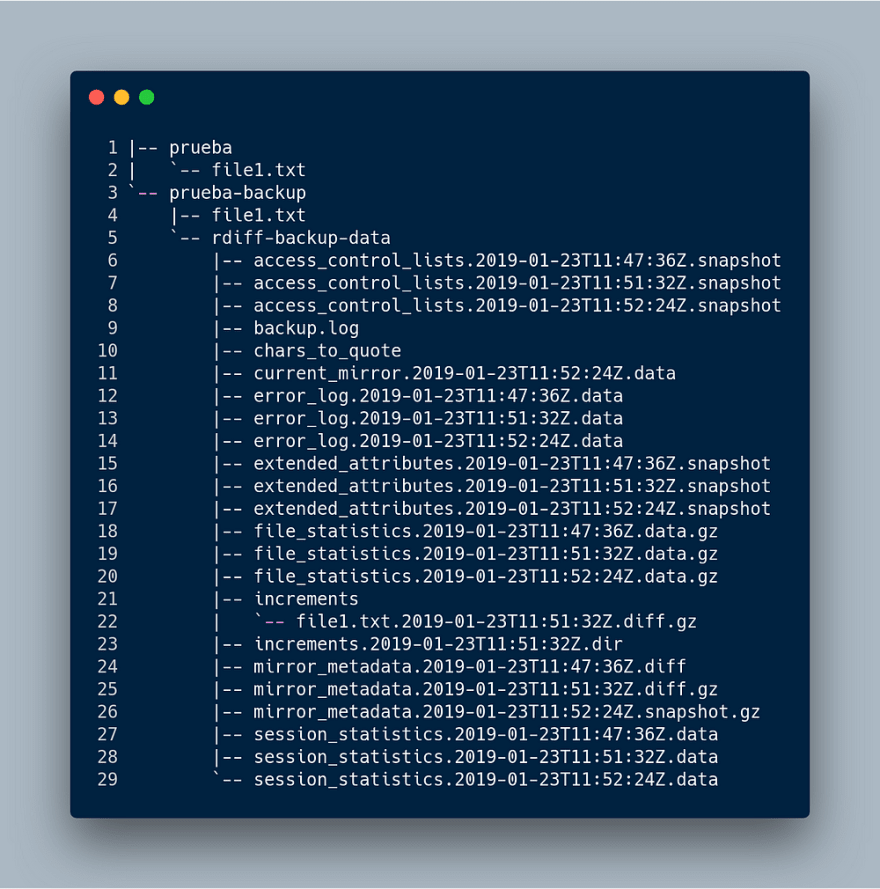
You may note that the file file1.txthas an incremental copy in the
increments directory.
Restoring backups
We can restore a copy with the rdiff-backup comand, or by directly using the
cp command, since the copy is neither compressed, nor has any of its metadata
altered. Therefore, the files are in the same state as when they were copied.
Although, you may use the cp command, the rdiff-backup tool is better to
use, due to the data restoration being more flexible.
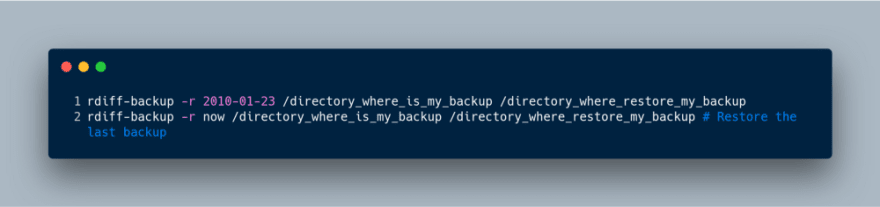
The use of the command for restoring backups is similar to the one to make the
backup, with the added the option of (restore-as-of, -r) , as well as the
timestamp to restore. The timestamp is very flexible, since the acceptible time
strings are intervals, like "3D64s"; w3-datetime strings, like
"2002-04-26T04:22:01-07:00" (strings like "2002-04-26T04:22:01" are also
acceptable - rdiff-backup will use the current time zone); or ordinary dates
like 2/4/1997 or 2001-04-23 (various combinations are acceptable, bearing in
mind that the month must always precede the day).
For example, the following command restores the copy made on 23 January 2010.
As you already know, the rdiff-backup command makes an incremental backup,
which entails a large amount of space disk being consumed. Therefore, it is
highly recommended to remove old backups (as long as you have other, more recent
backups, of course).
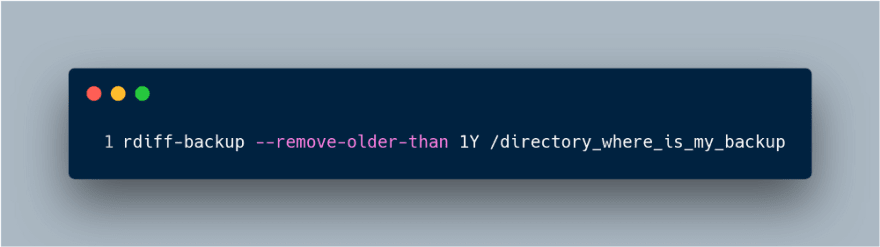
The rdiff-backup tool has the remove-older-than option, which removes any
backups older than that the date used in the argument. A good example is
removing any backups older than 1 year:
Filter Options
Most of the time, we are required to include o exclude files to our backup. The
most common options which can be used in the rdiff-backup are:
**- include.
- include-file-list
- exclude.
- exclude-file-list**
As well as these, there are plenty more filter options to make our backups, such
as:

In this example we exclude /mnt/backup to avoid an infinite loop, even though
rdiff-backup can automatically detect simple loops like the one above. This is
just an example, in reality it would be important to exclude /proc as well.
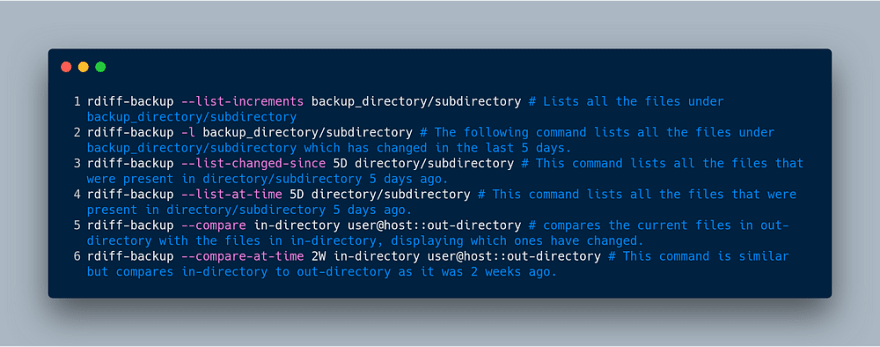
There may be a time when we need information about the backup (metadata).
rdiff-backup allows us to obtain this information. The most common options for
this are the following:
- list-increments
- list-changed-since
- list-at-time
- compare
- compare-at-time
Since they are quite descriptive, it isn’t hard to imagine what the goal of each
of the different options is. Despite this, I will show several examples applying
each of them:
Using in cron
A good practice is automating the backups in our system. To do this, we may use
the cron service.
Prior to using cron, we must remember to make sure that the script used in cron
doesn’t output anything, otherwise:
- cron will assume there is an error
- if there is any error, you will not be able to see it
The command which we used in our script is the following:

The content of the files_backup.txt file is the following:
It is important to know that both success and error logs are saved in the same
logfile, named rdiff-backup.log. Another interesting point is that I've used
the filter option include-globbing-filelist which allows the use of a file as
argument. This file contains the directories which will be backed up by using
the string + or - to express that said directory must be either included or
excluded. Note that the backups older than 1 year are deleted to perserve disk
space.
Finally, edit the cron file using the crontab -e command.
Conclusions
In this post I’ve explained the rdiff-backup tool, which allows us to make
incremental backups. I've also shown you the script I use to backup my projects,
which is executed by cron one time a day.
Originally published at www.carloscaballero.io on January 25, 2019.
Hi! My name is Carlos Caballero and I’m PhD. in Computer Science from Málaga,
Spain. Teaching developers and degree/master computer science how to be experts!


Oldest comments (0)